

On June 9, 2026, AWS put the FinOps Agent into public preview: an AI agent that answers cost questions in plain language, investigates spending anomalies down to their root cause, and surfaces optimization opportunities, all inside the tools your teams already use. For teams who have spent years manually chasing cost anomalies across many accounts, it is a genuinely useful arrival. But it is not a set-and-forget cost autopilot, and knowing exactly what it does, and what it does not, is what separates a smart rollout from a disappointed one.
This article walks through the FinOps Agent end to end: what it is, how we set one up in a real AWS account, and what it returns when you actually use it. Every screenshot below is from that live setup.
At SUDO Consultants, an AWS Premier Tier Partner working with teams across the UAE, Saudi Arabia, and the wider MENA region, we help organizations adopt agentic AI cost management like this on a solid AWS cost-optimization foundation. The walkthrough below comes from one such hands-on engagement.
What the FinOps Agent actually is
The FinOps Agent is a frontier agent built on Amazon Bedrock that turns cloud cost management into a conversational experience. Instead of navigating multiple dashboards and reports, you ask questions in plain language and get answers drawn from your real cost and usage data.
It does four things: answers cost questions in natural language, automatically investigates cost anomalies to root cause, surfaces optimization opportunities (rightsizing, idle resources, Savings Plans), and runs recurring FinOps workflows on a schedule you define. It delivers findings in a web application, and optionally into Slack and Jira.
To do this, it draws on the cost stack AWS already has: Cost Explorer for cost and usage data, Cost Anomaly Detection for alerts, Cost Optimization Hub and Compute Optimizer for rightsizing recommendations, and AWS CloudTrail to trace the root cause of cost changes by correlating a spike with the record of who changed what and when.
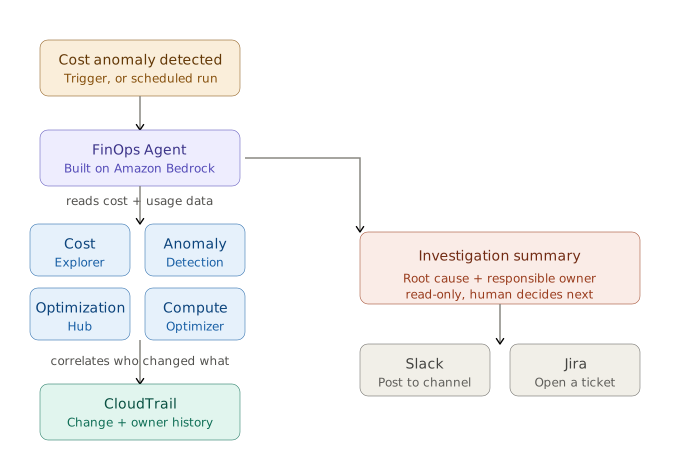
How the FinOps Agent works: an anomaly or scheduled run triggers the agent, which reads the four cost services, correlates against CloudTrail to find who changed what, and routes a root-cause summary to the web app, Slack, or Jira.
Before you start: the foundation the agent depends on
The agent is only as good as the cost data underneath it. If these are not in place, it has nothing to work with, so set them up first. We cover the reasoning behind tagging and budgets in depth in our FinOps fundamentals guide; here is the checklist:
- Enable Cost Explorer. This is the agent’s primary source of cost and usage data. Data can take up to 24 hours to populate, so do this a day ahead.
- Enable Cost Anomaly Detection. This is what the agent’s automatic investigations listen for. No monitor, no anomaly investigations.
- Enable Cost Optimization Hub (and confirm Compute Optimizer). These power the rightsizing, idle-resource, and Savings Plans recommendations. Easy to miss, and the agent will look thin without them.
- Confirm CloudTrail is logging management events in the regions you use, or the root-cause correlation has no data to work with.
- Tag resources with owner or team tags. The agent names the responsible owner far more reliably when tags exist.
In our walkthrough account, an active Cost Anomaly Detection monitor was already in place, the foundation that lets the agent investigate later.
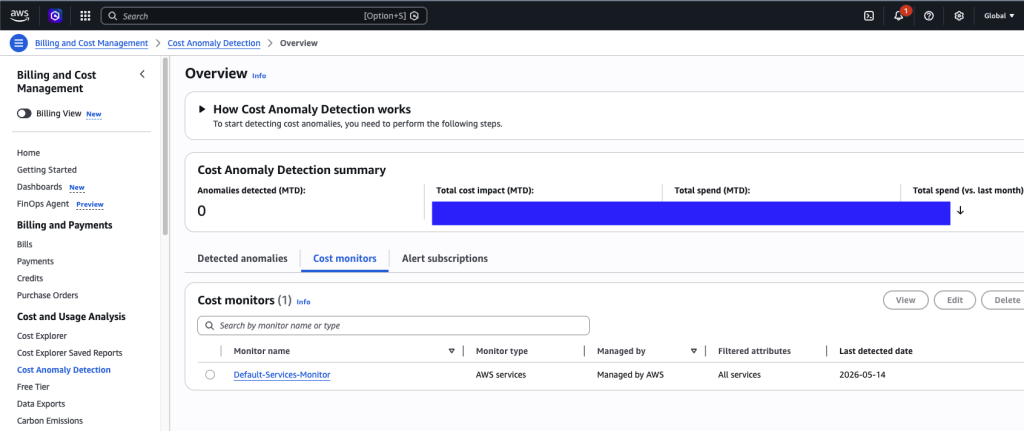
Foundation in place: an active Cost Anomaly Detection monitor, which the agent’s investigations listen for. Note the FinOps Agent (Preview) entry in the left navigation.
Creating the agent: a five-step setup
The agent is created in the AWS console. As of the preview, it runs only in the US East (N. Virginia), us-east-1 Region, though once created in a management account it can monitor costs across all Regions and accounts, including workloads in the Middle East, Europe, and Asia Pacific. It simply runs from us-east-1 while managing spend everywhere.
From the console, search for FinOps Agent, open it, and click Create Agent. The setup has five steps.
Step 1 and 2 — Name the agent, grant AWS resource access
First you name the agent (we used demo-FinOpsAgent) and optionally add a description.
Then you grant the IAM permissions the agent needs to read your cost data. The setup creates the role for you, auto-create is the recommended default, so you do not configure IAM manually unless your organization manages permissions centrally.
Step 2: The agent’s IAM role is auto-created with the permissions it needs to read the cost services.
Step 3 — Grant web app access
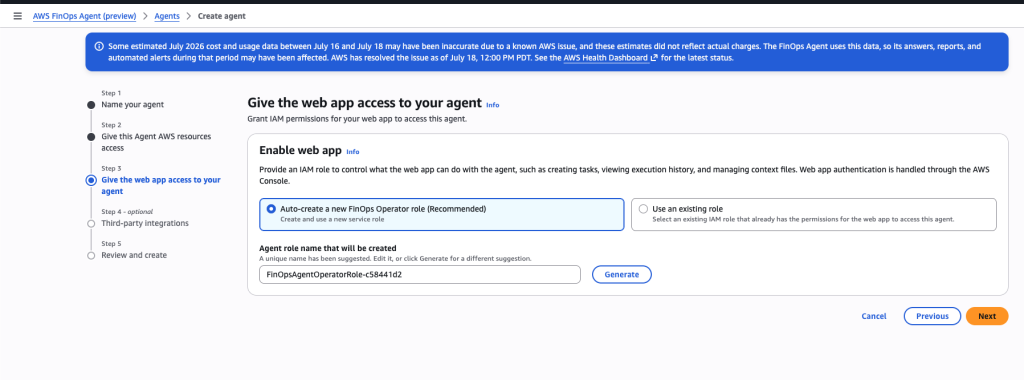
This is a distinct step worth noting: the agent gets a second, separate IAM role that controls what its web application can do, creating tasks, viewing execution history, and managing context files. Web app authentication is handled through the AWS Console. This is the role that powers the chat interface you will use to interact with the agent.
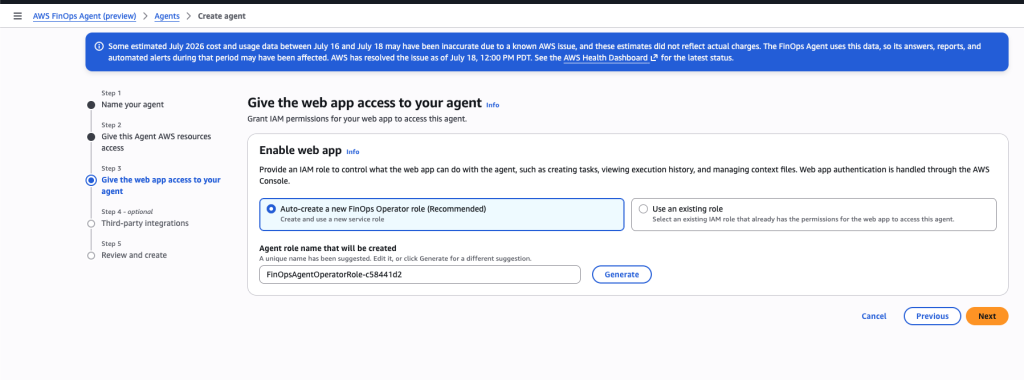
Step 3: A separate operator role governs what the web application can do with the agent.
Step 4 — Third-party integrations (optional)
The setup offers optional Jira and Slack integrations. Jira lets the agent create tickets; Slack lets it post findings to a channel. You can connect them now or later from agent settings. For this walkthrough, we skipped both to validate the core agent first; connecting them is a natural next step once the agent is proven.
One practical gotcha for when you do connect Slack: the FinOps Agent app must be added to the channel before you configure the integration, or it fails with an unhelpful error. AWS marks this as important, but it is easy to skip.
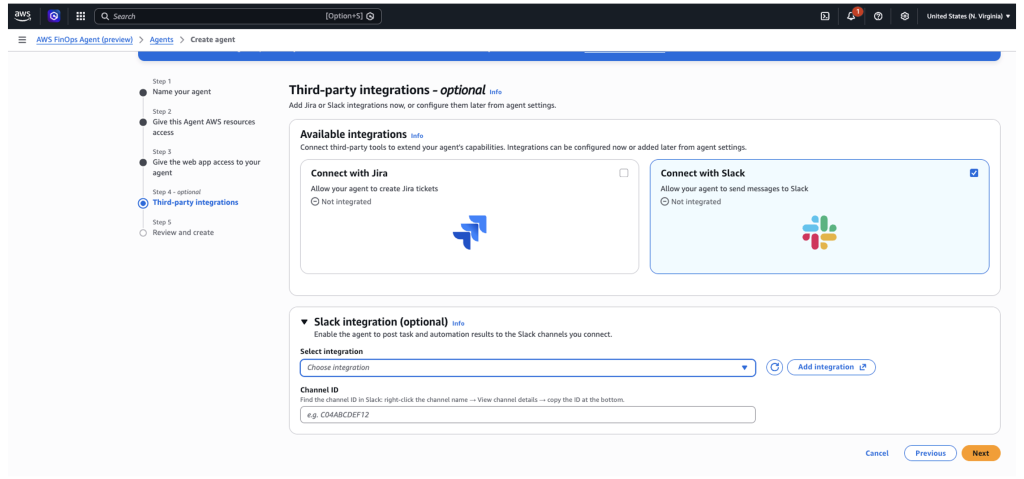
Step 4: Jira and Slack are available but optional. We skip them here and validate the core agent first; both can be connected later from agent settings.
Step 5 — Review and create
The final screen summarizes everything: the agent name, both auto-created IAM roles, and the integrations (none, since we skipped them). Confirm and click Create Agent.
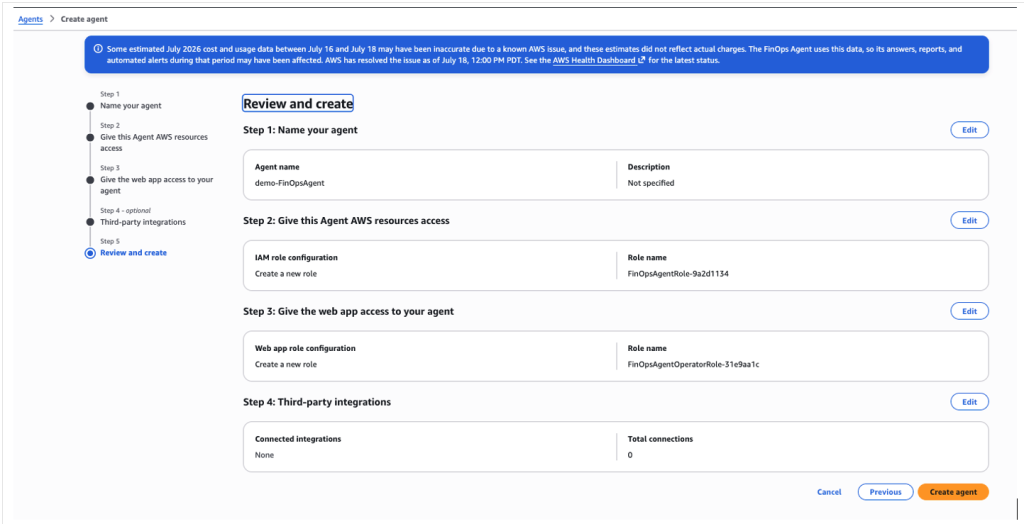
Step 5: The review screen confirms the full configuration, two auto-created roles and no integrations, before creation.
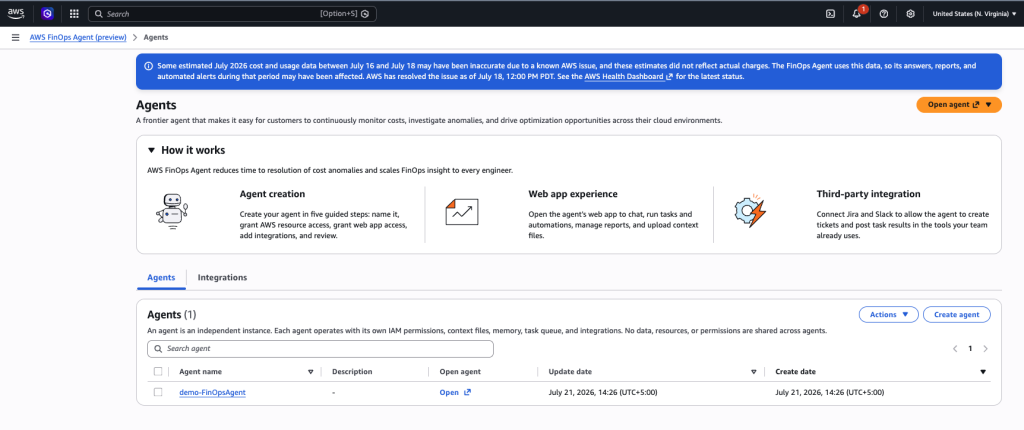
The agent provisions in a few moments and appears in the Agents list with an Open link. Note the useful detail here: each agent operates with its own IAM permissions, context files, memory, task queue, and integrations, with no data or permissions shared across agents, a clean isolation boundary that matters for regulated environments.
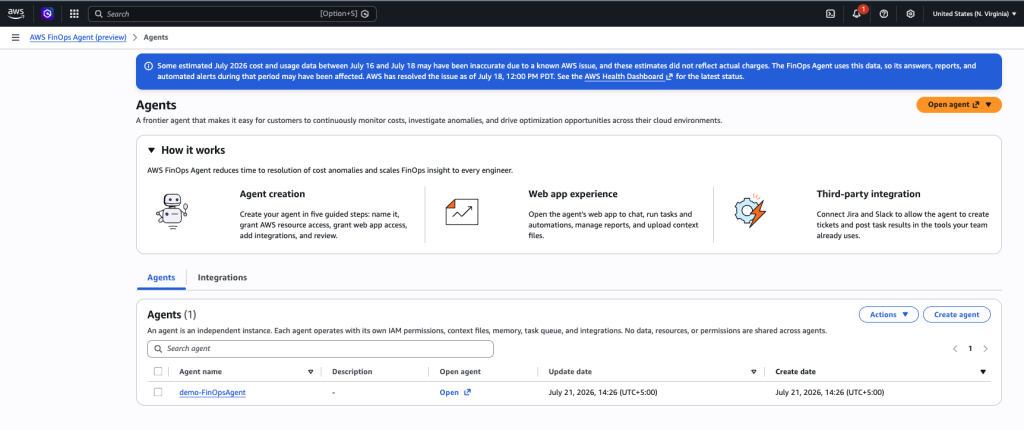
The created agent in the Agents list. The How it works panel summarizes the three phases: agent creation, the web app experience, and third-party integration.
Using the agent: a conversational interface over real cost data
Clicking Open launches the agent’s web application, a separate, chat-style interface distinct from the AWS console. This is where you actually work with the agent: ask questions, run tasks, manage automations, upload context files, and view artifacts.
The interface is a chatbot in form, but the value is what sits behind the chat. A normal chatbot would guess or answer generically. This one pulls actual figures from Cost Explorer, breaks them down per service, computes month-over-month change, and, for anomalies, correlates against CloudTrail to name who caused a spike. Conversational interface, real cost intelligence underneath.
The interface also suggests common tasks that show its range in AWS’s own words: find EC2 rightsizing opportunities and generate an HTML report, investigate anomalies in the last 7 days correlated with CloudTrail to identify the API calls and IAM principals behind them, automate anomaly alerts over a dollar threshold to a Slack channel, compare monthly costs, produce an executive-ready PPT report, or detect idle RDS instances. Prompts are capped at 1000 characters.
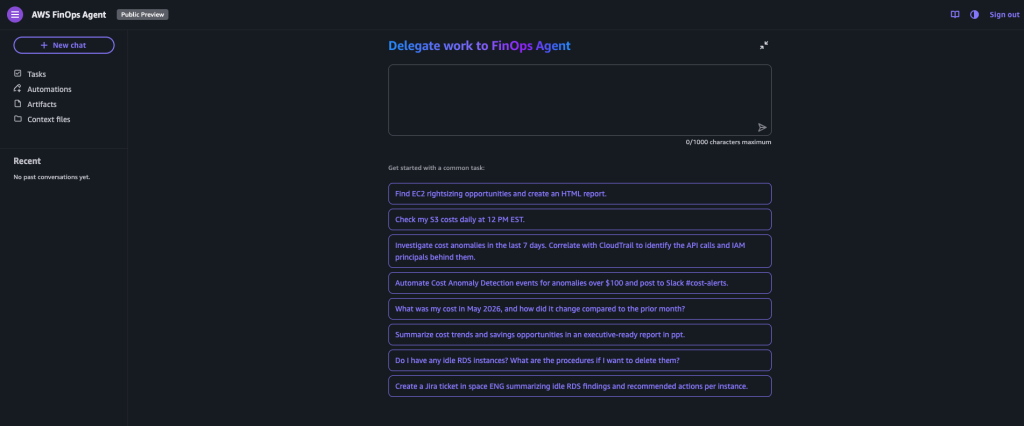
The agent’s web application. The left nav (Tasks, Automations, Artifacts, Context files) and the suggested prompts show the agent’s operating model and range.
Asking a real question
To test it, we asked a plain-language question: “What was my cost in May 2026, and how did it change compared to the prior month?” Within seconds, the agent returned a structured answer, a per-service breakdown table comparing April and May, the month-over-month change, and a short analysis naming the two services that drove the difference. It correctly excluded zero-cost services and labeled the metric it used (UnblendedCost). A Show thinking process link exposes the reasoning steps it took to get there.
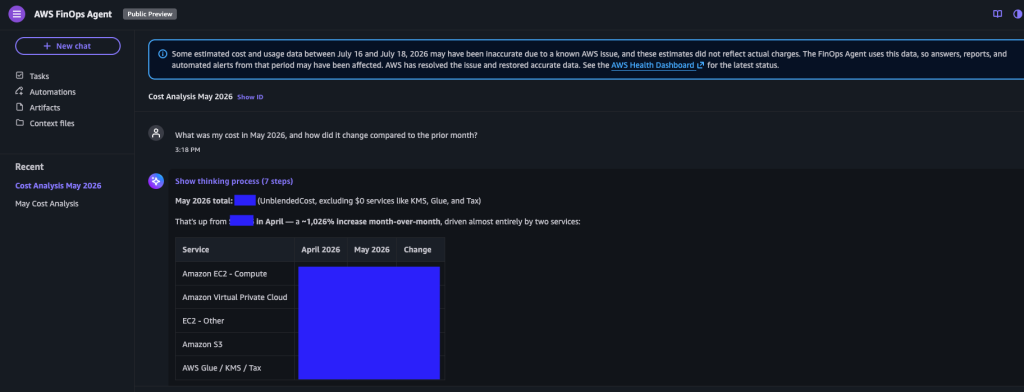
A plain-language question returns a structured, per-service, month-over-month breakdown. Even in a low-activity account, the point holds: the value is the automatic, itemized analysis from a single question, not the magnitude of the figures.
Follow-up questions work the same way, conversationally. Ask “How many active services are in my account?” and it inventories them; ask for a multi-month trend, and it breaks the spend down by service with a brief analysis and offers to drill deeper. You steer it like a chat, and it answers from your real account each time.
For example, asking for a six-month service breakdown returns a per-service table across the period, with a chart and a totals row, again, from a single plain-language question, with no dashboard to build.
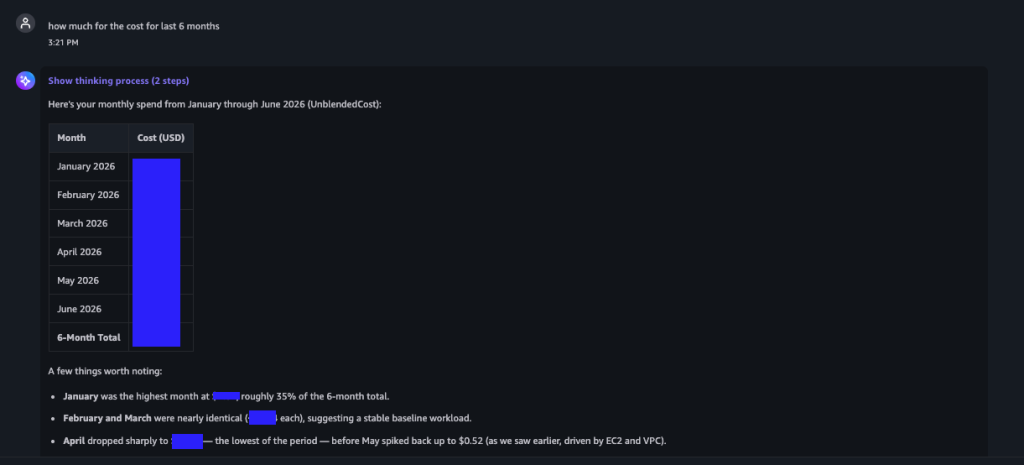
A follow-up question returns a six-month, per-service breakdown with a chart and totals. Cost values are redacted; the point is the instant, itemized multi-month analysis from one plain-language prompt.
What it deliberately does not do
This is where an honest read matters, because the launch coverage tends to skip it.
It is read-only. The agent investigates, reports, and (when connected) files tickets or posts messages, but it does not stop, resize, delete, or remediate anything. A human still decides and acts. That is the right design choice: autonomous action on production cost requires trust the industry is still building, but it means the agent is an analyst, not a brake.
It is reactive. It triggers on anomaly alerts or scheduled reviews, working from billing data after a cost change has already happened. It does not watch resource-creation events at the moment an expensive resource launches. By the time it investigates, the money is already being spent.
The practical takeaway
Treat the FinOps Agent as a very sharp investigator, not a guardrail that stops the bill before it lands. It complements preventative controls, budgets, tagging discipline, guardrails, and SCPs, but does not replace them. Most teams need both: preventative controls to stop surprises, and the agent to explain the ones that get through.
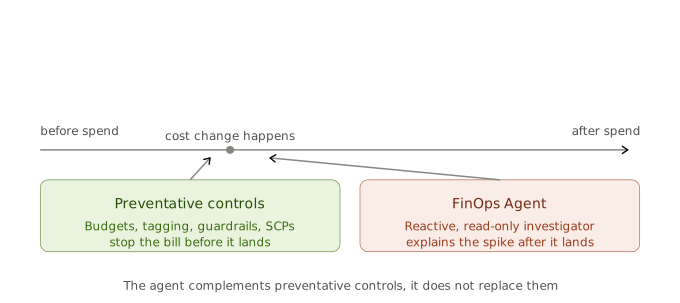
Where the FinOps Agent sits: preventative controls act before spend happens; the agent is reactive and read-only, explaining a spike after it lands. The two are complementary.
Availability and cost
The FinOps Agent is currently available only in us-east-1, but once deployed in a management account, it monitors costs across all Regions and member accounts. During the public preview, it is free, subject to a monthly usage limit; standard charges still apply for the underlying services it reads, such as Cost Explorer API calls. Pricing at general availability has not been announced, so confirm current terms before building it into a long-term cost-governance plan.
The honest verdict
The FinOps Agent is a real, capable tool that automates the single most tedious part of cloud cost management: root-cause investigation and plain-language cost analysis. It is not a replacement for preventative cost controls; it is not autonomous, and it is only as good as the cost foundation you have already built. Get that foundation right, and it is a strong addition to how modern teams keep cloud spend under control, turning cost from a monthly report the FinOps team chases into a real-time answer any engineer can get for themselves.
How SUDO Consultants can help
As an AWS Premier Tier Partner, SUDO Consultants helps organizations put the cost-governance foundation in place: cost anomaly detection, budget structures, tagging strategy, CloudTrail configuration- that makes tools like the FinOps Agent genuinely useful, and integrates them into your existing FinOps and engineering workflows. If your team wants to adopt agentic cost management on a solid footing, we can help you get there.
Through our AWS Managed Cloud Services and DevOps as a Service engagements, we build and run that cost-governance foundation for you and integrate agentic FinOps into your day-to-day cloud operations across the UAE, Saudi Arabia, and the wider MENA region.
Get in touch at sudoconsultants.com or [email protected].
Frequently asked questions
What is the AWS FinOps Agent?
The AWS FinOps Agent is a frontier AI agent built on Amazon Bedrock that answers cloud cost questions in plain language, investigates spending anomalies to their root cause using CloudTrail, and surfaces optimization opportunities delivered in a web app and, optionally, Slack and Jira.
Is the AWS FinOps Agent available in the Middle East?
During preview the agent runs only in us-east-1, but once created in a management account, it monitors costs across all Regions and accounts, including workloads in the UAE, Saudi Arabia, and the wider MENA region. It simply runs from us-east-1 while managing spend everywhere.
Does the FinOps Agent replace preventative cost controls?
No. It is read-only and reactive; it explains a spike after it lands but does not stop, resize, or remediate anything. Most teams pair it with preventative controls such as budgets, tagging, and SCPs. SUDO Consultants helps put both in place.

DevOps Engineer passionate about cloud automation, CI/CD, and scalable AWS solutions.