
In this blog post, we’ll take you on a journey through the world of DNS (Domain Name System), how it works, and how Amazon Route 53 — AWS’s scalable and highly available DNS web service , plays a crucial role in managing domains and routing traffic effectively. Whether you’re new to DNS or looking to optimize your system with advanced routing strategies, this guide is for you!

What is DNS?
The Domain Name System (DNS) is often referred to as the “phonebook” of the internet. When you type a website’s domain name, like www.example.com, into your browser, DNS is what translates that human-readable name into an IP address, the numerical address that computers use to identify each other on the internet.
Without DNS, we would have to remember long strings of numbers (like 172.217.11.46) to visit websites , not very user-friendly!
How Does DNS Work?
Here’s how the DNS resolution process works step-by-step:
User Request: A user types in www.example.com into their browser.
DNS Query:
- The browser first checks its local cache to see if it already knows the IP address.
- If not, the request is sent to a recursive DNS resolver (usually provided by your ISP or a third-party provider).
- If it can’t find the answer, the query is passed to the root DNS servers.
Root and TLD Servers: The root DNS servers direct the query to the Top-Level Domain (TLD) servers, like .com, .net, etc.
Authoritative Servers: These servers hold the actual DNS records for the domain and respond with the IP address.
Response: The browser can now connect to the website using the IP address provided by the authoritative DNS server.

What is Amazon Route 53?
Amazon Route 53 is a highly scalable and reliable DNS service from AWS. It helps manage your domain names, direct traffic to your resources, and ensures that your applications are fast, secure, and highly available.
Key Features of Route 53
- Scalable and Highly Available: Built on AWS’s global infrastructure, ensuring high availability and low latency.
- Domain Registration: Register domain names directly through AWS.
- Traffic Routing: Offers flexible routing strategies such as latency-based routing, geolocation routing, and more.
- Health Checks: Monitors the health of your resources to route traffic only to healthy endpoints.
- DNS Failover: Automatically reroutes traffic to a backup resource if the primary fails.
Route 53 integrates seamlessly with other AWS services, such as Elastic Load Balancing (ELB), Amazon S3, and CloudFront, making it a versatile choice for your DNS needs.

What Are Hosted Zones?
In Route 53, a hosted zone is like a container for the DNS records that define how traffic is routed for a specific domain. Think of it as the settings page for your domain’s DNS configuration.
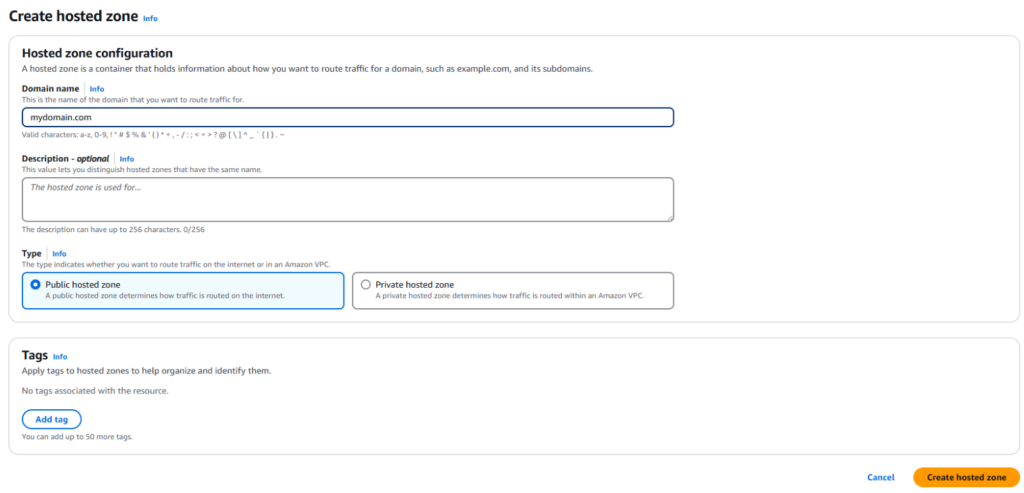
Types of Hosted Zones:
Public Hosted Zones: These manage DNS records for domains accessible on the internet (e.g., example.com).
Private Hosted Zones: Used for DNS records that are only accessible within an AWS Virtual Private Cloud (VPC), ideal for internal resources.

Dive into Route 53 Routing Policies
Amazon Route 53 provides several routing policies that give you full control over how traffic is routed to your resources. Let’s explore each of them in detail:

Simple Routing Policy
What Is Simple Routing?
The Simple Routing Policy in Amazon Route 53 is the most straightforward method to route traffic. It directs all DNS queries for a domain or subdomain to a single resource, such as an EC2 instance, an Elastic Load Balancer (ELB), or an S3 bucket. This policy is ideal for scenarios where you have a single resource performing a specific function for your domain.
How It Works
When you configure a simple routing policy:
Single Record: You create a DNS record (e.g., an A record) that maps your domain or subdomain to a single IP address or AWS resource.
DNS Resolution: When a user queries your domain, Route 53 responds with the IP address specified in the record.
Client Connection: The user’s browser or application connects directly to the resource using the provided IP address.
If you specify multiple IP addresses in a single record, Route 53 returns all values to the DNS resolver in random order. The resolver then returns these values to the client, which selects one to establish a connection. However, with simple routing, you cannot create multiple records with the same name and type.
Example Use Case
Suppose you have a single web server hosted on an EC2 instance with the IP address 203.0.113.10, and you want to route all traffic for www.mydomain.com to this server.
This setup is ideal for small websites or applications where high availability and load balancing are not primary concerns.
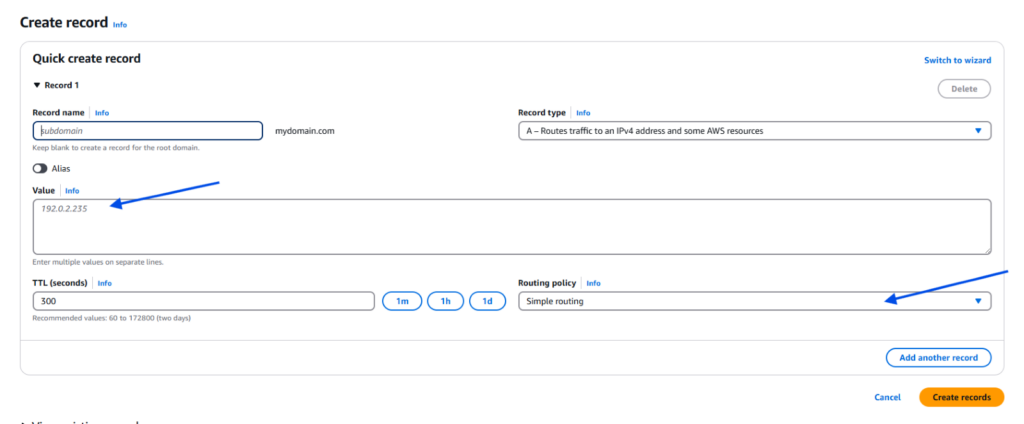
In the AWS Route 53 Console:
- Navigate to your Hosted Zone.
- Click on Create Record.
- Enter the Record name
- Select Record type as A – IPv4 address.
- Enter the Value as your server’s IP address (e.g., 203.0.113.10).
- Choose Routing policy as Simple routing.
- Click Create records.

Weighted Routing Policy
What Is Weighted Routing?
The Weighted Routing Policy in Amazon Route 53 allows you to distribute DNS traffic across multiple resources based on assigned weights. This enables controlled traffic distribution, which is particularly useful for scenarios like load balancing, A/B testing, or gradual deployments.
How It Works
To configure weighted routing:
Create Multiple Records: Define multiple records with the same name and type (e.g., A or CNAME records) for each resource you want to route traffic to.
Assign Weights: For each record, assign a relative weight that determines the proportion of traffic it should handle. The weight is a number between 0 and 255, where higher numbers indicate a higher proportion of traffic.
Route 53 Distribution: Amazon Route 53 calculates the total sum of all weights and routes traffic to each resource based on its individual weight as a percentage of the total.
Example Use Case
Imagine you have two web servers:
Server 1: Located in the US, handling 70% of the traffic.
Server 2: Located in Europe, handling 30% of the traffic.
To achieve this distribution:
Assign a weight of 70 to the record pointing to Server 1.
Assign a weight of 30 to the record pointing to Server 2.
Route 53 will route approximately 70% of the DNS queries to Server 1 and 30% to Server 2, based on the weights assigned.
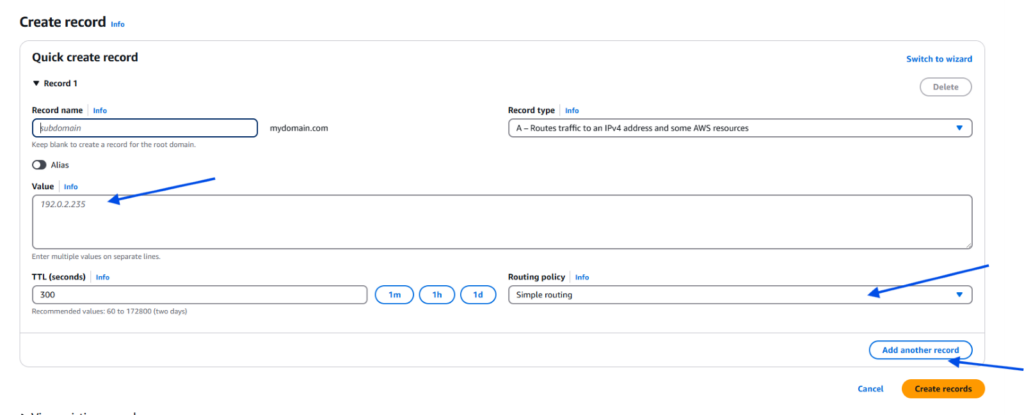
In the AWS Route 53 Console:
- Navigate to your Hosted Zone.
- Click on Create Record.
- Select Record type (e.g., A or CNAME).
- Under Routing policy, choose Weighted.
- Enter the Weight for each record.
- Optionally, associate a Health Check to monitor the health of the resource.

Latency-Based Routing Policy
What Is Latency-Based Routing?
The Latency-Based Routing Policy in Amazon Route 53 is designed to route user requests to the AWS region that offers the lowest network latency, enhancing the end-user experience by reducing response times. This is particularly beneficial for applications deployed in multiple AWS regions, aiming to serve a global user base efficiently.
How It Works
When a user initiates a request to your application:
DNS Query Initiation: The user’s device sends a DNS query for your domain (e.g., www.mydomain.com).
Route 53 Evaluation: Amazon Route 53 receives the query and evaluates which of your configured AWS regions offers the lowest latency to the user’s location.
Response with Optimal Endpoint: Route 53 responds with the IP address of the resource (such as an EC2 instance or Load Balancer) in the region with the lowest latency.
User Connection: The user’s request is directed to the selected endpoint, ensuring minimal latency.
Example Use Case
Imagine you have deployed your application in three AWS regions:
- US East (N. Virginia): us-east-1
- Europe (Ireland): eu-west-1
- Asia Pacific (Singapore): ap-southeast-1
Users accessing your application will be routed as follows:
- A user in New York: Directed to the US East (N. Virginia) region.
- A user in Berlin: Directed to the Europe (Ireland) region.
- A user in Sydney: Directed to the Asia Pacific (Singapore) region.
This routing ensures that each user experiences the lowest possible latency based on their geographic location.
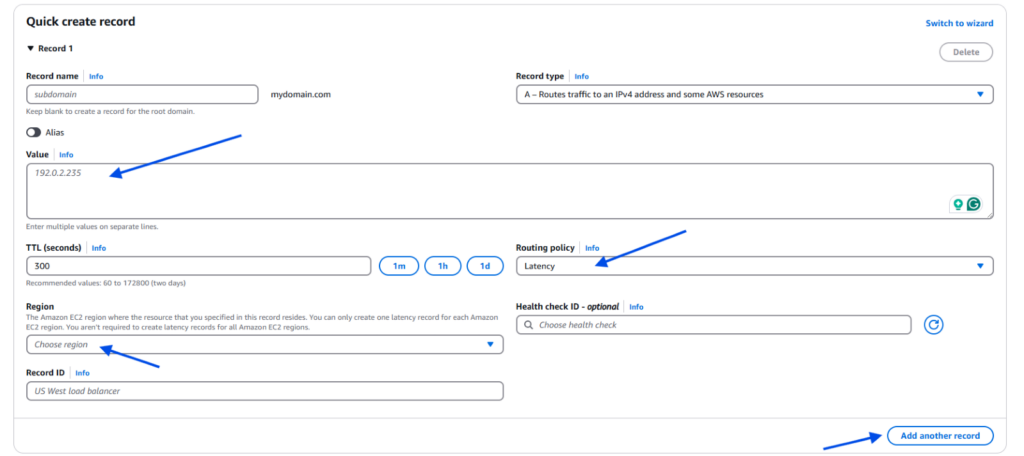
In the AWS Route 53 Console:
- Navigate to your Hosted Zone.
- Click on Create Record.
- Enter the Record name (e.g., www).
- Select Record type as A – IPv4 address.
- Enter the Value as the IP address of your resource in a specific region.
- Choose Routing policy as Latency routing.
- Select the appropriate Region for this record.
- Repeat steps 2–7 for each region where your application is deployed.

Geolocation Routing Policy
The Geolocation Routing Policy in Amazon Route 53 allows you to direct user traffic based on the geographic location from which the DNS queries originate. This means you can serve different content or direct users to different resources depending on their location, such as continent, country, or, within the United States, even by state.
How It Works
When a user initiates a DNS query for your domain (e.g., www.mydomain.com), Route 53 determines the origin of the request based on the user’s IP address. It then matches this location to the most specific geolocation record you’ve configured:
Specific Match: If there’s a record matching the user’s exact location (e.g., country or state), Route 53 responds with the corresponding resource.
Broader Match: If no specific match is found, Route 53 looks for a broader match (e.g., continent).
Default Record: If neither specific nor broader matches are found, and you’ve configured a default record, Route 53 uses it to respond.
This hierarchy ensures that users are directed to the most appropriate resource based on their location.
Example Use Case
Suppose you have deployed your application in three AWS regions:
- US East (N. Virginia): us-east-1
- Europe (Ireland): eu-west-1
- Asia Pacific (Singapore): ap-southeast-1
You want users from North America to be directed to the US East region, users from Europe to the Ireland region, and users from Asia to the Singapore region.
With this setup, users are directed to the resource closest to their geographic location, and any users from unspecified locations are handled by the default record.
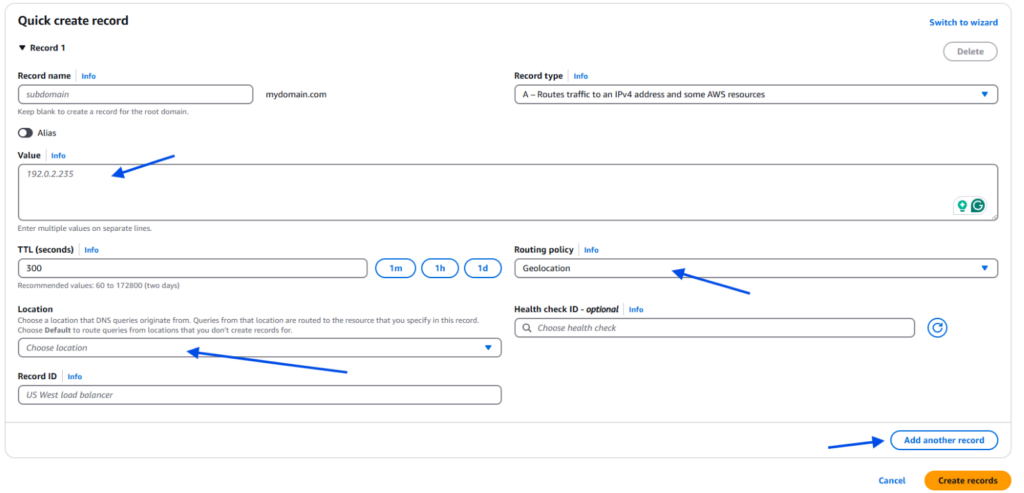
In the AWS Route 53 Console:
- Navigate to your Hosted Zone.
- Click on Create Record.
- Enter the Record name.
- Select Record type as A – IPv4 address.
- Enter the Value as the IP address of your resource.
- Choose Routing policy as Geolocation routing.
- Select the appropriate Location (e.g., North America, Europe, Asia).
- Repeat steps 2–7 for each geographic location you want to configure.
- Optionally, create a Default record to handle unspecified locations.

Geoproximity Routing Policy
Geoproximity Routing allows you to route traffic based on the geographic location of your resources and, optionally, shift traffic from resources in one location to resources in another. This is particularly useful when you want to control the geographic distribution of your traffic and ensure that users are directed to the most appropriate resource based on proximity.
How It Works
When a user makes a DNS query, Route 53 evaluates the geographic location of both the user and your resources. By default, Route 53 routes traffic to the resource that is geographically closest to the user. However, you can adjust this behavior using a bias value:
Positive Bias: Expands the geographic region from which traffic is routed to a resource, effectively attracting more traffic to that resource.
Negative Bias: Shrinks the geographic region from which traffic is routed to a resource, effectively diverting traffic away from that resource.
This flexibility allows you to fine-tune traffic distribution based on your specific requirements.
Example Use Case
Imagine you have resources in two AWS Regions:
US East (N. Virginia): us-east-1
Europe (Ireland): eu-west-1
By default, Route 53 will route traffic from users to the closest region. However, if you want to attract more traffic to the US East region, you can apply a positive bias to the us-east-1 resource. This adjustment will expand the geographic region from which traffic is routed to that resource, effectively attracting more users to the US East region.
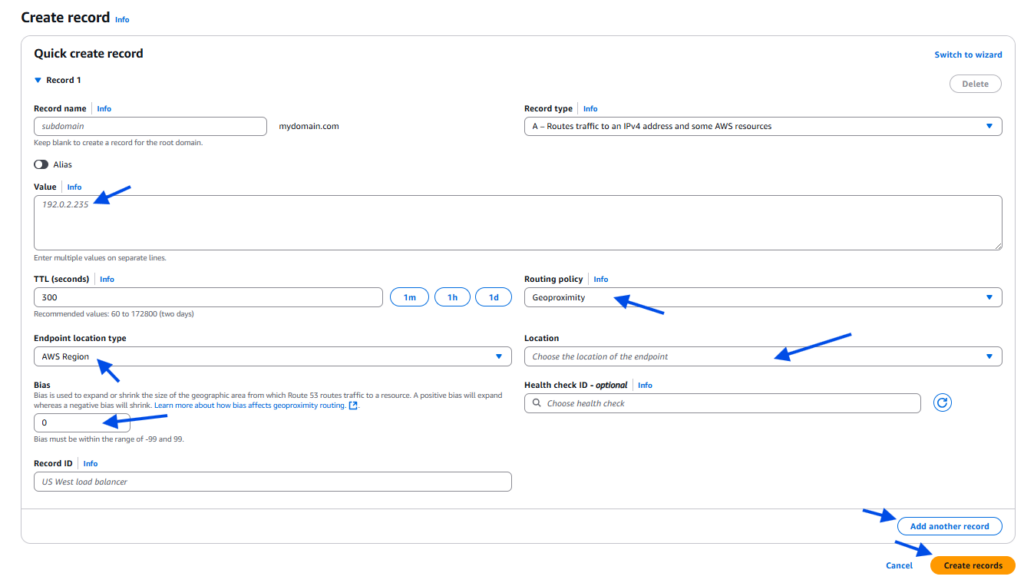
In the AWS Route 53 Console:
- Navigate to Your Hosted Zone
- Create a New Record: In your hosted zone, click on Create Record.
- Specify Record Details:
- Record Name: Enter the desired subdomain (e.g., www).
- Record Type: Select A – IPv4 address.
- Value: Enter the IP address of your resource.
- Set Routing Policy: Choose Geoproximity Routing as the routing policy.
- Select Endpoint Location Type
Choose how to specify your endpoint’s location:
- AWS Region
- Local Zone Group
- Custom Coordinates
- Select Location
If you chose AWS Region (or Local Zone Group), pick the specific region or zone where your resource lives (e.g., us-east-1).
- Specify Bias
Use the Bias slider or field to expand (positive) or shrink (negative) the geographic area from which traffic is routed to this endpoint.
- Configure Health Check (Optional): If desired, associate a health check to monitor the health of your endpoint.
- Save the Record: Click Create records to save your configuration.
- Repeat for Other Locations: Repeat steps 3–8 for each geographic location you want to configure.
- Create a Default Record (Optional): To handle queries from locations not specified in your geolocation records or from IP addresses that can’t be mapped to a location, create a record with the location set to Default

5. Multivalue Answer Routing Policy
Multivalue Answer Routing allows Amazon Route 53 to return multiple values, such as IP addresses for your web servers, in response to DNS queries. This policy enables you to configure Route 53 to respond with up to eight healthy records selected at random, enhancing availability and fault tolerance.
How It Works
When a user makes a DNS query, Route 53 evaluates the health of each associated record. It then responds with up to eight healthy records, selected at random. If a record becomes unhealthy, Route 53 stops responding with that record until it becomes healthy again.
Example Use Case
Suppose you have multiple web servers deployed across different Availability Zones. By configuring multivalue answer records for each server and associating health checks, Route 53 can route traffic to healthy servers, improving the resilience of your application.
Key Considerations
- Health Checks: Associating health checks with multivalue answer records ensures that only healthy records are returned in DNS responses.
- No Load Balancing: While multivalue answer routing provides some level of traffic distribution, it is not a substitute for a dedicated load balancer.
- Record Limit: Route 53 responds with up to eight healthy records. If more records are needed, consider using a different routing policy in conjunction.
- TTL Settings: Configuring an appropriate Time to Live (TTL) value ensures that DNS resolvers cache the records for an optimal duration, balancing between performance and the need for timely updates.
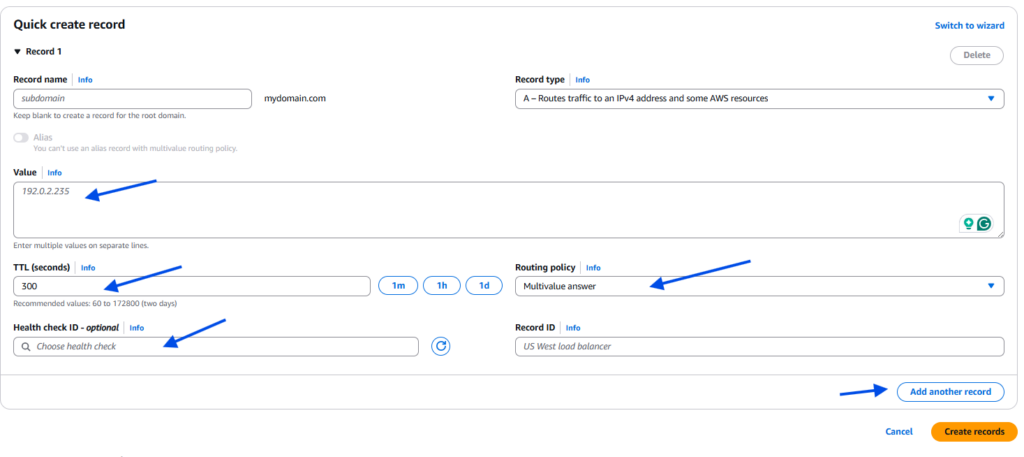
In the AWS Route 53 Console:
- Navigate to your Hosted Zone.
- Click on Create Record.
- Enter the Record name.
- Select Record type as A – IPv4 address.
- Enter the Value as the IP address of your resource.
- Choose Routing policy as Multivalue answer routing.
- Specify the TTL (e.g., 60 seconds).
- Optionally, associate a Health check to monitor the health of your resource.

Failover Routing Policy
Failover Routing allows you to route traffic to a primary resource when it’s healthy and to a secondary (standby) resource when the primary becomes unhealthy. This active-passive configuration ensures high availability and disaster recovery capabilities for your applications.
How It Works
When a DNS query is made, Route 53 checks the health of the primary resource using associated health checks. If the primary resource is healthy, Route 53 responds with its IP address. If the primary is unhealthy, Route 53 routes traffic to the secondary resource. This setup is ideal for scenarios where you want a backup resource to take over in case of failure.
Example Use Case
Imagine you have a web application hosted in the US East (N. Virginia) region, and you want to ensure availability in case of regional issues. You can configure a primary record pointing to your N. Virginia resource and a secondary record pointing to a backup resource in the US West (Oregon) region. By associating health checks with the primary record, Route 53 will monitor its health and failover to the secondary resource if necessary.
Key Considerations
- Health Checks: Route 53 uses health checks to determine the health of the primary resource. If the primary resource fails the health check, traffic is routed to the secondary resource.
- Alias Records: For AWS resources like Elastic Load Balancers or CloudFront distributions, you can use alias records with the Evaluate Target Health option set to Yes. This allows Route 53 to consider the health of the target resource directly.
- Private Hosted Zones: Failover routing can be configured in private hosted zones, enabling internal failover scenarios within your VPC.
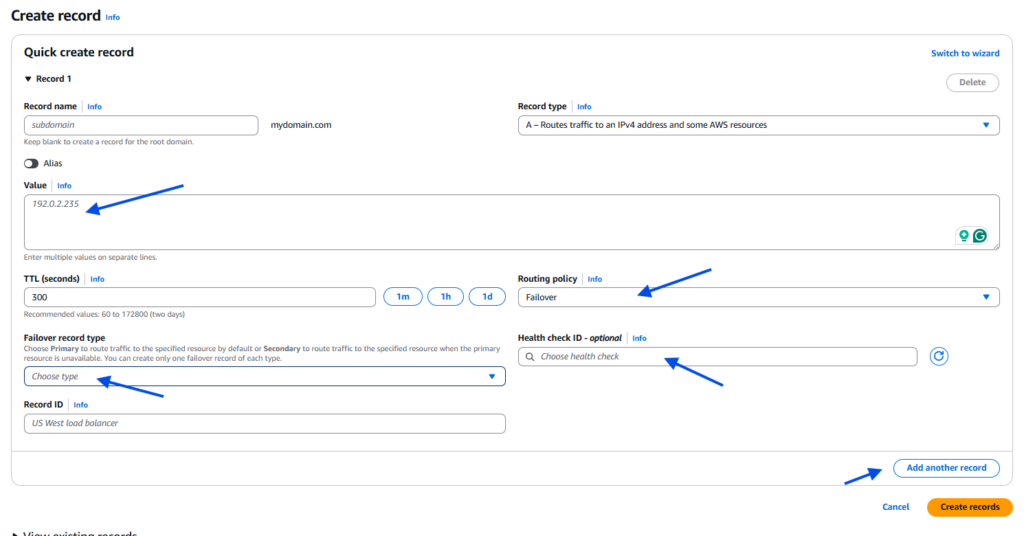
In the AWS Route 53 Console:
- Navigate to your Hosted Zone.
- Click on Create Record.
- Enter the Record name (e.g., www).
- Select Record type as A – IPv4 address.
- Enter the Value as the IP address of your primary resource.
- Choose Routing policy as Failover.
- Set Failover record type to Primary.
- Associate a Health check to monitor the health of your primary resource.
- Click Create to save the record.
Repeat the above steps to create a secondary record:
- Enter the same Record name (e.g., www).
- Select Record type as A – IPv4 address.
- Enter the Value as the IP address of your secondary resource.
- Choose Routing policy as Failover.
- Set Failover record type to Secondary.
- Associate a Health check to monitor the health of your primary resource.
- Click Create to save the record.

Conclusion
Amazon Route 53’s routing policies offer incredible flexibility, allowing you to optimize the performance, availability, and cost-efficiency of your applications. Whether you’re looking to distribute traffic based on location, latency, or even health checks, Route 53 has you covered.
By understanding how to use these routing policies, you can build a robust, highly available infrastructure that meets the needs of your users and keeps your application performing at its best.
Happy routing!