Ever wondered how websites load so quickly, delivering images, text, and other content to your screen almost instantly? The magic often lies behind the scenes in a well-architected content delivery system. In this guide, we’ll dive into the power of Amazon Web Services (AWS) to efficiently host and deliver static websites to users around the globe. The diagram below illustrates the core components we’ll be exploring.
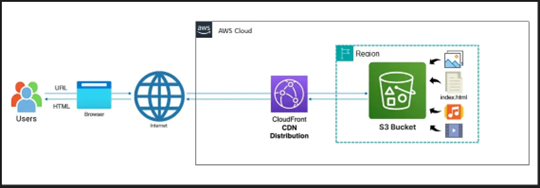
We’ll take a step-by-step journey to understand how AWS S3, a highly scalable storage service, and AWS CloudFront, a fast content delivery network (CDN), work together to make your website lightning fast and reliable.
Step 1: Creating Your Amazon S3 Bucket:
The first step in hosting your static website on AWS is to create an Amazon S3 bucket. Think of an S3 bucket as a container where you will store all your website files — your HTML, CSS, JavaScript, images, and other assets.
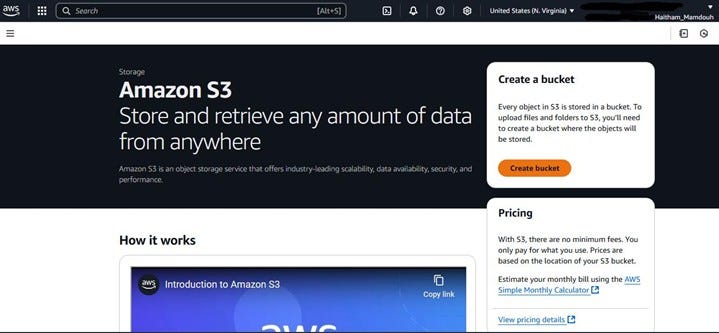
As shown in the screenshot, you should now be on the Amazon S3 service page within the AWS Management Console. If you’re not already there, you can easily find it by searching for “S3” in the console’s search bar.
Look for the “Create bucket” button, click on this button to begin the process of setting up your storage container.
Step 2: Configuring Your S3 Bucket :
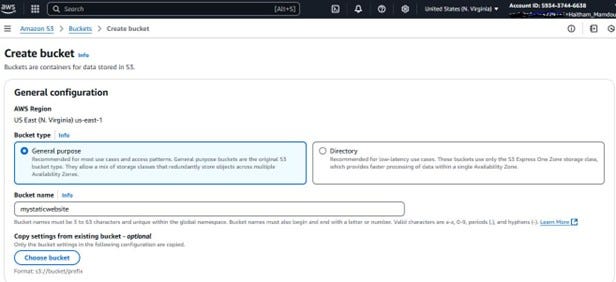
Once you click “Create bucket,” you’ll be taken to a page where you need to configure the settings for your new bucket. This involves choosing the AWS Region, selecting the bucket type, and most importantly, giving your bucket a unique name.
Referring to the screenshot :
- AWS Region: The first setting is to choose the AWS Region where you want your bucket to be located. It’s generally recommended to choose a region that is geographically closest to your target audience for lower latency. In this example, “US East (N. Virginia)” is selected.
- Bucket Type: You’ll see options for “General purpose” and “Directory.” For hosting a static website, “General purpose” is the recommended and default choice, offering a balance of cost and performance. Ensure this option is selected.
- Bucket Name: This is a crucial setting. You need to provide a globally unique name for your bucket. This name will also be part of your website’s URL later on. In the screenshot, “mystaticwebsite” is used as an example. Remember that bucket names have specific requirements: * Must be between 3 and 63 characters long. * Must be unique across all existing Amazon S3 bucket names globally. * Must not contain uppercase letters or underscores. * Must start and end with a letter or number. * Can contain lowercase letters, numbers, periods (.), and hyphens (-).
Step 3: Keeping Block Public Access Enabled for Enhanced Security:
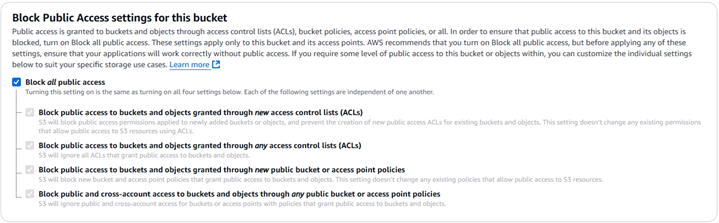
In this setup, we’re taking a more secure approach by keeping the Amazon S3 bucket itself private. This means that the files stored in the bucket won’t be directly accessible via a public S3 URL. Instead, we will control access through our CloudFront CDN. This method adds a layer of security by ensuring users can only access your content through the CloudFront distribution.
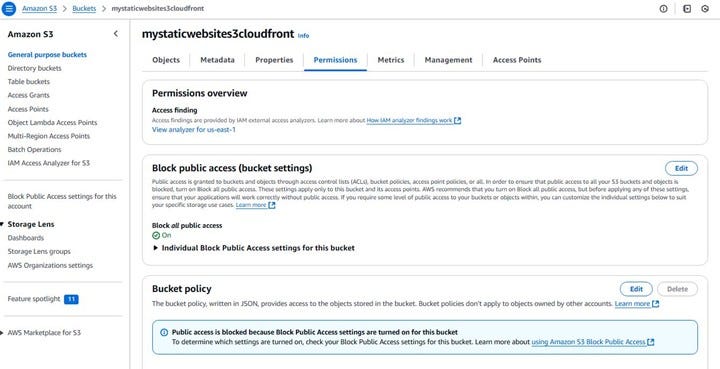
As shown in the screenshot : You’ll find the “Block Public Access settings for this bucket” section during the bucket creation process or in the bucket’s permissions tab after creation.
Ensure that the “Block all public access” setting remains ON (checked). This is the recommended setting for this architecture, as it prevents direct public access to your S3 bucket.
By keeping this setting enabled, we ensure that all requests for your website content will go through CloudFront. We will later configure the CloudFront distribution to securely access the content in your private S3 bucket. This approach offers better control over who can access your content and can help prevent unauthorized access.
Step 4: Your S3 Bucket is Ready:
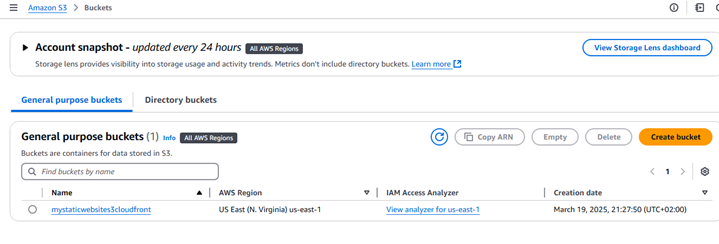
As shown in the screenshot , your newly created Amazon S3 bucket, in this example named “mystaticwebsites3cloudfront”, should now appear in your list of S3 buckets within the AWS Management Console.
Take a moment to verify that the bucket name and the AWS Region are correct as you configured them in the previous steps.
Step 5: Time to Upload Your Website Files:
Now that your S3 bucket is created and ready, it’s time to add your website content.
As shown in the screenshot below, the bucket is currently empty:
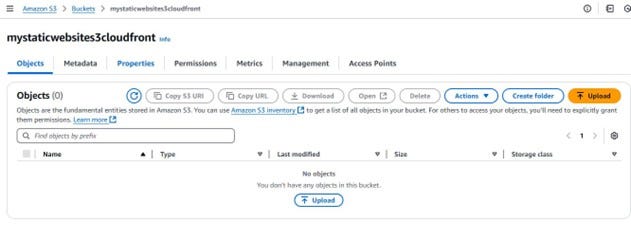
click on upload then Add Files,
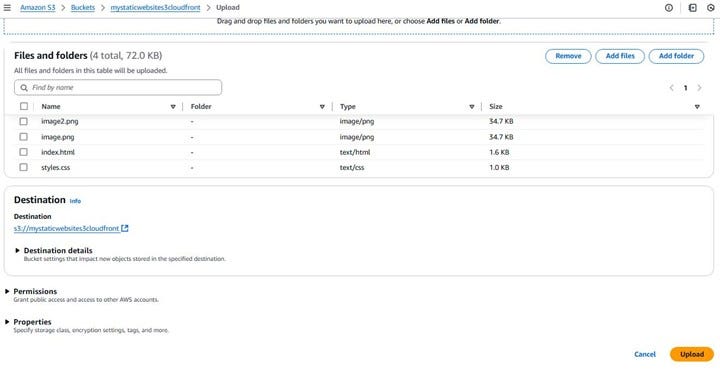
Once everything looks good, click the “Upload” button in the bottom-right corner. AWS will start uploading your content into the bucket.
Step 6: Creating Your CloudFront Distribution:

With your website files safely stored in your private S3 bucket, the next crucial step is to set up AWS CloudFront. CloudFront will act as the content delivery network (CDN), caching your website content across its global network of edge locations. This ensures that your website loads quickly for users regardless of their geographic location.
As shown in the screenshot below: You should now navigate to the AWS CloudFront service page within the AWS Management Console. If you’re not already there, you can easily find it by searching for “CloudFront” in the console’s search bar, as highlighted in the image.
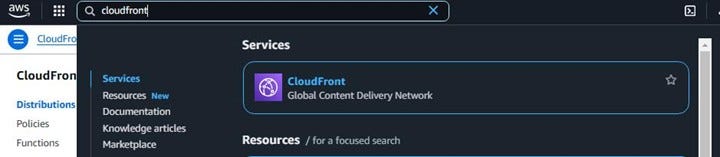
On the CloudFront service page, click on “Create Distribution” button to start the process of creating your CDN distribution.
Configuring Your CloudFront Distribution, Origin Settings:
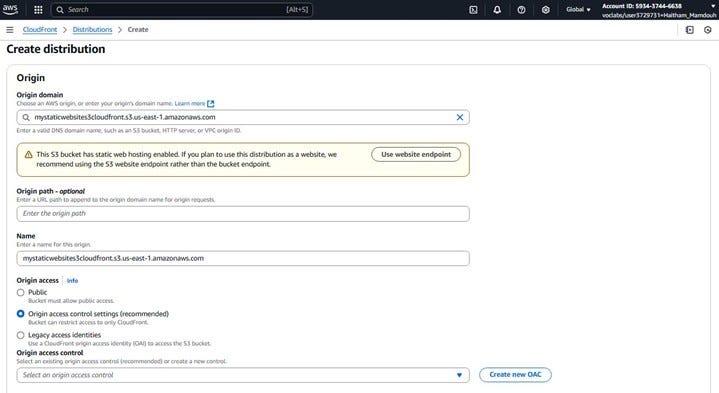
Once you click “Create Distribution,” you’ll be taken to a page where you need to configure the settings for your new CloudFront distribution. The first section you’ll encounter is the “Origin” settings. This is where you tell CloudFront where to fetch your website content from.
Referring to the screenshot:
Origin domain: Click in the “Origin domain” field. CloudFront will present you with a list of your S3 buckets.
Origin access: Here, you need to specify how CloudFront will access your private S3 bucket. Since we kept “Block all public access” enabled on the bucket, we need to use an Origin Access Control (OAC). As highlighted in the screenshot, select the option “Origin access control settings (recommended)”.
Origin access control settings: You’ll likely see a prompt to create a new OAC. We will configure this in the next step.
Configuring Your CloudFront Distribution, Origin Settings (Continued)
Origin access control settings: As seen in the previous screenshot, you selected “Origin access control settings (recommended)”. Now, you should see a button that says either “Create control setting” or a dropdown menu if you have created OACs before. Click the button to create a new OAC.
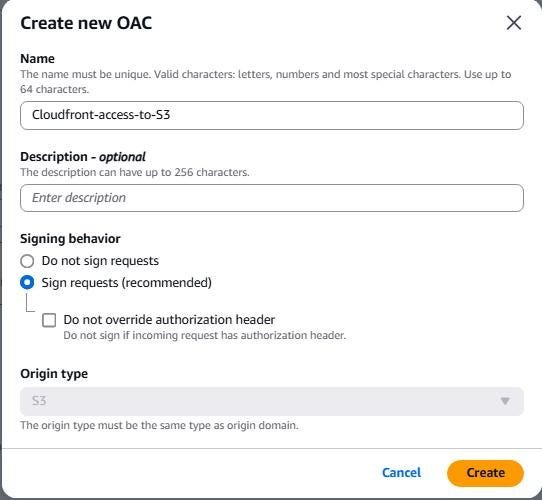
Origin access control — Name: A dialog box titled “Create new OAC” will appear, as shown in the screenshot . Provide a descriptive name for your OAC. For example, in the screenshot, “Cloudfront-access-to-S3” is used.
Origin access control — Signing behavior: Ensure “Sign requests (recommended)” is selected, as it is in the screenshot. This ensures that CloudFront signs all requests it sends to your S3 bucket, enhancing security.
Origin type: This should automatically be set to “S3” since your origin is an S3 bucket. Confirm that it is set correctly.
Click the “Create” button. CloudFront will now create the OAC.
Configuring Your CloudFront Distribution — Default Cache Behavior Settings
Next, you’ll configure the “Default cache behavior settings.” These settings control how CloudFront caches your content and how it handles requests.
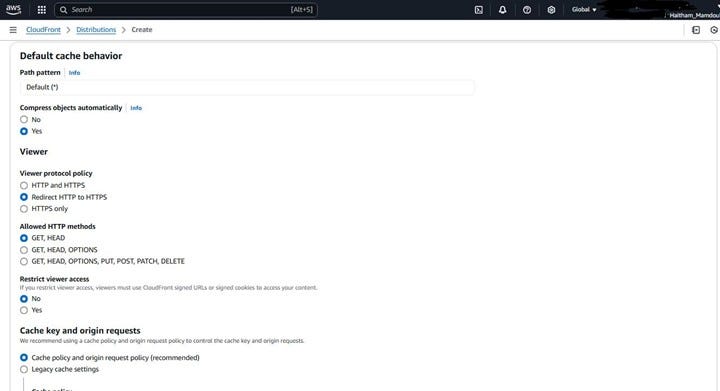
Viewer protocol policy: As shown in the screenshot, choose “Redirect HTTP to HTTPS” to ensure that all traffic to your website is secure. This will automatically redirect any HTTP requests to HTTPS.
Allowed HTTP methods: For static websites, select “GET, HEAD” as seen in the screenshot. These are the only methods needed to retrieve and check the existence of your content. Disabling other methods adds a small layer of security.
Compress objects automatically: You can choose “Yes” to have CloudFront automatically compress eligible files (like text files, HTML, CSS, JavaScript) before sending them to the viewer. This can improve loading times. In the screenshot, “Yes” is selected.
Cache key and origin requests: You can typically leave this as the default setting, which is usually “Cache policy and origin request policy (recommended)”. This allows CloudFront to use its managed policies for optimal caching and request handling for most static website scenarios.
Cache policy: CloudFront offers managed cache policies. For static websites, the default “Managed-CachingOptimized” policy often works well. You might see this selected or be able to choose it from a dropdown.
Origin request policy: Similarly, for origin request policies, the default “Managed-AllViewer” policy is often suitable for static websites. This forwards all viewer headers, cookies, and query strings to the origin. For a basic static website, you might not need to forward cookies or query strings, and you could potentially select a more restrictive policy if needed for advanced use cases.

Default root object: This is the file that CloudFront will serve when a user requests the root of your domain (e.g., /). As shown in the screenshot, typically, this will be your main HTML file, named index.html. Enter index.html in this field.

Web Application Firewall (WAF)
In this guide, we do not enable AWS WAF for the sake of simplicity and to keep the setup beginner-friendly, as shown in the screenshot below. However, for production-level or more critical applications, it is highly recommended to enable AWS WAF. AWS WAF helps protect your application from common web exploits such as SQL injection and cross-site scripting (XSS) .
Once you have configured all the necessary settings, review them carefully.
and click the “Create distribution” button
after you click the “Create distribution” button, you should see a green banner at the top indicating that the distribution was successfully created.
However, you’ll also notice a yellow banner with a warning message: “The S3 bucket policy needs to be updated.” This is a crucial step because we configured our S3 bucket to block all public access and are using Origin Access Control (OAC) to allow CloudFront to access the content.
As highlighted in the yellow banner, you need to grant CloudFront permission to access your private S3 bucket. The banner provides a “Copy policy” button. Click this button to copy the necessary bucket policy. We will now proceed to update the S3 bucket policy in the next step.

Step 7: Updating Your S3 Bucket Policy:
Now that you’ve copied the bucket policy from the CloudFront console, you need to apply it to your S3 bucket.
As shown in the screenshot : Navigate back to your S3 bucket in the AWS Management Console.
Go to the “Permissions” tab of your bucket. You can find this tab next to the “Objects,” “Properties,” “Metrics,” and “Management” tabs.
Scroll down to the “Bucket policy” section. You should see an “Edit” button on the right side. Click this button to open the policy editor.
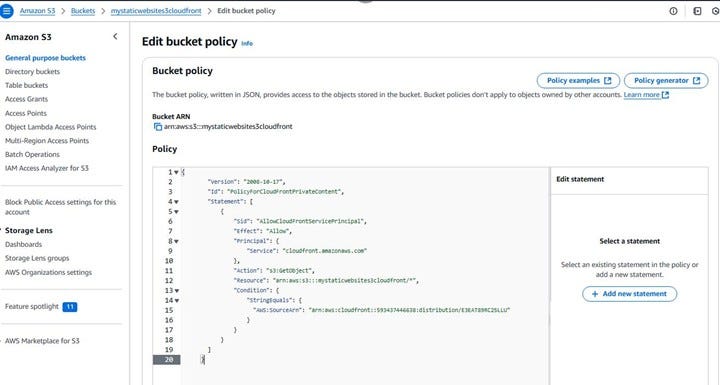
In the policy editor, paste the policy that you copied from the CloudFront console in the previous step. This policy specifically grants the Origin Access Control (OAC) you created for your CloudFront distribution the permission to get objects from your bucket.
After pasting the policy, click the “Save changes” button. Your S3 bucket is now configured to allow access only from your CloudFront distribution through the OAC.
Step 8: Accessing Your Website via CloudFront:
Once your CloudFront distribution is created, it will take some time for it to be fully deployed across all of CloudFront’s edge locations. You can monitor the status of your distribution on the CloudFront console.
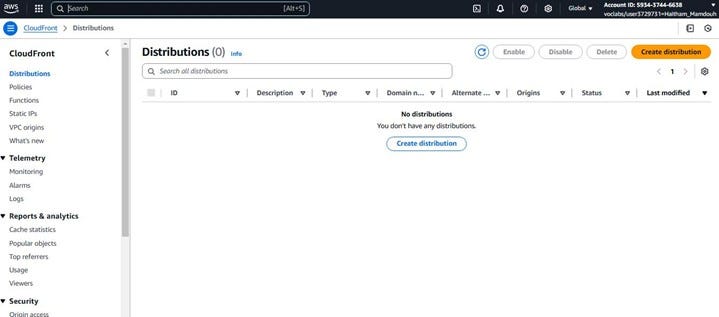
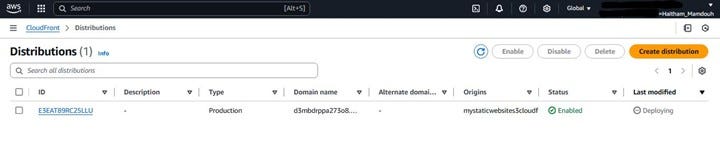
As shown in the screenshot below: Navigate to the CloudFront service in the AWS Management Console and click on “Distributions” in the left-hand menu. You should see your newly created distribution in the list.
The “Status” column will initially show “Deploying.” This process can take several minutes, depending on the configuration. Once the deployment is complete, the status will change to “Enabled.”
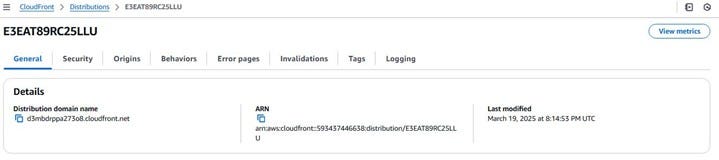
Just make sure that the “Status” of your distribution on the main “Distributions” page has changed from “Deploying” to “Enabled”. Once it’s enabled, you can copy this domain name and paste it into your web browser to see your website live.
Congratulations on reaching this incredible step! Your static website should now be loading lightning-fast and super efficiently through the power of AWS S3 and CloudFront.
Bonus Step: Monitoring Your CloudFront Distribution:
Once your static website is up and running, it’s essential to monitor its performance and understand your audience. AWS CloudFront provides built-in monitoring tools that allow you to gain insights into how your content is being delivered and accessed.
As shown in the screenshot below: In the AWS Management Console, navigate to the CloudFront service. In the left-hand menu, under the “Telemetry” section, you’ll find options like “Monitoring,” “Alarms,” and “Logs.”
Click on “Monitoring” to get an overview of your distribution’s performance, including metrics like request counts, error rates, and latency.
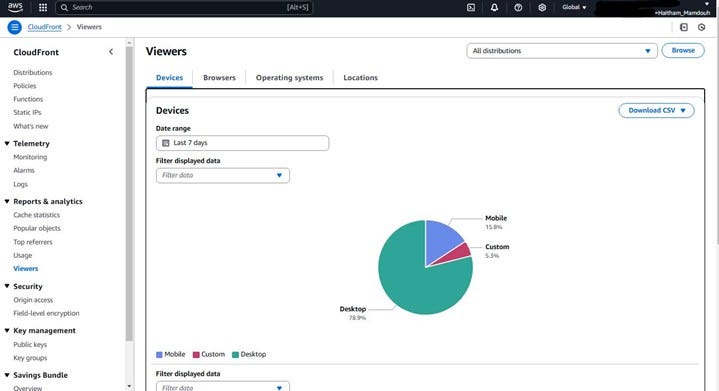
For a deeper understanding of your viewers, click on “Viewers” (also under “Telemetry”). Here, as illustrated in the screenshot, you can see valuable data such as:
- Devices: The types of devices your users are using to access your website (e.g., Desktop, Mobile, Tablet).
- Browsers: The web browsers your visitors are using.
- Operating systems: The operating systems of your users’ devices.
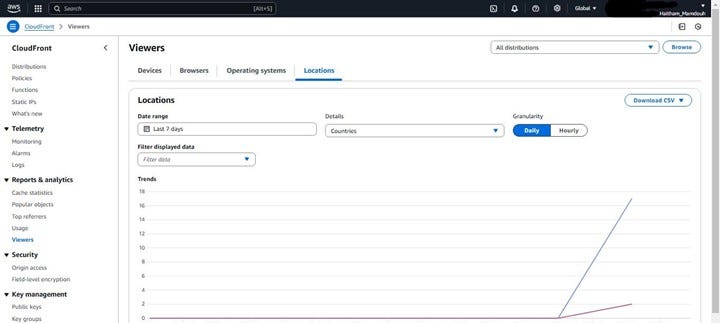
- Locations: The geographic locations from where your website is being accessed.
These monitoring tools help you understand your audience better, identify potential issues, and optimize your website’s performance over time. Regularly checking these metrics can provide valuable insights into your website’s usage and help you make informed decisions about future improvements.