
About this guide
This document is for entry-level DevOps engineers or anyone preparing to learn and follow GitOps Kubernetes deployment approach using GitOps and Argo CD.
It assumes you have:
- Understanding of what Kubernetes is and its core resources (pods, deployments, services).
- Familiarity with running basic commands in a terminal.
- Ability to use Git for basic tasks .
- Awareness of what is YAML files in Kubernetes environment.
Introduction
Deploying applications to Kubernetes often feels like juggling YAML files, kubectl commands, and keeping different environments in sync. It’s easy to end up with configuration drift , where what’s running in the cluster doesn’t match what’s in your manifests.
GitOps solves this by making your Git repository the single source of truth. Every change is version-controlled, auditable, and automatically reflected in your clusters. Instead of manually pushing updates, the cluster pulls them from Git.
In this Argo CD tutorial, will walk through a GitOps Kubernetes deployment from start to finish. By the end, you’ll have Argo CD set up, synced to a Git repo, and deploying an application automatically.
Why GitOps?
GitOps is a deployment workflow where:
- All configuration is stored in Git.
- The desired state of your system is declared in code.
- The cluster automatically syncs with Git, reducing manual changes.
- Rollbacks are quick, just revert a commit.
- It improves security by reducing direct cluster access.
This means production, staging, and dev environments always match their declared configuration.
Why Argo CD?
Argo CD is a Kubernetes-native GitOps controller that:
- Continuously compares your Git repo with your cluster.
- Syncs changes automatically or on demand.
- Supports plain YAML, Helm, and Kustomize.
- Provides both a CLI and a web UI.
- Includes built-in audit logs, RBAC, and health checks.
Think of it this way: GitOps defines what you want; Argo CD makes sure its delivered
Preparing Your System
Before diving in, make sure you’ve got:
- A running Kubernetes cluster (local like minikube or k3s, or cloud-based).
kubectlinstalled and configured to talk to your cluster.- A Git repo holding your application manifests—or templates if you’re using Helm or Customize
Install Argo CD
1. Create a namespace for Argo CD:
Let’s start off by installing Argo CD. To do this, we’ll first create a new namespace, argocd
, where Argo CD services and application resources will live.
kubectl create namespace argocd Next, let’s apply our resource configuration file on the argocd namespace we just created.
2. Install Argo CD in that namespace:
kubectl apply -n argocd -f https://raw.githubusercontent.com/argoproj/argo-cd/stable/manifests/install.yaml
3. Check pod status:
Once your installation completes, you can use the watch command to check the status of your Kubernetes pods and make sure they are ready.
watch kubectl get pods -n argocd
Since we are using a stock Argo CD installation, you should see five pods with a Running status.

You should see all Argo CD pods in Running status. Press Ctrl+C to stop watching.
Accessing the Argo CD API Server
By default, the Argo CD API server is not assigned an external IP. For this guide, we’ll connect to it using kubectl port-forwarding, which allows access without exposing the service publicly.
Run the following command:
kubectl port-forward svc/argocd-server -n argocd 8080:443
This forwards local port 8080 to port 443 of the argocd-server service in the argocd namespace. You can now access the API server at localhost:8080.
Note: Port-forwarding is intended for local development or demos, not production use.
Other ways to access the API server include using a Service of type LoadBalancer or configuring an Ingress. For more details on these methods.
Download Argo CD CLI
With Argo CD installed and accessible, the next step is logging in. You can do this through either the web UI or the CLI, both offer similar capabilities. The CLI is especially useful for changing settings and quickly deploying applications, while the UI provides a more visual approach. In practice, it’s common to use both depending on the task, and we’ll be using both in this guide.
- For cross-platform convenience (Linux, macOS, ), Homebrew is often the easiest installation method. To install the Argo CD CLI with Homebrew, run:
brew install argocd
- After installation, verify it by running
argocd version
Login Using the CLI
We’ll log in to Argo CD using the admin account. The initial admin password is auto-generated and stored as plain text in a Kubernetes secret named argocd-initial-admin-secret within your namespace.
- Retrieve it with:
kubectl -n argocd get secret argocd-initial-admin-secret -o jsonpath=”{.data.password}” | base64 -d && echo
The && echo adds a newline, making the password easier to copy. Save this password for the next step. - Now log in with:
argocd login <ARGOCD_SERVER>
Replace <ARGOCD_SERVER> with the Argo CD IP or hostname. If you set up port-forwarding earlier, use:
argocd login localhost:8080 - You’ll be prompted for a username (admin) and the password you retrieved earlier. The password won’t be visible as you type.
- Since the default password is stored in plain text, it’s best to change it immediately:
argocd account update-password - You’ll be asked for your current password, the new password, and to confirm the new password. Store the new password securely for future use.
Create Your First Application
To demonstrate how Argo CD works, we’ll create an application using an example guestbook app from this repository:
https://github.com/argoproj/argocd-example-apps.git
As mentioned earlier, you can create applications either via the UI or the CLI,use whichever you prefer. When learning something new, I recommend starting with the UI to get a better feel for the options available. So, let’s begin by creating our app through the UI.
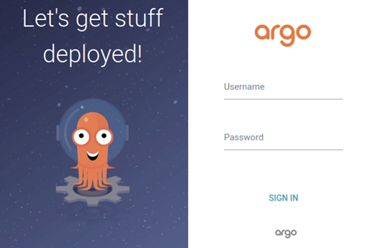
Creating Apps Via UI Open a browser to the Argo CD external UI by visiting localhost:8080 and login using the admin credentials we set up earlier. Your login page should look similar to this
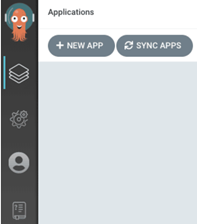
click the “+ New App” button as below:
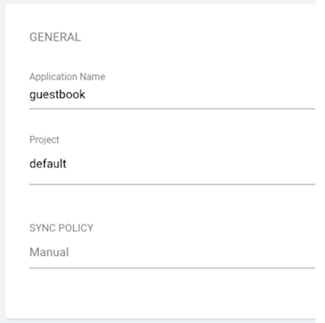
Give your app the name guestbook, select the project default, and set the sync policy to Manual (leave it as the default)
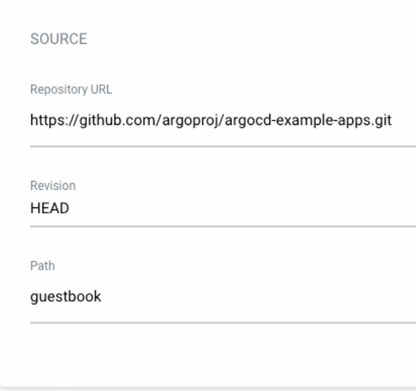
Connect the repository by setting:
Path: guestbook
Repository URL: https://github.com/argoproj/argocd-example-apps.git
Revision: HEAD (leave as default)
For Destination, set:
Namespace: default
Cluster: in-cluster
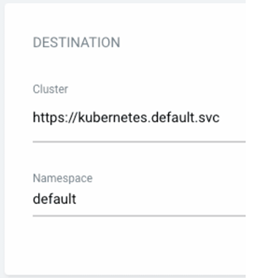
We use in-cluster because when deploying inside the same cluster where Argo CD runs, the application connects to the Kubernetes API server at the hostname https://kubernetes.default.svc.
Once you’ve filled out all the details, click Create at the top of the UI to create the guestbook application.
Creating Apps Via CLI
We can create that same app using the CLI

argocd app create guestbook --repo https://github.com/argoproj/argocd-example-apps.git --path guestbook --dest-server https://kubernetes.default.svc --dest-namespace default
Sync (Deploy) The Application
Syncing via UI
After creating the guestbook application, you can now view its status in the Argo CD UI. From here, you can manually Sync (deploy) the application to apply the desired state to the cluster.
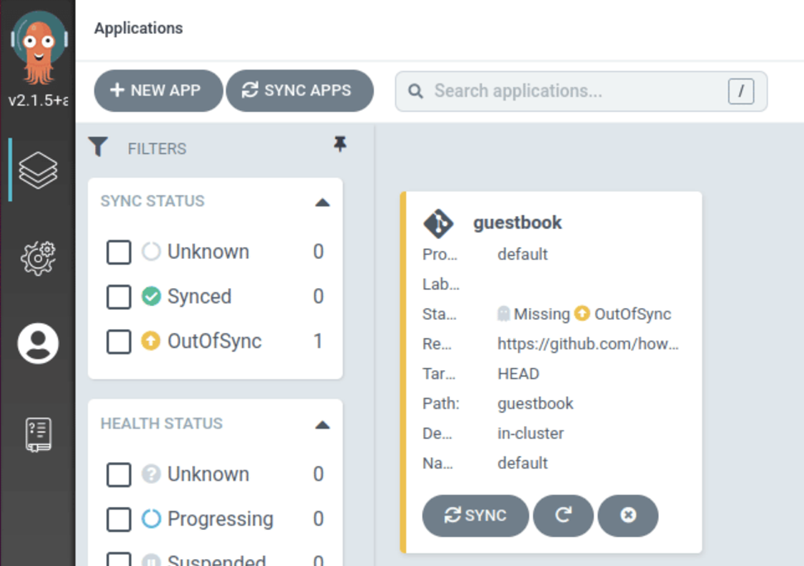
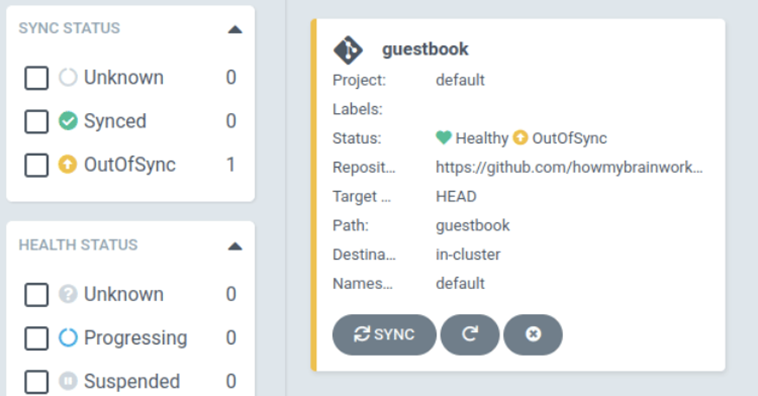
When you look at the application status, you’ll notice it shows OutOfSync! This means the Git state and the cluster state don’t match yet.
In the UI, OutOfSync status is usually highlighted in yellow and can be filtered from the dashboard sidebar. Exploring the dashboard can help you find the view that works best for you.
Initially, the application is OutOfSync because it hasn’t been deployed yet—no Kubernetes resources exist in the cluster.
To deploy, click the Sync button. This will open a second set of options—select Synchronize to start the deployment.
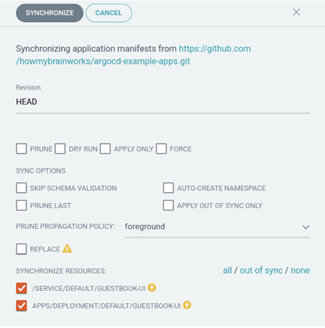
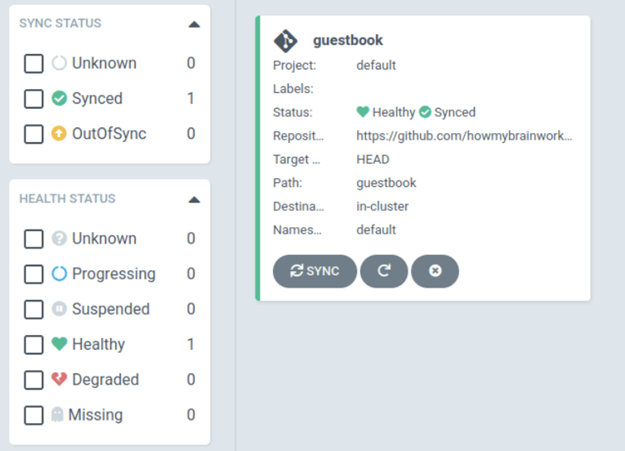
Synchronizing is how we deploy the application. When you Sync or Synchronize, you update the cluster state to match the Git state, this is a core principle of GitOps. After the sync completes, return to the dashboard, and you’ll see the guestbook app is now running. Click on the app to explore and review the details!
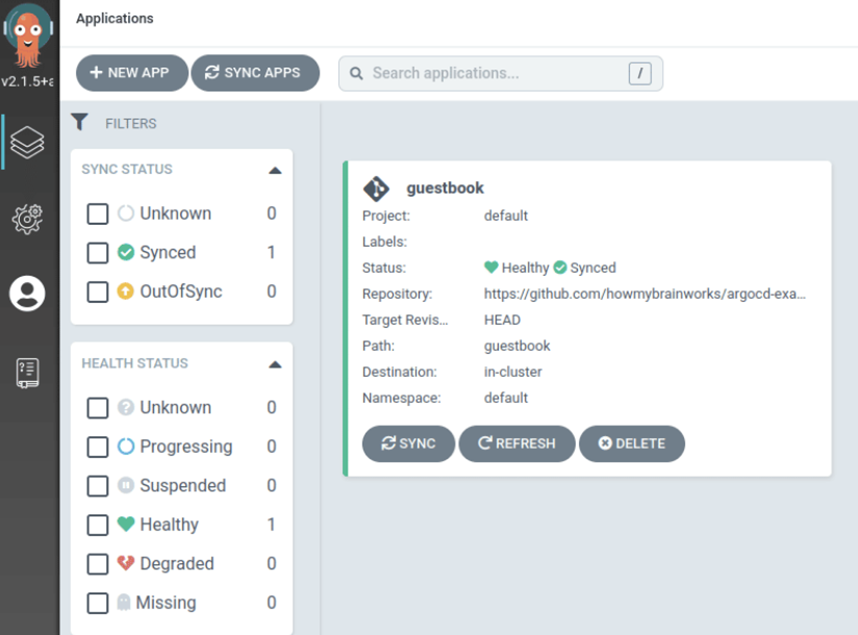
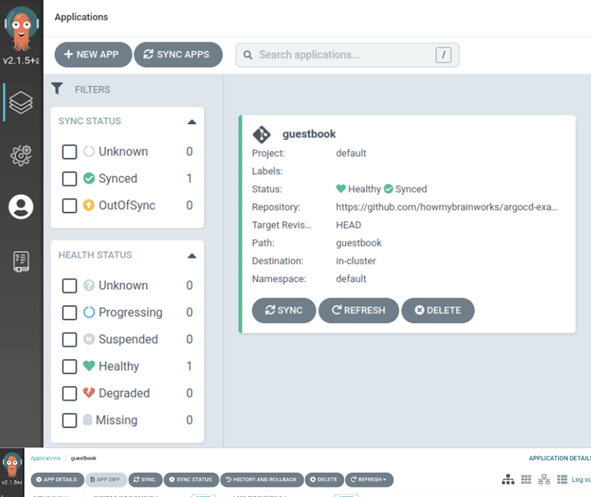
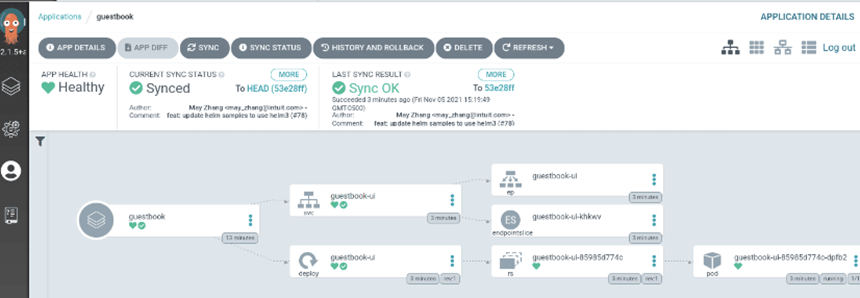
If you click on the application name, you’ll see a hierarchical view of all the Kubernetes resources involved in the application, along with details about their health and synchronization status.
Syncing via CLI
Everything you can do in the UI can also be done using the CLI. Since the guestbook application is created, you can check its status with:
argocd app get guestbook
argocd app get guestbook
Name:               guestbook
Project:            default
Server:             https://kubernetes.default.svc
Namespace:          default
URL:                https://localhost:8080/applications/guestbook
Repo:               https://github.com/howmybrainworks/argocd-example-apps.git
Target:
Path:               guestbook
SyncWindow:         Sync Allowed
Sync Policy:        <none>
Sync Status:        OutOfSync from  (13b08f1)
Health Status:      Missing
GROUP  KIND        NAMESPACE  NAME
STATUS     HEALTH   HOOK  MESS
Service     default    guestbook-ui  OutOfSync  Miss
apps   Deployment  default    guestbook-ui  OutOfSync  Missin
If you check the Sync Status, you’ll see the application is initially OutOfSync because it hasn’t been deployed yet and no Kubernetes resources exist.
To sync (deploy) the application, run:
argocd app sync guestbook
Modifying and Redeploying the Application
This is where Argo CD really starts to shine
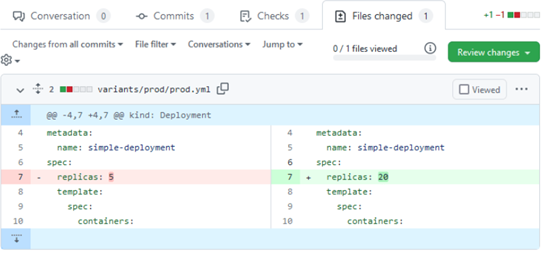
We’ll make a small but meaningful change: scaling our application. In the deployment.yaml file, we’ll update the number of replicas from 5 to 20.
Since we’re working in a GitOps way, this change isn’t just made directly in the cluster. Instead, we commit the updated configuration to our Git repository. This ensures everything stays declarative and version-controlled , plus, it’s a great way to track and highlight configuration drift.
Once the commit is pushed, Argo CD immediately notices something’s different. The application’s status changes to OutOfSync, letting us know that what’s running in the cluster doesn’t match what’s defined in Git.
Not only does Argo CD flag that our application is OutOfSync, but it also gives us a handy “App Diff” view that shows exactly what changed.
Just click on the application name in the UI, and at the top of the page, you’ll see the App Diff option. This side-by-side comparison makes it crystal clear what’s different between what’s running in the cluster and what’s defined in Git, perfect for catching mistakes or verifying intended changes before resyncing.

Now, switch to Compact Diff mode. It trims down the noise and lets you spot changes right away. In our case, it’s easy to see the exact update we made , the replica count has gone from 5 to 20.
From here, it’s the same process as before , just hit the Sync button, and Argo CD will redeploy the application using the updated configuration.
A few moments later, our app is back to a Healthy state, now running with the new replica count. Simple, fast, and fully in line with GitOps principles.
Resyncing (redeploying) via CLI
Now, let’s try something different ,we’ll scale down the application, but this time using kubectl instead of editing the Git repo.
We’ll reduce the replicas from 20 back to 1 with a simple command:
kubectl scale --current-replicas=20 --replicas=1 deployment/guestbook-ui
Follow the same steps as above to retrieve our application status using

 argocd app get guestbook
Name: guestbook
Project: default
Server: https://kubernetes.default.svc
Namespace: default
URL: https://localhost:8080/applications/guestbook
Repo: https://github.com/howmybrainworks/argocd-example-apps.git
Target:
Path: guestbook
SyncWindow: Sync Allowed
Sync Policy: <none>
Sync Status: OutOfSync from (13b08f1)
Health Status: Healthy
GROUP KIND NAMESPACE NAME STATUS HEALTH HOOK MESSAGE
Service default guestbook-ui Synced Healthy service/guestbook-ui created
apps Deployment default guestbook-ui OutOfSync Healthy deployment.apps/guestbook-ui created
If you check the output from the CLI, you’ll see it ,we’re OutOfSync again.
argocd app diff guestbook
===== apps/Deployment default/guestbook-ui ======
109c109
<   replicas: 1
--
>   replicas: 20
Verify now
Run the sync command once again to deploy:
argocd app sync guestbook
Wrapping Up
With Argo CD in place, you’ve got:
- Version-controlled Kubernetes deployments.
- Automatic drift detection.
- Easy rollbacks and reproducibility.
This is Continuous Delivery with GitOps in action , less manual work, more reliable releases.
——————— EnD————————-