
In the fast-paced digital world, interactive AI solutions are transforming the way users interact with websites. This blog showcases how to integrate Amazon Lex into a web interface using Streamlit and how to implement a serverless backend with AWS Lambda. The specific use case here is a Job Interview Advisor Chatbot that provides personalized interview tips based on job roles and industries.
Use Case Overview:
The chatbot allows users to receive tailored interview preparation tips by interacting in natural language. The process involves:
- Accepting user inputs such as job roles and industries using Amazon Lex for intent recognition and slot filling.
- Using Amazon Bedrock to generate detailed interview tips with Titan’s natural language processing.
- Website built Streamlit to mimic a typical website that gives job interview tips.

Architectural diagram of Job Interview Advisor Use case
The workflow for the Job Interview Tip Advisor project unfolds as follows:
- User Interaction with Amazon Lex: Users begin by interacting with a chatbot embedded in the client’s website, powered by Amazon Lex. This conversational AI bot guides users to phrase their requests in a structured way it understands, such as, “I need interview tips for an Accountant role in the Finance industry,” “Help me prepare for an interview for the Software Engineer position in the Tech field,” or “Can you provide tips for a Marketing Specialist in the Marketing sector?” This ensures the chatbot effectively interprets and processes the user’s intent.
- Request Fulfillment via Lambda: Upon identifying the user’s request, Amazon Lex seamlessly invokes a Lambda function, enabling dynamic fulfillment and backend processing.
- Fetching User Preferences and Generating Tips: The Lambda function extracts the user’s specified job role and industry preferences. It then leverages the generative AI capabilities of Amazon Bedrock’s Amazon Titan T1 Express model to produce tailored and insightful interview tips.
- Streamlit Web Application for Demonstration: The interaction between the user and the bot is elegantly showcased through a Streamlit-powered web interface, providing a clean and user-friendly demonstration of the entire system.
Prerequisites
Before you begin you need:
- An aws account with a full administrative privileges
- Python runtime environment
- AWS Command Line Interface (CLI)
Step 1: Create IAM User
The job interview advisor application will programmatically access Amazon Lex to capture user intent. To enable this, you need to create an IAM user with the appropriate permissions. This ensures secure and authorized access to the service.
- In the navigation pane, choose Users.
- In the list, choose the name of the user and click Next.
- Select the ‘Attach policies directly’ option. In the Permissions Policies section, search for and choose the ‘AmazonLexFullAccess’
- Click ‘Next,’ review, and confirm the permission addition.
- Create the User by clicking ‘Create user’.
Step 2: Generate Access Key
To generate an Access Key for the user
- Go to the security credentials tab, scroll down to the “Access keys” section
- In the Access keys section, choose Create access key.
- On the Access key best practices & alternatives page, choose “Command Line Interface (CLI)” tick the “I understand the above recommendation and want to proceed to create an access key.” check box and then click Next.
- On the Retrieve access keys page, choose either Show to reveal the value of your user’s secret access key, or Download .csv file. This is your only opportunity to save your secret access key. After you’ve saved your secret access key in a secure location, choose Done.
Step 3: Initialize Python Application and Install the necessary packages
Now that we have all aws config setups completed we can now create our Python app. This step assumes you have Python installed and running.
- Open Windows Command Prompt
- CD into your chosen project directory
- Install the boto3 package, the AWS SDK for Python
- Install Streamlit library
pip install boto3 Streamlit (installs the two packages in one go)
Note: The boto3 package is a Python library provided by Amazon Web Services
(AWS) to interact with various AWS services programmatically.
Step 4: Set up authentication details
At this point, we are setting up our application to interact with AWS services. To achieve this, we’ll be configuring our AWS Command Line Interface (CLI) with the credentials of the user we’ve already created. Assuming you have the AWS CLI installed, we prefer configuring the user credentials through the CLI rather than hard-coding them into our code. This approach enhances security, as storing sensitive credentials directly in the code is not recommended. Following the AWS credentials provider chain, the AWS SDK will automatically search and use the credential within the AWS CLI, ensuring that our application can securely access AWS bedrock.
- Open the command prompt and initiate the user configuration by entering the command “aws configure.”
- Enter the Access Key ID.
- Provide the Secret Access Key.
- Specify the Region.

Setting up aws CLI with IAM user credentials
Step 5: Create an Amazon Lex V2 Bot
- Access the Amazon Lex V2 Console: Log in to the Amazon Lex V2 Console and click “Create bot”.
- Choose Bot Creation Method: Select the ‘Traditional’ tab under the bot creation methods.
- Select Bot Type: Click ‘Create a blank bot’.
- Configure Bot Details:
- Bot Name: JobInterviewTipsBot
- Description: “A bot to provide job interview tips based on role and industry.”
- Set IAM Permissions: Opt for ‘Create a role with basic Amazon Lex permissions’ to grant the bot the required access.
- COPPA Compliance: Choose the appropriate Children’s Online Privacy Protection Act (COPPA) option for your application.
- Session Timeout: Retain the default Idle session timeout of 5 minutes and click Next.
- Language Configuration: Keep the default language settings during the ‘Add language to bot’ step and click Done.

Screenshot of Amazon Lex’s Bot creation page.
Step 6: Add an Intent to the Bot
An intent in Amazon Lex represents a specific goal or purpose that a user wants to achieve through their interaction with the bot. For example, in a flight-booking bot, an intent could be “BookFlight” or “CheckFlightStatus”. Each intent is defined by the bot developer and includes associated utterances, which are sample phrases users might say to trigger the intent (e.g., “I want to book a flight”).
- Navigate to Intents Section: From the left navigation panel, go to Intents and click “Create Intent”.
- Define Intent Details:
- Intent Name: JobTipsIntent
- Sample Utterances: Add the following examples:
- “I need interview tips for a {JobRole} in {Industry}.”
- “Can you provide tips for a {JobRole} in the {Industry} industry?”
- “Help me prepare for an interview as a {JobRole} in {Industry}.”
- Save the intent.
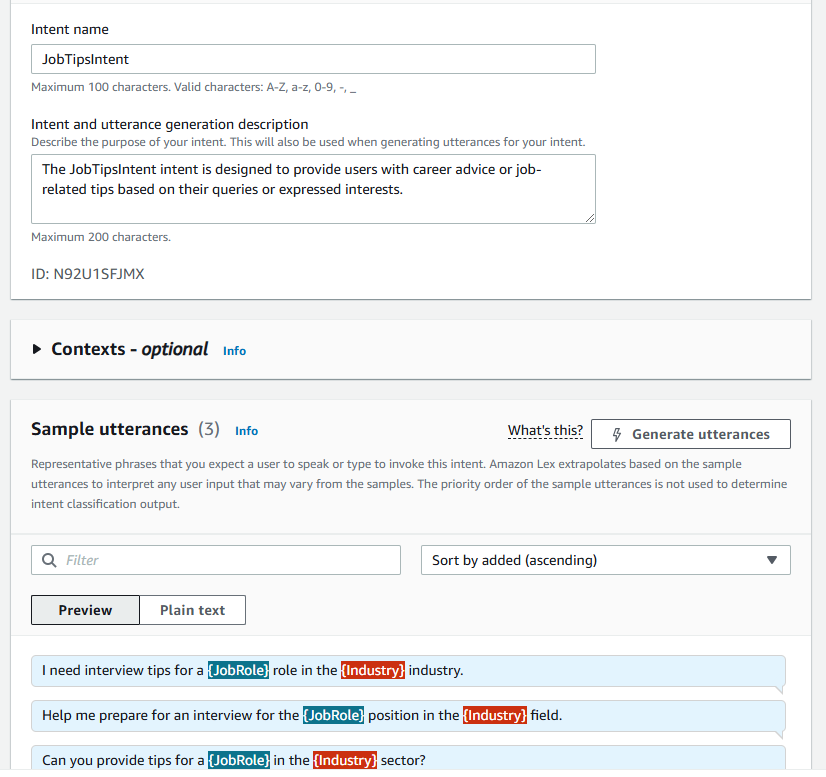
Screenshot of Amazon Lex’s Intent creation page.
- Return to Intents List: Click ‘Back to intents list’ in the left navigation panel.
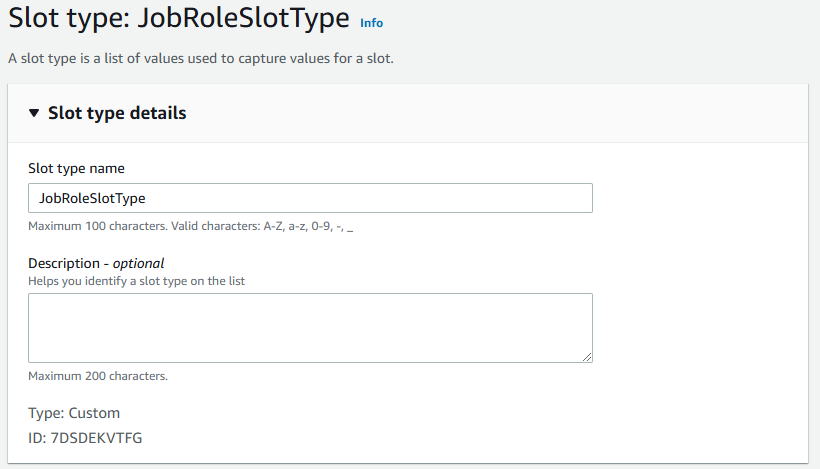
- Create Slot Types:
A slot is a data placeholder within an intent that collects specific pieces of information needed to complete the user’s request. For example, in the “BookFlight” intent, slots might include “departure city”, “destination city”, and “travel date”. Slots allow the bot to guide the conversation and capture required details.
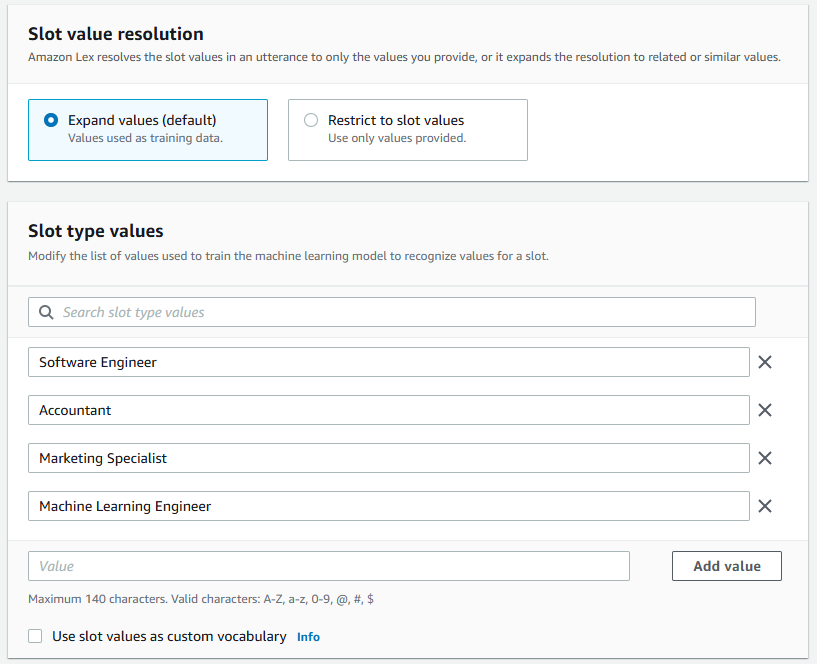
A slot type defines the kind of data a slot can accept, such as a predefined set of values (e.g., a list of cities) or free-form text. Amazon Lex provides built-in slot types (e.g., AMAZON.DATE, AMAZON.NUMBER) and also allows you to create custom slot types tailored to your use case. We will define custom slot types for this project “JobRoleSlotType” and “IndustrySlotType”
- Navigate to Slot Types and select ‘Add blank slot type’ from the ‘Add slot type’ options.
- JobRoleSlotType:
- Name: JobRoleSlotType
- Add values such as “Software Engineer,” “Accountant,” etc., using the ‘Add value’ button. Save the slot type.
- IndustrySlotType:
- Name: IndustrySlotType
- Add values like “Tech,” “Finance,” etc. Save the slot type.
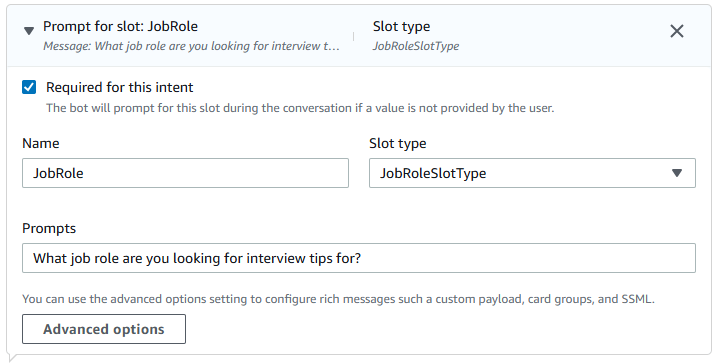
- Assign Slots to Intent:
- Return to Intents and open the JobTipsIntent.
- Scroll down to the ‘Slots’ section and click ‘Add slot’.
- For each slot:
- Slot Name: JobRole or Industry
- Slot Type: Select the corresponding JobRoleSlotType or IndustrySlotType.
- Prompt:
- For JobRole: “What job role are you looking for interview tips for?”
- For Industry: “Which industry is this role related to?”
- Click Add to finalize each slot.
Screenshot of Amazon Lex’s Slot type definition page.
Screenshot of Amazon Lex’s Slot configuration modal.
- Configure Confirmation Options:
- Navigate to the Confirmation section and activate it.
- Click on Advanced options, then in the Confirmation options modal:
- Scroll down to the Dialog code hook section.
- Activate the ‘Invoke Lambda function’ checkbox.
- Click Update options to save the changes.
- Set Fulfillment Options:
- Go to the Fulfillment section and activate it.
- Click on Advanced options, then in the Fulfillment advanced options modal:
- Check the ‘Use a Lambda function for fulfillment’ checkbox.
- Click Update options to save the configuration.
- Enable Initialization and Validation:
- In the Code Hooks section, check the ‘Use a Lambda function for initialization and validation’ checkbox.
- Save Intent and Build the Bot:
- Click Save intent to finalize the intent configuration.
- Build the bot and test it.
Step 7: Python implementation of a Lambda Function
This function calls an AWS Bedrock Foundation Model using user preferences from Amazon Lex and delivers the generated job interview tips to a Streamlit website
import json
import boto3
from botocore.exceptions import BotoCoreError, ClientError
bedrock_client = boto3.client('bedrock-runtime', region_name='us-east-1')

def lambda_handler(event, context):
    try:
        job_role = event['sessionState']['intent']['slots']['JobRole']['value']['interpretedValue']
        industry = event['sessionState']['intent']['slots']['Industry']['value']['interpretedValue']
        prompt = (
            f"Provide detailed interview tips for a {job_role} role in the {industry} industry. "
            "Focus on key skills, preparation strategies, and example questions."
        )

        response = bedrock_client.invoke_model(
            modelId='amazon.titan-text-express-v1',
            accept='application/json',
            contentType='application/json',
            body=json.dumps({"inputText": prompt})
        )

        response_body = response['body'].read().decode('utf-8')
        response_data = json.loads(response_body)
        results = response_data.get('results', [])

        if results and 'outputText' in results[0]:
            generated_content = results[0]['outputText']
        else:
            generated_content = "Sorry, no meaningful response was generated."

        return {
            "sessionState": {
                "dialogAction": {
                    "type": "Close"
                },
                "intent": {
                    "name": event['sessionState']['intent']['name'],
                    "state": "Fulfilled"
                }
            },

            "messages": [
                {
                    "contentType": "PlainText",
                    "content": generated_content
                }
            ]
        }

    except ClientError as e:
        error_message = f"ClientError: {e.response['Error']['Message']}"
        print(error_message)
        return {
            "sessionState": {
                "dialogAction": {
                    "type": "Close"
                },
                "intent": {
                    "name": event['sessionState']['intent']['name'],
                    "state": "Failed"
                }
            },
            "messages": [
                {
                    "contentType": "PlainText",
                    "content": error_message
                }
            ]
        }

    except Exception as e:
        print(f"Error: {str(e)}")
        return {
            "sessionState": {
                "dialogAction": {
                    "type": "Close"
                }
            },
            "messages": [
                {
                    "contentType": "PlainText",
                    "content": f"An unexpected error occurred: {str(e)}"
                }
            ]
        }
Let’s break down the key sections of the Lambda Function.
Imports and Initialization:
import json
import boto3
from botocore.exceptions import BotoCoreError, ClientError
bedrock_client = boto3.client('bedrock-runtime', region_name='us-east-1')
Imports and Initialization:
the code starts by importing
- The json module, which is used for JSON encoding and decoding.
- boto3 library, which is used to interact with AWS services.
- The exceptions to handle AWS service-specific errors.
Event Processing:
def lambda_handler(event, context):
    try:
        job_role = event['sessionState']['intent']['slots']['JobRole']['value']['interpretedValue']
        industry = event['sessionState']['intent']['slots']['Industry']['value']['interpretedValue']
Here, “event [‘sessionState’][‘intent’][‘slots’]” tries to extract the slot values (job role and industry) provided by the user via Lex. These slots are mapped in the Lex bot design.
Generating a Prompt for Bedrock:
prompt = (
            f"Provide detailed interview tips for a {job_role} role in the {industry} industry. "
            "Focus on key skills, preparation strategies, and example questions."
        )
Here a descriptive prompt is crafted to instruct the Titan model to generate specific interview advice.
Calling Amazon Bedrock:
response = bedrock_client.invoke_model(
            modelId='amazon.titan-text-express-v1',
            accept='application/json',
            contentType='application/json',
            body=json.dumps({"inputText": prompt})
        )
This code snippet sends a text prompt to the Amazon Titan model using the invoke_model method of the bedrock_client. Specifically, it utilizes the amazon.titan-text-express-v1 model, which is designed for text generation tasks. The accept and contentType parameters are set to application/json to indicate the format of the request and expected response. The body parameter contains the serialized JSON payload with the input text, defined in the prompt variable. Once the method is invoked, it returns a response that includes the generated text, which can be further processed or utilized in the application.
Handling and Returning Responses:
response_body = response['body'].read().decode('utf-8')
        response_data = json.loads(response_body)
        results = response_data.get('results', [])
        if results and 'outputText' in results[0]:
            generated_content = results[0]['outputText']
        else:
            generated_content = "Sorry, no meaningful response was generated."

        return {
            "sessionState": {
                "dialogAction": {
                    "type": "Close"
                },
                "intent": {
                    "name": event['sessionState']['intent']['name'],
                    "state": "Fulfilled"
                }
            },
            "messages": [
                {
                    "contentType": "PlainText",
                    "content": generated_content
                }
            ]
        }
The above code snippet processes the response from the Amazon Titan model by reading and decoding the response body, then parsing it as JSON. It extracts the results array and checks if it contains the expected outputText. If outputText is present, it assigns the generated text to generated_content; otherwise, it defaults to an error message. Finally, it constructs and returns a response for Amazon Lex, marking the intent as fulfilled and including the generated content as a message to be displayed to the user.
Step 9 : Integration of Amazon Lex with a Website
import streamlit as st
import boto3

lex_client = boto3.client(
    'lexv2-runtime',
    region_name='us-east-1',
)

bot_id = '<our_bot_id>'
bot_alias_id = '<our_bot_alias_id>'
locale_id = 'en_US'

st.set_page_config(page_title="Amazon Lex Chatbot", layout="wide")
st.title("Job Interview Tips Chatbot")
st.write("Ask for interview tips for specific roles and industries.")

if "messages" not in st.session_state:
    st.session_state.messages = []
st.markdown(
    """
    <style>
        .chat-container {
            max-width: 700px;
            margin: auto;
        }
        .chat-message {
            display: flex;
            margin-bottom: 10px;
        }
        .chat-message.user {
            justify-content: flex-end;
        }
        .chat-bubble {
            max-width: 80%;
            padding: 10px;
            border-radius: 10px;
            margin: 5px;
            color: black;
        }
        .chat-bubble.user {
            background-color: #DCF8C6;
            text-align: right;
        }
        .chat-bubble.bot {
            background-color: #E0E0E0;
            color: black;
        }
    </style>
    """,
    unsafe_allow_html=True,
)

for msg in st.session_state.messages:
    align_class = "user" if msg["sender"] == "user" else "bot"
    st.markdown(
        f"""
        <div class="chat-message {align_class}">
            <div class="chat-bubble {align_class}">
                {msg['content']}
            </div>
        </div>
        """,
        unsafe_allow_html=True,
    )

input_key = f"input_{len(st.session_state.messages)}"
user_message = st.text_input("Type your message:", key=input_key)

if user_message:
    st.session_state.messages.append({"sender": "user", "content": user_message})
    try:
        response = lex_client.recognize_text(
            botId=bot_id,
            botAliasId=bot_alias_id,
            localeId=locale_id,
            sessionId="test-session",
            text=user_message,
        )

        bot_message = response["messages"][0]["content"]
        st.session_state.messages.append({"sender": "bot", "content": bot_message})

    except Exception as e:
        st.session_state.messages.append(
            {"sender": "bot", "content": f"Error: {str(e)}"}
        )

    st.experimental_rerun()
Let’s break down the key sections of the streamlit website code
Imports:
import streamlit as st
import boto3
The code begins by importing the Streamlit library as st, which is used to build the user interface for the application. It also imports the boto3 library to interact with AWS services.
Amazon Lex Client Initialization:
lex_client = boto3.client(
    'lexv2-runtime',
    region_name='us-east-1',
)

bot_id = '<our_bot_id>'
bot_alias_id = '<our_bot_alias_id>'
locale_id = 'en_US'
This code initializes a client for Amazon Lex V2 Runtime using the boto3 library, specifying the region (us-east-1) where the Lex bot is deployed. It also defines key identifiers for interacting with the Lex bot: ‘bot_id’ for the bot, ‘bot_alias_id’ for the specific alias or version of the bot, and ‘locale_id’ to indicate the language locale (en_US for English). These parameters enable subsequent API calls to communicate with the specified Lex bot.
Steps to Retrieve bot_id, bot_alias_id, and locale_id:
- Navigate to Amazon Lex V2 Console:
- Go to the Amazon Lex V2 Console.
- Find our Bot:
- Under “Bots”, click on our bot’s name.
- bot_id:
- In the bot’s detail page URL, find the bot_id. It’s also displayed in the bot’s properties.
- bot_alias_id:
- Navigate to the “Aliases” tab, and find the alias for our bot. The alias ID is displayed there.
- locale_id:
- Check the “Languages” section of our bot’s configuration. The language locale ID (e.g., en_US) will be listed there.
UI Setup:
st.set_page_config(page_title="Amazon Lex Chatbot", layout="wide")
st.title("Job Interview Tips Chatbot")
st.write("Ask for interview tips for specific roles and industries.")
This code defines the page title and layout. It also provides context about the chatbot’s purpose.
Storing Chat History:
if "messages" not in st.session_state:
    st.session_state.messages = []
This code snippet maintains chat state across user inputs.
for msg in st.session_state.messages:
    align_class = "user" if msg["sender"] == "user" else "bot"
    st.markdown(
        f"""
        <div class="chat-message {align_class}">
            <div class="chat-bubble {align_class}">
                {msg['content']}
            </div>
        </div>
        """,
        unsafe_allow_html=True,
    )
The code iterates through the chat history stored in st.session_state.messages, where each message contains a sender (user or bot) and its content. For each message, it determines the CSS class (user or bot) based on the sender and uses Streamlit’s st.markdown to render the message in a styled HTML format, ensuring the chat bubbles are visually distinct for the user and the bot. The unsafe_allow_html=True flag enables rendering of custom HTML for the chat interface.
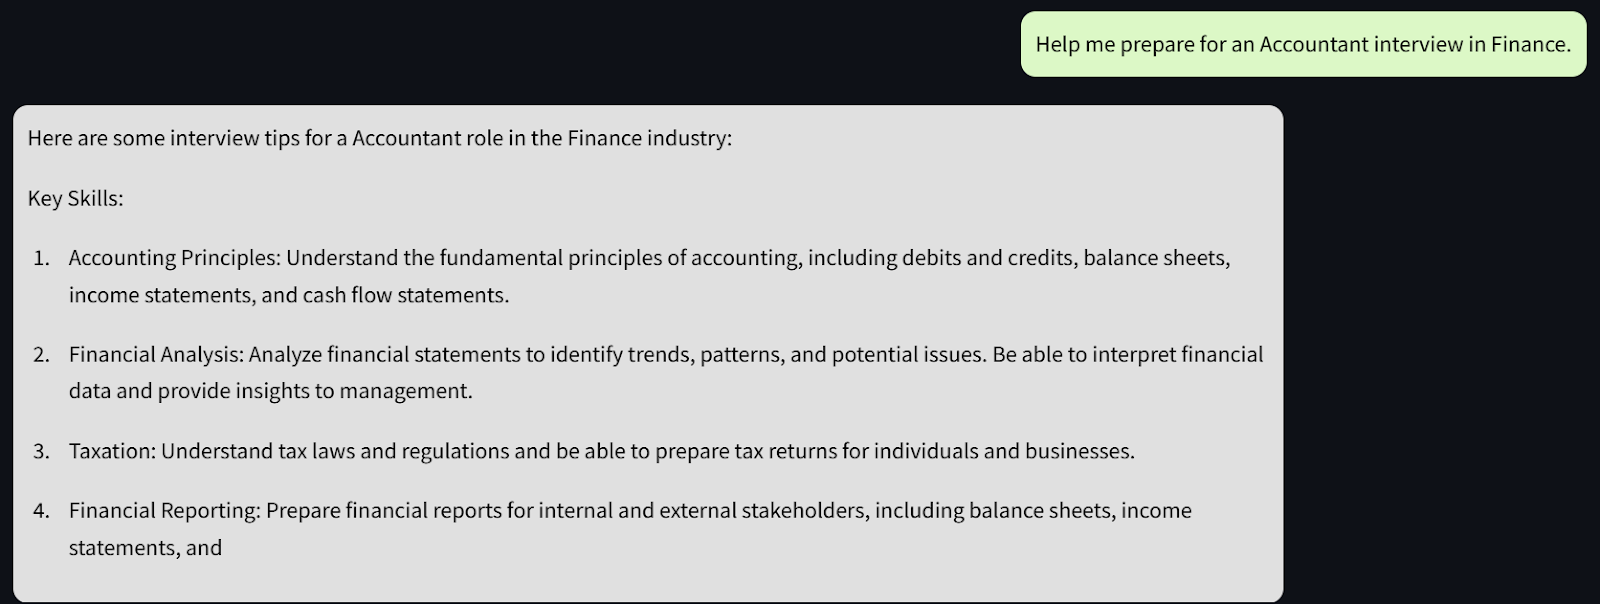
Sample output:
Sending User Input to Lex:
user_message = st.text_input("Type your message:", key=input_key)

if user_message:
    st.session_state.messages.append({"sender": "user", "content": user_message})

    try:
        response = lex_client.recognize_text(
            botId=bot_id,
            botAliasId=bot_alias_id,
            localeId=locale_id,
            sessionId="test-session",
            text=user_message,
        )
        bot_message = response["messages"][0]["content"]
        st.session_state.messages.append({"sender": "bot", "content": bot_message})

    except Exception as e:
        st.session_state.messages.append(
            {"sender": "bot", "content": f"Error: {str(e)}"}
        )
The above code snippet captures user input through a text input field labeled “Type our message:” using Streamlit. If the we have provided a message, it is added to the chat history stored in ‘st.session_state.messages’ with the sender labeled as “user.” The code then sends this message to an Amazon Lex bot using the ‘recognize_text’ method, specifying the bot ID, alias ID, locale, session ID, and the user’s text. The bot’s response is extracted from the response object and added to the chat history with the sender labeled as “bot.” If an error occurs during the interaction, an error message is recorded in the chat history instead.
Conclusion
Integrating Amazon Lex with AWS Lambda provides a robust, serverless architecture for building conversational AI solutions. In this example, we’ve created a Job Interview Advisor Chatbot that leverages Amazon Bedrock for generating detailed advice.
This integration showcases the power of combining AWS services to deliver intelligent, scalable, and user-friendly experiences.