
Integrating AWS Bedrock AI Models into Your Python App
There might be many cases in which you might want to integrate generative AI capabilities into your application. One way to do this is by leveraging aws bedrock APIs. Amazon Bedrock is a fully managed service that offers a choice of high-performing foundation models (FMs) from leading AI companies like AI21 Labs, Anthropic, Cohere, Meta, Stability AI, and Amazon via a single API, along with a broad set of capabilities you need to build generative AI applications with security, privacy, and responsible AI.
In this blog post, I will lead you through the process of setting up AWS bedrock and connecting it to a python application for running inferences. I will show you how you can create a simple python function that does some inference and returns result when it is invoked. I will be using the AWS’s “’Titan Text G1 – Lite’” model for this demonstration.
Prerequisites
Before you begin you need:
- An aws account with a full administrative privileges
- Python runtime environment
- AWS Command Line Interface (CLI)
Step 1 : Create an IAM User
Our Python application will programmatically access AWS Bedrock to execute inferences using the ‘Titan Text G1 – Lite’ model. To achieve this, the application uses an IAM user. In this step we will create that IAM user.
To create an IAM user
- Navigate to the Identity Access Management (IAM) Console.
- Go to the Users link in the left side navigation panel
- Click Create User, and proceed with the outlined steps.
Step 2 : Authorize the user to access the AWS Bedrock service
After creating the user, it is necessary to grant them access to AWS Bedrock.
To configure permissions
- In the navigation pane, choose Users.
- In the list, choose the name of the user you have created earlier.
- Choose the Permissions tab.
- Locate the Permissions Policies section, and choose the ‘Add Permissions’ dropdown, followed by clicking the ‘Add Permissions’ button.
- Select the ‘Attach policies directly’ option. In the Permissions Policies section, search for and choose the AWS-managed policy ‘AmazonBedrockFullAccess,’ click ‘Next,’ review, and confirm the permission addition.
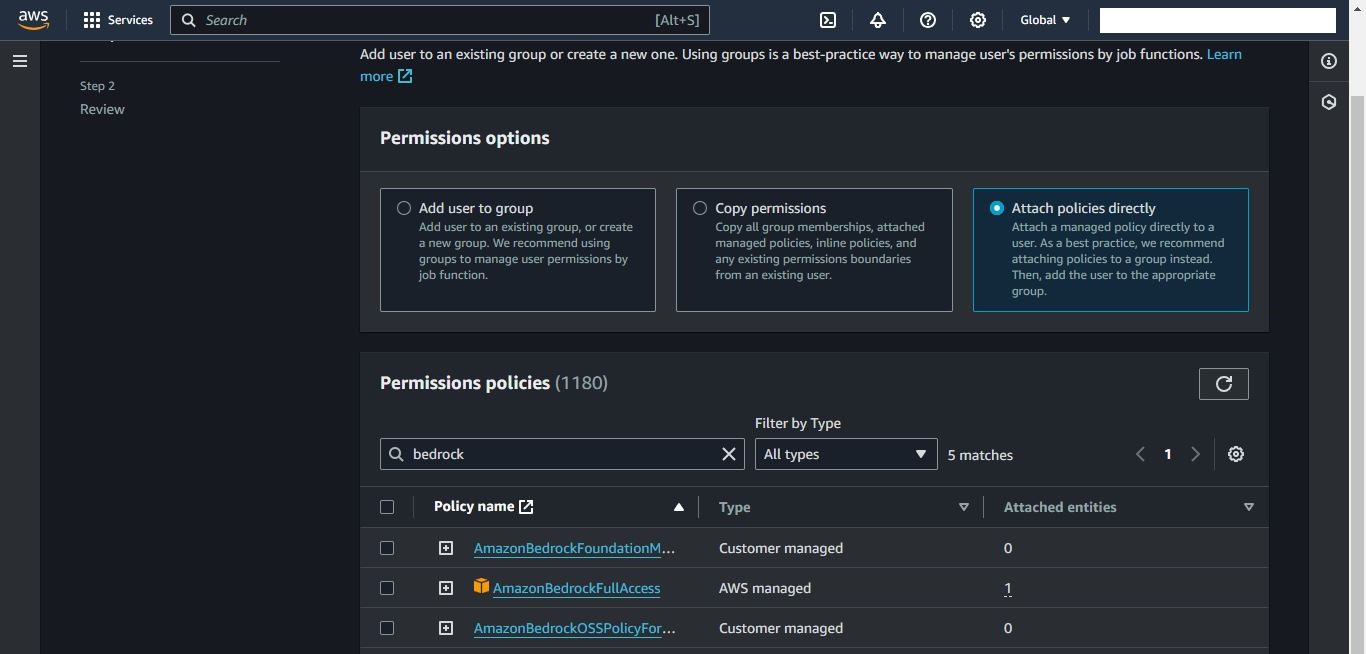
Screenshot of the IAM console’s Add permission page
Step 3 : Generate Access Key
To generate an Access Key for the user
- Go to the security credentials tab, scroll down to the “Access keys” section
- In the Access keys section, choose Create access key.
- On the Access key best practices & alternatives page, choose “Command Line Interface (CLI)” tick the “I understand the above recommendation and want to proceed to create an access key.” check box and then click Next.
- On the Retrieve access keys page, choose either Show to reveal the value of your user’s secret access key, or Download .csv file. This is your only opportunity to save your secret access key. After you’ve saved your secret access key in a secure location, choose Done.
Step 4 : Configure aws bedrock service to enable “’Titan Text G1 – Lite’” model access
Amazon Bedrock users need to request access to models before they are available for use. Model access can be managed only in the Amazon Bedrock console.
You can add access to a model in Amazon Bedrock with the following steps:
- Open the Amazon Bedrock console at Amazon Bedrock console
- Go to the Model access link in the left side navigation panel in Amazon Bedrock, or go to the Edit model access page.
- Select the check box next to the ‘Titan Text G1 – Lite’ model.
- Select the Save Changes button in the lower right corner of the page. It may take several minutes to save changes to the Model access page.

Screenshot of aws bedrock console’s request model access page.
Step 5 : Initialize Python Application and Install the necessary packages
Now that we have all aws config setups completed we can now create our python app. This step assumes you have python installed and running.
- Open Windows Command Prompt
- CD into you chosen project directory
- Install the boto3 package, the AWS SDK for Python
pip install boto3
Note: The boto3 package is a Python library provided by Amazon Web Services
(AWS) to interact with various AWS services programmatically. It allows you to
automate tasks, manage resources, and integrate AWS services into your Python
applications.
Step 6 : Set up authentication details
At this point, we are setting up our application to interact with AWS services. To achieve this, we’ll be configuring our AWS Command Line Interface (CLI) with the credentials of the user we’ve already created. Assuming you have the AWS CLI installed, we prefer configuring the user credentials through the CLI rather than hard-coding them into our code. This approach enhances security, as storing sensitive credentials directly in the code is not recommended. Following the AWS credentials provider chain, the AWS SDK will automatically search and use the credential within the AWS CLI, ensuring that our application can securely access AWS bedrock.
- Open the command prompt and initiate the user configuration by entering the command “aws configure.”
- Enter the Access Key ID.
- Provide the Secret Access Key.
- Specify the Region.
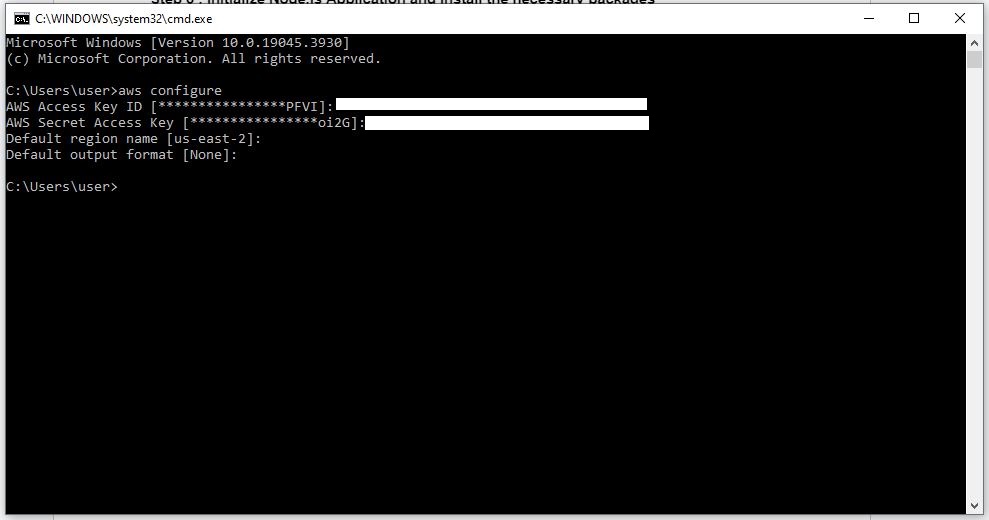
Screenshot of Windows command prompt window showing the process of aws user configuration
Step 7 : Write a Python code that does Inference
In this final step, I will demonstrate how you can make use of the python boto3 package to interact with AWS Bedrock and send basic requests.
- Create a new file named main.py.
- Paste the provided code into the main.py file.
import boto3
import json

MODEL_ID = 'amazon.titan-text-lite-v1'
ACCEPT = 'application/json'
CONTENT_TYPE = 'application/json'
REGION = 'us-east-1'

def ask_ai(question):
   brt = boto3.client(service_name='bedrock-runtime', region_name=REGION)
   body = json.dumps({
       "inputText": f"\n\nHuman: {question}",
       "textGenerationConfig": {
           "temperature": 0.5,
           "maxTokenCount": 512,
           "topP": 1,
       }
   })

   response = brt.invoke_model(body=body, modelId=MODEL_ID, accept=ACCEPT, contentType=CONTENT_TYPE)
   result_in_byte = (response.get('body').read())
   result = json.loads(str(result_in_byte, encoding='utf-8'))
   return result["results"][0]["outputText"]

print(ask_ai("Hi")) #prints Bot: Hello, how can I assist you today?
This code snippet is a python implementation using the AWS SDK for the Bedrock Runtime service. Here’s an explanation of the code:
Imports:
import boto3
import json
Here, the code imports the boto3 library, which is used to interact with AWS services, and the json module, which is used for JSON encoding and decoding.
Constant Declarations:
These lines define several constants:
MODEL_ID: Identifier for the deployed AI model.
MODEL_ID = 'amazon.titan-text-lite-v1'
ACCEPT = 'application/json'
CONTENT_TYPE = 'application/json'
REGION = 'us-east-1'
ACCEPT and CONTENT_TYPE: Specify the content type for HTTP requests sent to the model.
REGION: Specifies the AWS region where the model is deployed.
Function Definition – ask_ai:
def ask_ai(question):This line defines a function named ask_ai which takes a parameter question. This function will interact with the deployed AI model.
Function Body:
   brt = boto3.client(service_name='bedrock-runtime', region_name=REGION)
   body = json.dumps({
       "inputText": f"\n\nHuman: {question}",
       "textGenerationConfig": {
           "temperature": 0.5,
           "maxTokenCount": 512,
           "topP": 1,
       }
   })
Here, it constructs a JSON object containing the input text (the question) and some configuration parameters for text generation such as temperature, maxTokenCount, and topP.
Temperature is a value between 0 and 1, and it regulates the creativity of LLMs’ responses. Use lower temperature if you want more deterministic responses, and use higher temperature if you want more creative or different responses for the same prompt from LLMs on Amazon Bedrock. For all the examples in this prompt guideline, we set temperature = 0.
Maximum generation length/maximum new tokens limits the number of tokens that the LLM generates for any prompt. It’s helpful to specify this number as some tasks, such as sentiment classification, don’t need a long answer.
Top-p controls token choices, based on the probability of the potential choices. If you set Top-p below 1.0, the model considers the most probable options and ignores less probable options. The result is more stable and repetitive completions.
response = brt.invoke_model(body=body, modelId=MODEL_ID, accept=ACCEPT, contentType=CONTENT_TYPE)This line invokes the model using the invoke_model method of the Boto3 client. It passes the JSON body, model ID, accept type, and content type.
result_in_byte = (response.get('body').read())This line reads the response body and stores it as bytes.
result = json.loads(str(result_in_byte, encoding='utf-8'))Here, it decodes the response from bytes to a string and then parses it as JSON.
return result["results"][0]["outputText"]Finally, it returns the output text extracted from the parsed JSON response.
Main Code:
print(ask_ai("Hi"))This line calls the ask_ai function with the question “Hi” and prints the response received from the AI model.
Conclusion
In this blog post, I’ve tried to demonstrate the process of accessing the AWS Bedrock model from your Python application and performing inferences. By following the outlined steps, you can establish and incorporate AI functionality seamlessly into your Python application. This will allow you to incorporate AI capabilities into your application and leverage the advantages offered by AI functionalities.
