The cloud has become the cornerstone of modern IT infrastructure, offering unparalleled scalability, flexibility, and cost-effectiveness. However, migrating existing workloads from on-premises environments to cloud platforms can be a daunting task. This guide provides a comprehensive, step-by-step blueprint for migrating your virtual machines (VMs) from VMware to Amazon Web Services (AWS). By following this detailed tutorial, you’ll gain the confidence and expertise to successfully transition your applications to the cloud, unlocking the full potential of AWS.
Imagine a company, let’s call it “Sudo 2.0” which has been relying on VMware to manage its IT infrastructure. Over time, they realized the need for a more scalable solution to handle their growing needs and decided to migrate to AWS. However, the team was concerned about the complexities of such a migration—how to ensure a smooth transition without disrupting their ongoing operations? This is where our guide comes in, designed to equip you with the confidence and expertise needed to successfully transition your applications to the cloud, unlocking the full potential of AWS.
Prerequisites
Before we dive into the steps, ensure you have the following:
- A VMware vSphere environment with at least one cluster
- An ESXi host capable of running at least two virtual machines
- An AWS Account with the Application Migration Service initialized
Here, we’ll be working with a VMware environment containing one Ubuntu 22.04 and one Windows Server 2019 virtual machine. Our goal is to migrate Windows Virtual Machine to our AWS Account.
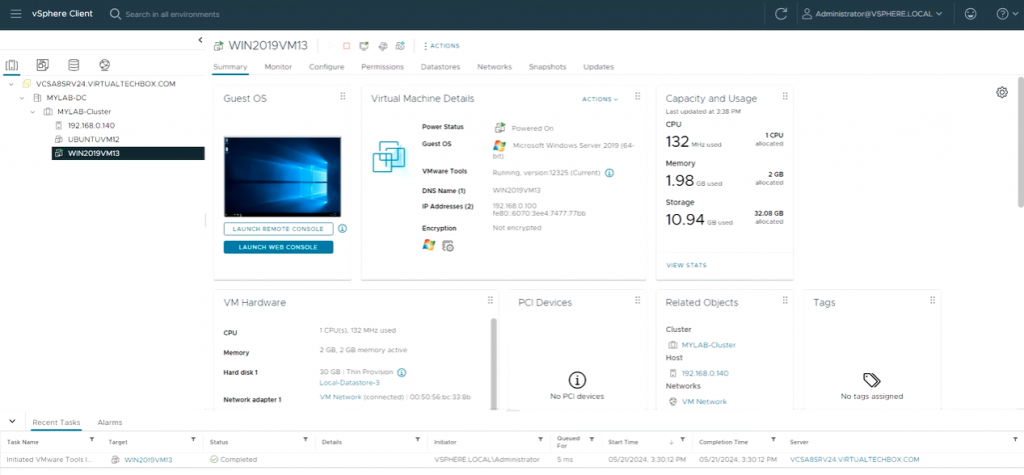
Step 1: Create an IAM User
To interact with the AWS Application Migration Service, we’ll need an IAM user with specific permissions. Follow these steps to create a new user:
- On the AWS Management Console, navigate to IAM.
- Click on user in the left pane, then click “Create User” button.
- Give user a name, then on “Set Permissions” page, select “attach policies directly”.
- Attach “AWSApplicationMigrationAgentInstallationPolicy” and “AWSApplicationMigrationVCenterClientPolicy” to the user.
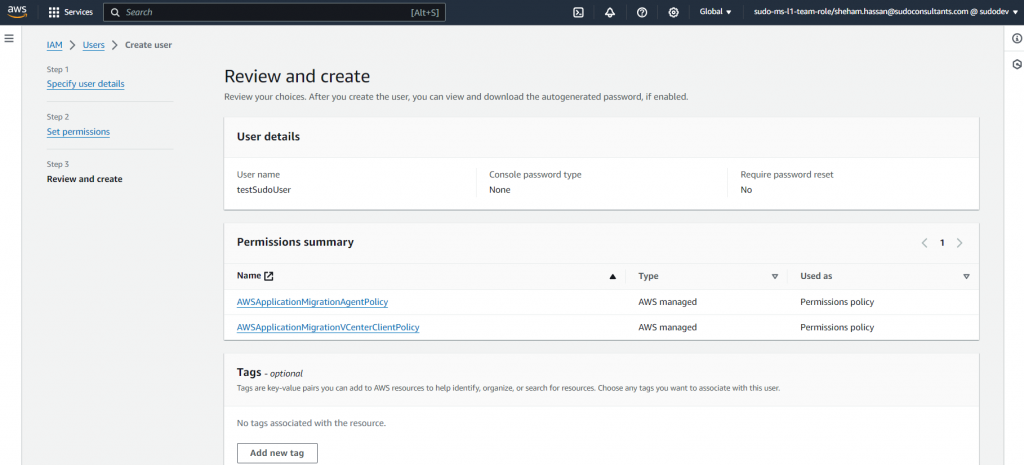
Once the user is created, generate the access keys. These keys will be used later in the tutorial.
Step 2: Installing AWS MGN vCenter client
The AWS MGN vCenter Client is a software component that acts as a bridge between your vCenter environment and the AWS Application Migration Service (MGN). It facilitates agentless replication of your virtual machines to AWS. Here’s how to install it:
1. Prepare the environment
Set up a dedicated Ubuntu 22.04 VM in your vCenter environment. Ensure Python is installed on this VM.
2. Download Required Files
- Once server is configured, Download the Virtual Disk Development Kit (VDDK) from Broadcom’s developer portal developer.broadcom.com/sdks/vmware-virtual-disk-development-kit-vddk/7.0 and transfer it to the Linux server.

- Next step is to download AWS MGN vCenter client on the Linux server. This can be done using the following command:
# Replace region with your desired region
wget https://aws-application-migration-service-ap-south-1.s3.ap-south-1.amazonaws.com/latest/vcenter-client/linux/aws-vcenter-client-installer-init.py
3. Run the Installer
Once both installers have been downloaded, run the following command to install the client
sudo python3 aws-vcenter-client-installer-init.pyDuring the installation, you will need to provide the following details:
- AWS Access Key ID
- AWS Secret Access Key
- AWS Region Name
- vCenter IP or hostname
- vCenter port
- vCenter user name
- vCenter password
- vCenter root CA Cert path
- VDDK path
- Resource Tags
Once done, our next step is to replicate servers from vCenter to AWS
Step 3: Replicating Servers from vCenter to AWS
With the setup complete, it’s time to initiate the migration process. The AWS Application Migration Service (AWS MGN) will facilitate the replication of your VMs from VMware to AWS.
- Navigate to Application Migration Service: On the AWS Management Console, go to the Application Migration Service.
- Select Source Servers: Click on the “Source Servers” tab in the left pane.
- Choose Discovered Servers: From the “Active Source Servers” dropdown, select “Agentless discovered servers.”
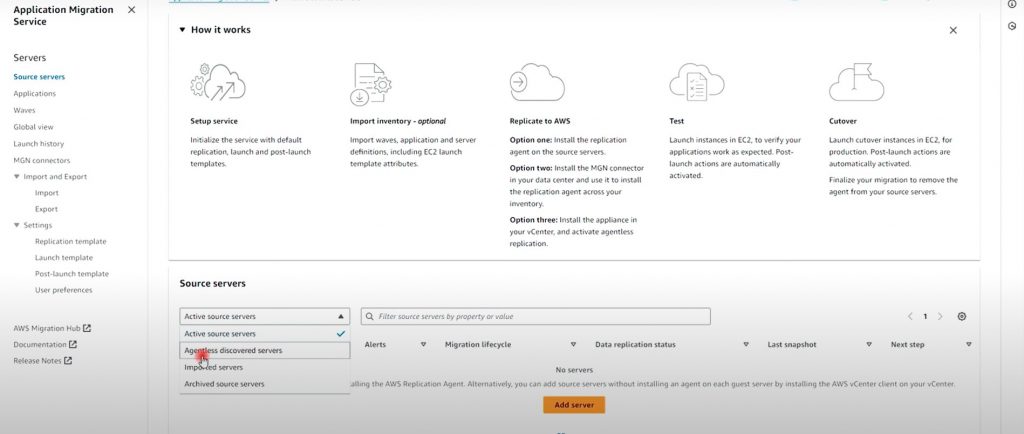
- Start Replication: Here we can see the same discovered servers that were in our VMware environment. Select the VM you want to replicate, click on the replication dropdown, and select “Start Replication.”
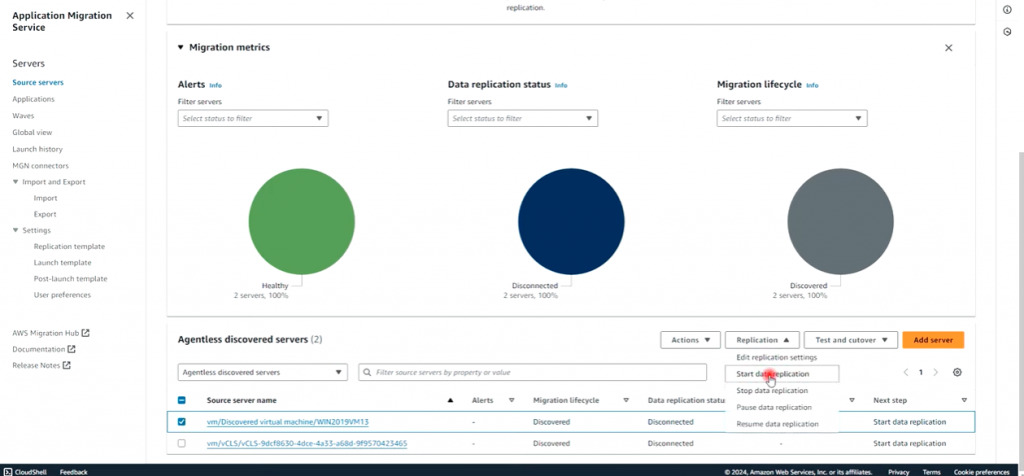
- Monitor Replication: To view the replication status, click on the “Application discovered servers” dropdown and choose “Active source servers.” The replication process might take a few minutes depending on the size of the VM.
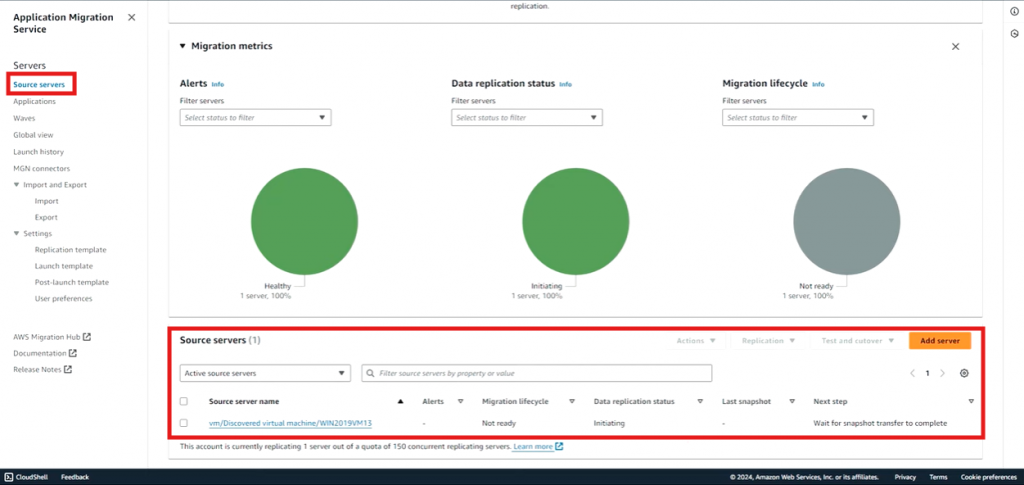
Once the state of migration lifecycle is changed to “Ready for testing” and data replication status becomes “Healthy”, click on “Test and cutover” dropdown and select “Launch test instance”.
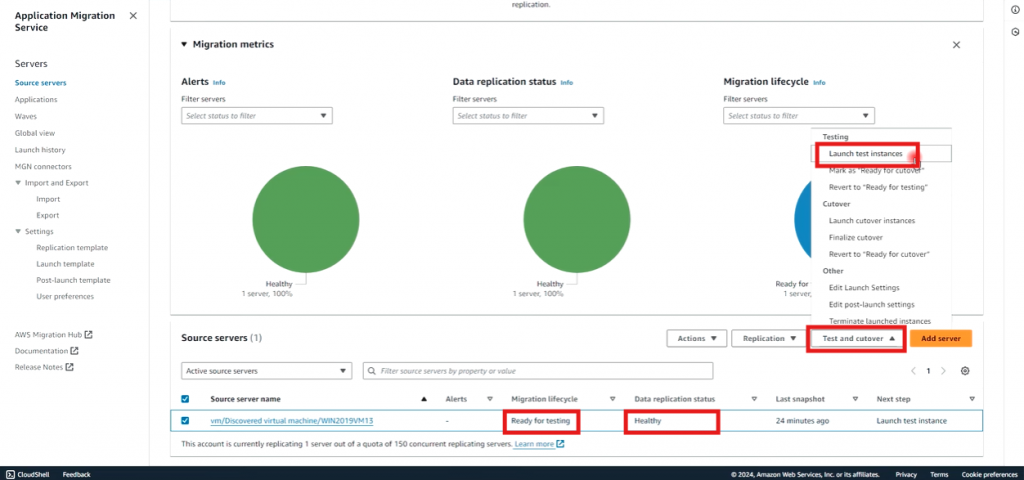
- This will launch test instance with the same configuration as it was in the VMware. We can navigate to EC2, connect to this instance and test if everything is working as expected.
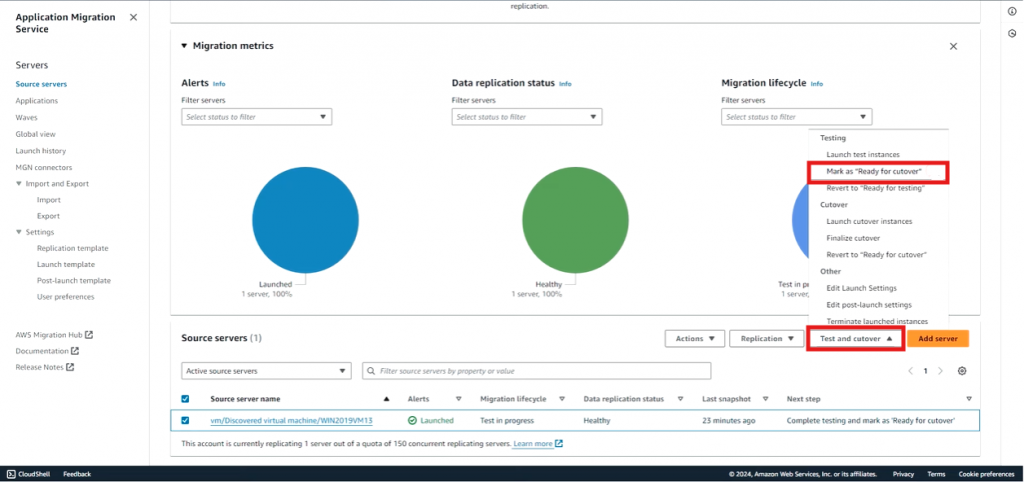
- Once the testing is completed, select the instance again, click on the “Test and cutover” dropdown. Then click “Mark as Ready for Cutover”.
- Once done, our next step is to launch cutover instance. To do so, repeat the same steps, that is to select the instance >> Click Test and cutover dropdown >> Click launch cutover instances.
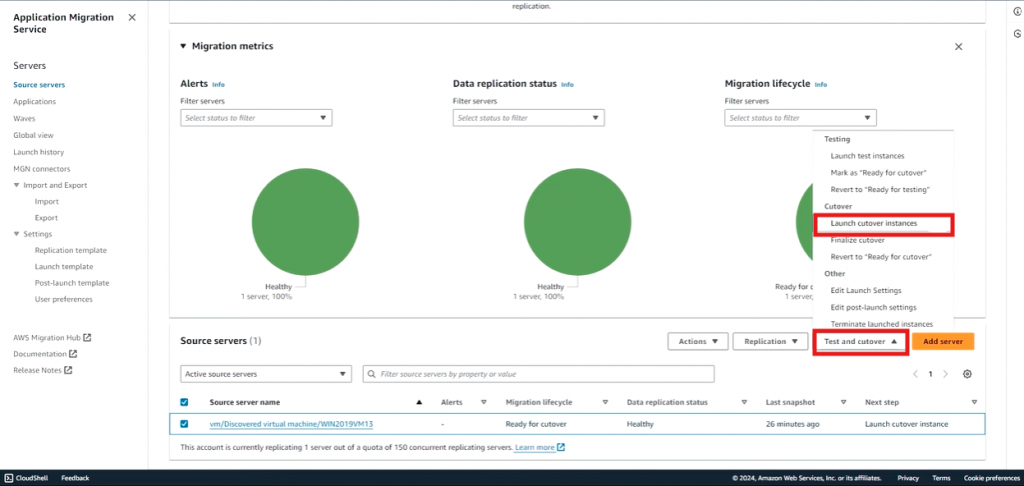
Finalize Cutover: After successful testing, repeat the same steps to launch the cutover instance. Finally, select “Finalize Cutover” from the Test and Cutover dropdown.
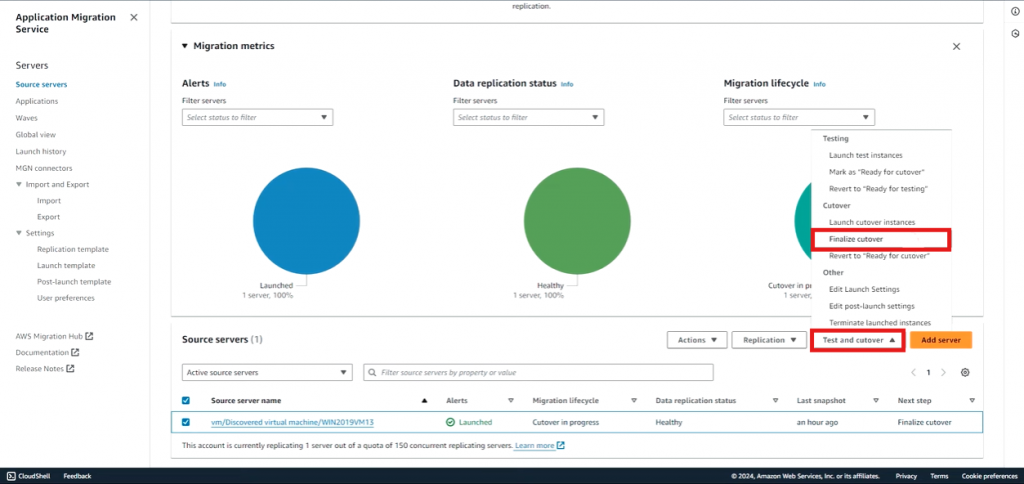
- Additionally, we can archive this instance once the cutover has been finalized. By clicking “mark as archive” from the Test and Cutover dropdown
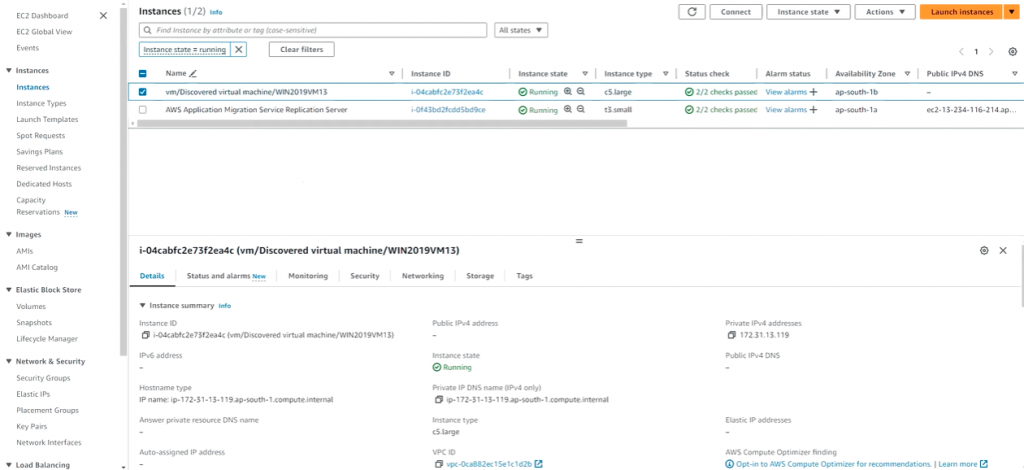
- To verify the changes, navigate to the EC2 dashboard and view the migrated instance. To fully utilize your migrated instance, consider allocating an Elastic IP, configuring network security groups (inbound/outbound rules), and optimizing performance settings based on your application requirements.
Security Configurations
- After migration, organization should secure their AWS instances by configuring network security groups, restricting inbound and outbound traffic to only what is necessary. Allocating an Elastic IP and fine-tuning performance settings can help ensure smooth operations.
- Following the principle of least privilege is crucial when assigning IAM policies. Regularly review and update permissions to minimize potential security risks, ensuring that only essential access is granted.
- Implement strong encryption with AWS Key Management Service (KMS) for data both at rest and in transit. Additionally, set up monitoring with AWS CloudTrail and CloudWatch, and enable Multi-Factor Authentication (MFA) to enhance security and maintain a robust audit trail.
Conclusion
Congratulations! You’ve successfully migrated your virtual machine to AWS, tapping into the powerful benefits of cloud computing such as scalability, flexibility, and cost-efficiency. With careful planning and the right tools, the daunting task of cloud migration becomes a structured, manageable process.
Remember, the cloud is not just a destination but a journey. As you continue to explore AWS, you’ll discover more ways to optimize and secure your applications, driving innovation and growth for your business.

