
Introduction
In today’s cloud-centric world, containerization has emerged as a groundbreaking paradigm, streamlining application deployment and scaling. While containers offer a myriad of advantages, managing their orchestration can often become challenging. Enter AWS Fargate, a pivotal service from Amazon Web Services (AWS), designed to alleviate this very challenge. Fargate revolutionizes container orchestration by allowing developers to run containers without having to manage the underlying infrastructure. It abstracts the complexities of server and cluster management, paving the way for a true serverless container experience.
The purpose of this blog post is to delve deep into the world of AWS Fargate, shedding light on its core components, benefits, and best practices. By the end, readers will gain a comprehensive understanding of how AWS Fargate operates and how it can be harnessed to optimize container workloads seamlessly, without the operational overhead.
Section 1: Understanding AWS Fargate
AWS Fargate is a managed compute engine service offered by Amazon Web Services (AWS), tailor-made for Amazon Elastic Container Service (ECS) and Amazon Elastic Kubernetes Service (EKS). Its primary role is to provide users the ability to run containers without needing to handle or even think about the server or cluster infrastructure. This innovative approach to container management eliminates the manual, often tedious task of provisioning, configuring, and scaling clusters of virtual machines to run containers.
Contrast this with traditional EC2-based container deployments, where users need to maintain the underlying EC2 instances and ensure that they are appropriately scaled, patched, and secured. With EC2-based deployments, capacity planning and cluster scaling decisions lie with the user, which can introduce additional complexities and overhead.
Fargate, on the other hand, offers a serverless container experience. By handling the heavy lifting of the infrastructure management, Fargate allows developers and operators to focus solely on designing and running their applications. Some primary benefits include:
- Operational Simplicity: No need to patch, scale, or secure clusters manually.
- Cost Efficiency: Pay only for the vCPU and memory resources consumed by containerized applications.
- Enhanced Security: Each task or pod runs in its own isolated environment, ensuring better resource isolation and security.
With AWS Fargate, the realm of container orchestration becomes more accessible, scalable, and efficient, empowering businesses to drive innovation without being bogged down by infrastructure intricacies.
Section 2: Key Features and Use Cases
Key Features of AWS Fargate
AWS Fargate boasts several compelling features that make it an attractive choice for container orchestration:
- Automatic Scaling: Fargate can automatically scale your containerized applications up or down based on the workload, ensuring optimal resource utilization without manual intervention.
- Cost-Effectiveness: Fargate follows a pay-as-you-go model, charging only for the vCPU and memory resources consumed by your tasks. This eliminates the need to overprovision and allows you to optimize costs effectively.
- Reduced Administrative Overhead: With Fargate, infrastructure management tasks, such as server provisioning, patching, and scaling, are abstracted, significantly reducing the administrative burden. This simplifies operations and allows developers to focus on their applications.
- Resource Isolation: Each task in Fargate runs in its own isolated environment, preventing resource contention issues and improving the security and stability of your applications.
- Integration with AWS Services: Fargate seamlessly integrates with other AWS services like AWS Load Balancers, AWS Identity and Access Management (IAM), Amazon CloudWatch, and Amazon VPC for networking, monitoring, and security.
Use Cases for AWS Fargate
Fargate is well-suited for a range of use cases, including:
- Microservices: Ideal for breaking down monolithic applications into smaller, manageable microservices.
- Web Applications: Fargate can efficiently host web applications, automatically handling traffic spikes and scaling based on demand.
- Batch Processing: Use Fargate for running batch processing jobs, like data ETL tasks, without worrying about provisioning resources.
- API Services: Host RESTful or GraphQL APIs with Fargate, ensuring consistent and efficient service delivery.
- Stateless Applications: Stateless applications that can scale horizontally benefit from Fargate’s automatic scaling capabilities.
The versatility of AWS Fargate makes it a powerful choice for various application types and workloads, providing both cost savings and operational simplicity while maintaining high scalability and performance.
Section 3: Setting up AWS Fargate
Setting up AWS Fargate involves configuring a Virtual Private Cloud (VPC) and defining task definitions with specific resource requirements. Here’s a step-by-step guide:
1. Create a Virtual Private Cloud (VPC):
A VPC is the networking foundation for your Fargate tasks. Follow these steps:
- Log in to the AWS Management Console.
- Navigate to the Amazon VPC service.
- Create a new VPC or use an existing one to provide network isolation for your containers.
2. Configure Security Groups:
Security groups act as virtual firewalls for your Fargate tasks, controlling inbound and outbound traffic. To configure them:
- Navigate to the VPC Dashboard and select “Security Groups.”
- Create a new security group, specifying inbound and outbound rules to control traffic access.
3. Define Task Definitions:
Task definitions are essential for specifying how your containers should run. Here’s how to do it:
- Go to the Amazon ECS or Amazon EKS service in the AWS Management Console.
- Create or update a task definition, specifying the container image, CPU, and memory requirements.
- Include essential details like network mode, environment variables, and IAM roles for task execution.
4. Launch a Fargate Service:
Once your task definition is ready, you can launch a Fargate service:
- In the ECS or EKS console, create a new Fargate service and link it to your task definition.
- Configure how many tasks you want to run and set up a load balancer if needed.
5. Monitor and Scale:
Utilize Amazon CloudWatch and Auto Scaling to monitor and scale your Fargate service based on defined metrics and thresholds.
Setting up AWS Fargate involves careful planning and consideration of your application’s requirements. By configuring a VPC, defining task definitions, and ensuring security groups are in place, you create a strong foundation for running serverless containers in Fargate.
Section 4: Running a Serverless Container
Using AWS Fargate to deploy serverless containers is a streamlined process. Once you’ve set up the necessary infrastructure, as outlined in the previous section, you can swiftly create Fargate services and schedule tasks. Here’s how:
1. Creating a Fargate Service:
- Navigate to the Amazon ECS dashboard in the AWS Management Console.
- Choose “Create Cluster” and then “Fargate”.
- Provide the necessary cluster name and details.
- Upon successful cluster creation, select “Create New Service”.
- Specify the task definition from earlier, define the desired count of tasks, and choose the VPC and subnet.
2. Scheduling Tasks:
Tasks in Fargate can be scheduled based on time or event triggers.
- For time-based scheduling, use Amazon CloudWatch Events.
- For event-driven scheduling, use AWS Lambda along with Amazon EventBridge.
3. Code Snippets:
Defining a Fargate Task using AWS CLI:
aws ecs register-task-definition --cli-input-json file://path_to_your_task_definition.jsonSample Task Definition (task_definition.json):
{
    "family": "my-fargate-task",
    "networkMode": "awsvpc",
    "containerDefinitions": [
        {
            "name": "my-container",
            "image": "my-repo/my-image:latest",
            "memory": 512,
            "cpu": 256,
            "essential": true,
            "portMappings": [
                {
                    "containerPort": 80,
                    "hostPort": 80
                }
            ]
        }
    ],
    "requiresCompatibilities": ["FARGATE"],
    "cpu": "256",
    "memory": "512"
}
To deploy the task:
aws ecs create-service --cluster my-cluster --task-definition my-fargate-task --desired-count 1 --launch-type FARGATE --network-configuration "awsvpcConfiguration={subnets=[subnet-xxxxxx],securityGroups=[sg-xxxxxx]}"When deploying serverless containers with AWS Fargate, you’re not just launching an application but also defining how it interacts with the broader AWS ecosystem. By understanding the flow from task definition to task execution, you can leverage Fargate’s power for a truly serverless experience.
Section 5: Networking and Security
Networking with Fargate:
When deploying with AWS Fargate, one of the key considerations is the networking configuration. Fargate tasks are launched within an Amazon VPC, allowing them to communicate with other resources within the VPC.
Load Balancers: Fargate supports integration with Elastic Load Balancing, which automatically distributes incoming application traffic across multiple tasks. You can use both Application Load Balancer (for HTTP/HTTPS traffic) and Network Load Balancer (for TCP traffic).
Service Discovery: With AWS Cloud Map, Fargate tasks can register themselves with a service name upon startup. This means other tasks or services can discover them by simply querying the service name, simplifying microservices architectures.
Security in Fargate:
Security is paramount when deploying any application. With Fargate:
IAM Roles for Fargate: Instead of managing credentials within your application, you can assign IAM roles to your Fargate tasks. These roles define which AWS services the task can interact with and what permissions it has.
Best Practices:
- Always adhere to the principle of least privilege. Only grant the necessary permissions to your tasks.
- Regularly review and audit IAM roles to ensure they are up-to-date with your application’s requirements.
- Make use of VPC security groups to control inbound and outbound traffic to your tasks.
By understanding and implementing proper networking and security configurations, you can ensure that your Fargate deployments are both scalable and secure.
An IAM role for AWS Fargate typically includes permissions that allow the tasks to interact with other AWS services. Here is a basic sample IAM role for a Fargate task that needs to access an Amazon RDS instance and write logs to Amazon CloudWatch:
{
    "Version": "2012-10-17",
    "Statement": [
        {
            "Effect": "Allow",
            "Action": [
                "logs:CreateLogGroup",
                "logs:CreateLogStream",
                "logs:PutLogEvents"
            ],
            "Resource": "arn:aws:logs:*:*:*"
        },
        {
            "Effect": "Allow",
            "Action": [
                "rds:DescribeDBInstances",
                "rds:Connect"
            ],
            "Resource": "arn:aws:rds:region:account-id:db:mydbinstance"
        }
    ]
}
Explanation:
- The first statement allows the Fargate task to create and write to CloudWatch Logs. This is essential for logging and monitoring the task’s activities.
- The second statement provides permissions to describe and connect to a specific RDS instance.
Section 6: Monitoring and Scaling
In the world of serverless containers, visibility into your operations and the ability to automatically adjust to varying workloads are paramount. AWS Fargate integrates seamlessly with AWS CloudWatch, giving developers and administrators a powerful tool for monitoring their Fargate services. With CloudWatch, you can keep a close eye on metrics such as CPU and memory utilization, ensuring that your tasks are operating optimally.
But what about those moments when demand spikes? Fargate has got you covered. By setting up autoscaling for your Fargate tasks, you can ensure that your applications remain responsive even during unexpected surges in traffic. Autoscaling adjusts the number of running tasks up or down based on defined CloudWatch metrics or custom metrics tailored to your needs. This not only optimizes resource usage but also ensures that you’re paying only for what you actually use. The combination of CloudWatch and Fargate’s autoscaling capabilities means that you can run your serverless containers with confidence, knowing that AWS has your back every step of the way.
1. AWS CloudWatch Metrics for Fargate: To monitor Fargate with CloudWatch:
# Navigate to the CloudWatch dashboard
$ aws cloudwatch list-metrics –namespace AWS/Fargate
This command fetches metrics related to Fargate. You can filter further based on dimensions such as ClusterName or ServiceName.
2. CloudWatch Alarm for CPU Utilization: To ensure your tasks are not overusing CPU resources, you can set an alarm:
$ aws cloudwatch put-metric-alarm --alarm-name FargateCPUUtilizationHigh --metric-name CPUUtilization --namespace AWS/Fargate --statistic Average --period 300 --threshold 80 --comparison-operator GreaterThanThreshold --dimensions Name=ClusterName,Value=my-cluster --evaluation-periods 2This creates an alarm when the average CPU utilization exceeds 80% for two consecutive periods of 5 minutes.
3. Fargate Autoscaling: First, create a target tracking scaling policy:
$ aws ecs put-scaling-policy --service-name my-service --desired-count 2 --policy-name FargateAutoScalingPolicy --policy-type TargetTrackingScaling --target-tracking-scaling-policy-configuration file://target-config.json --region us-west-2Where target-config.json contains:
{
    "targetValue": 60.0,
    "predefinedMetricSpecification": {
        "predefinedMetricType": "ECSServiceAverageCPUUtilization"
    }
}
This ensures that the service scales in or out to maintain an average CPU utilization of 60%.
By incorporating these samples into your workflow, you can efficiently monitor and scale your AWS Fargate deployments, ensuring optimal performance and cost-effectiveness.
Section 7: Cost Optimization
AWS Fargate’s serverless infrastructure offers multiple avenues to optimize costs, ensuring you pay only for what you use.
1. Right-Sizing Resources: Always align your Fargate task specifications with actual requirements. Over-provisioning can lead to unnecessary costs. Begin by analyzing your workload and then select the appropriate CPU and memory combination. Regularly reviewing and adjusting these configurations ensures optimal performance without overspending.
2. Task Placement Strategies: Fargate supports strategies like binpack and spread. Using the ‘binpack’ strategy, tasks are placed based on the least available amount of CPU or memory, optimizing resource utilization. The ‘spread’ strategy distributes tasks evenly, which might be useful in certain scenarios but can lead to increased costs if not utilized effectively.
3. Use Spot Instances: Fargate Spot Instances let you take advantage of unused Fargate capacity at a discount. However, be prepared for the possibility of your tasks being interrupted.
4. Monitor & Analyze with AWS Cost Explorer: Regularly review your spending patterns with Cost Explorer. Set up alerts for unexpected spikes in usage or cost.
5. Clean Up Unused Resources: Always terminate unused tasks and deregister task definitions that are no longer in use.
By adopting these practices, users can effectively manage their Fargate costs, ensuring that they achieve an efficient balance between performance and expenditure.
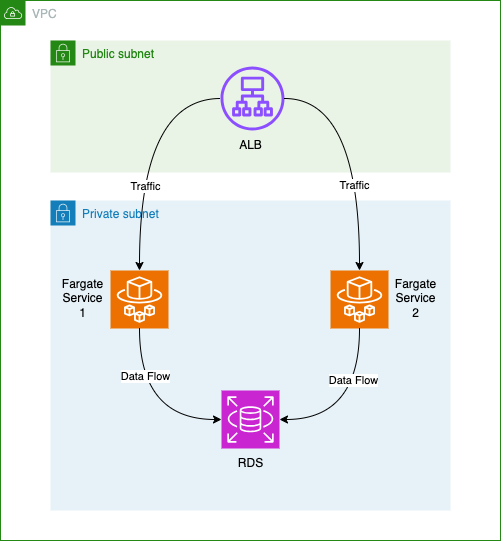
Section 8: Sample Diagram
As an architect, you frequently need to integrate various AWS services to build comprehensive solutions. Step Functions natively integrates with a wide range of AWS services, such as AWS Lambda, Amazon S3, Amazon SQS, Amazon DynamoDB, and more. This native integration simplifies the implementation of workflows that involve these services, reducing the need for custom code.
Conclusion
In this journey through AWS Fargate, we’ve uncovered a transformative approach to container management. With Fargate, you can run serverless containers effortlessly, abstracting the complexities of infrastructure management.
Key takeaways from this exploration include the automatic scaling, cost-effectiveness, and reduced administrative overhead that Fargate brings to the table. We’ve delved into setting up Fargate, networking, security, monitoring, scaling, and cost optimization strategies.
As you look to the future, consider Fargate’s potential to streamline your container workloads, whether you’re deploying microservices, web applications, batch processing, or APIs. AWS Fargate empowers you to focus on innovation while AWS handles the operational details.
Explore AWS Fargate further, and utilize the wealth of AWS resources for in-depth learning, driving your containerized applications to new heights.
References
- AWS Fargate: AWS’s official documentation on Fargate provides comprehensive details on features, pricing, and how to get started.
- Task Definitions: Learn how to define tasks for your Amazon ECS containers.
- Amazon ECS: Understand the larger context of the Amazon Elastic Container Service.
- Networking: Get to know how networking works with Fargate and ECS.
- Security: AWS’s guidelines and best practices on securing Fargate services.
- CloudWatch: Official documentation on AWS CloudWatch, its integration with Fargate, and its capabilities.
- Autoscaling with Fargate: Dive deeper into scaling Fargate services based on demand.
- Cost Optimization: Resources to ensure you’re getting the most bang for your buck.
Remember, the world of AWS is vast and ever-evolving. The provided links are a starting point, but AWS’s documentation and forums are rich resources to continue your learning journey. Always refer to the official documentation for the most accurate and up-to-date information.