
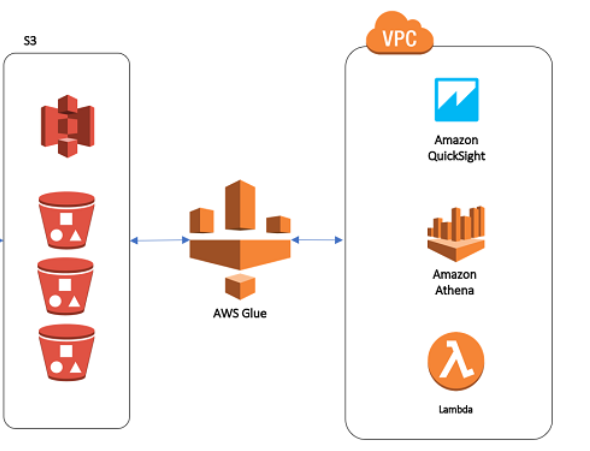
Building a serverless data warehouse on AWS can be done by using a combination of AWS services, including AWS Glue for data extraction, transformation, and loading (ETL); Amazon S3 for data storage; and Amazon Redshift Spectrum or Amazon Athena for data querying.
Step 1 : Firstly, set up an Amazon S3 bucket to store the raw data
Using Management Console
To set up an Amazon S3 bucket to store raw data, you can use the following steps using management console:
- Log in to the AWS Management Console.
- Go to the S3 service.
- Click on the “Create Bucket” button.
- Enter a unique name for the bucket and select the region where you want the bucket to be located.
- Configure the options for the bucket as per your requirement, like versioning, access control and encryption.
- Click on “Create Bucket” to create the bucket.
Using Command Line Interface
To set up an Amazon S3 bucket using the AWS CLI, you can use the aws s3 mb command to create a new bucket. The basic syntax is as follows:
aws s3 mb s3://<bucket-name>
For example, to create a bucket named “my-raw-data-bucket” in the US East (N. Virginia) region, you would use the following command:
aws s3 mb s3://my-raw-data-bucket --region us-east-1
You can also set options for the bucket, such as versioning and encryption, using the aws s3api put-bucket-versioning command and aws s3api put-bucket-encryption command.
It’s also important to note that you should consider using versioning and setting up a lifecycle policy to automatically archive or delete older versions of the data. This will help in cost optimization and management. You can set up versioning using the following command:
aws s3api put-bucket-versioning --bucket my-raw-data-bucket --versioning-configuration Status=Enabled
And to set up lifecycle rule you can use the following command:
aws s3api put-bucket-lifecycle-configuration --bucket my-raw-data-bucket --lifecycle-configuration file://config.json
It’s important to note that the config.json file should contain the rule and configuration for the lifecycle policy.
Once the bucket is created, you can start uploading data to it using the AWS S3 management console, the AWS CLI, or an S3 SDK.
It’s also important to note that you should consider using versioning and setting up a lifecycle policy to automatically archive or delete older versions of the data. This will help in cost optimization and management.
Step 2 : Load Data into S3 Bucket
Using Management Console
Use AWS Glue to extract data from various sources, transform it, and load it into the S3 bucket.
To set up an Amazon S3 bucket to store raw data, you can use the following steps:
- Log in to the AWS Management Console.
- Go to the S3 service.
- Click on the “Create Bucket” button.
- Enter a unique name for the bucket and select the region where you want the bucket to be located.
- Configure the options for the bucket as per your requirement, like versioning, access control and encryption.
- Click on “Create Bucket” to create the bucket.
Using Command Line Interface
To use AWS Glue to extract, transform, and load (ETL) data using the AWS CLI, you can use the following commands:
- To create a new Glue job, you can use the
aws glue create-jobcommand. The basic syntax is as follows:
aws glue create-job --name <job-name> --role <role-arn> --command <command>
For example, to create a job named “my-etl-job” with the role “my-glue-role” and command “glueetl”, you would use the following command:
aws glue create-job –name my-etl-job –role arn:aws:iam:::role/my-glue-role –command {“Name”:”glueetl”}
2. To run a Glue job, you can use the aws glue start-job-run command. The basic syntax is as follows:
aws glue start-job-run --job-name <job-name>
For example, to run the job “my-etl-job” you would use the following command:
aws glue start-job-run --job-name my-etl-job
3. To check the status of a Glue job run, you can use the aws glue get-job-run command. The basic syntax is as follows:
aws glue get-job-run --job-name <job-name> --run-id <run-id>
For example, to check the status of the run “jr_0123456789abcdef01” of job “my-etl-job”, you would use the following command:
aws glue get-job-run --job-name my-etl-job --run-id jr_0123456789abcdef01
In the Glue job script you can use the Glue API to extract data from various sources, such as relational databases, NoSQL databases, or other file formats, transform the data as needed, for example, by filtering, renaming, or aggregating columns, and load the transformed data into the S3 bucket.
It’s also worth noting that you can schedule your Glue jobs to run periodically using Glue triggers, which allows you to keep your data warehouse up to date with new data. You can create a Glue trigger using the following command:
aws glue create-trigger --name <trigger-name> --type SCHEDULED --schedule <cron-expression> --actions <action>
and then associate it to a job using:
aws glue put-trigger --name <trigger-name> --job-name <job-name>
You can also use the aws glue list-triggers and aws glue delete-trigger commands to manage your triggers.
Once the bucket is created, you can start uploading data to it using the AWS S3 management console, the AWS CLI, or an S3 SDK.
It’s also important to note that you should consider using versioning and setting up a lifecycle policy to automatically archive or delete older versions of the data. This will help in cost optimization and management.
Step 3 : Create a data catalog of the data stored in S3
Use Amazon Redshift Spectrum or Athena to create a data catalog of the data stored in S3, allowing for easy querying of the data using SQL.
Once your data is loaded into the S3 bucket, you can use Amazon Redshift Spectrum or Amazon Athena to create a data catalog and query the data using SQL.
Using Management Console
Amazon Redshift Spectrum allows you to query data stored in S3 directly from your Amazon Redshift cluster. To set it up, you’ll need to do the following:
- In the AWS Management Console, navigate to the Amazon Redshift service.
- Create an Amazon Redshift cluster if you don’t have one already.
- Create an external schema and external tables that reference the data in S3.
- Run SQL queries on the external tables to analyze the data
On the other hand, Amazon Athena is a serverless, interactive query service that allows you to query data stored in S3 using SQL. To set it up, you can follow these steps:
- In the AWS Management Console, navigate to the Athena service.
- Create a data catalog, or use an existing one if you have one.
- Create a table in the data catalog that references the data in S3.
- Run SQL queries on the table to analyze the data.
Using Command Line Interface
To use Amazon Redshift Spectrum to create a data catalog and query data stored in S3 using the AWS CLI, you can use the following commands:
- To create an external schema in your Amazon Redshift cluster, you can use the
aws redshift create-external-schemacommand. The basic syntax is as follows:
aws redshift create-external-schema --schema-name <schema-name> --external-id <external-id> --data-catalog <data-catalog> --db-name <db-name> --region <region>
For example, to create an external schema named “my-schema” with the external ID “my-data-catalog” and the database “my-db” in the US East (N. Virginia) region, you would use the following command:
aws redshift create-external-schema --schema-name my-schema --external-id my-data-catalog --data-catalog '{"Type":"S3","Properties": {"bucket":"<bucket-name>","path":"<path>","roleArn":"<role-arn>"}}' --db-name my-db --region us-east-1
2.To create an external table in the external schema, you can use the aws redshift create-external-table command. The basic syntax is as follows:
aws redshift create-external-table --schema-name <schema-name> --table-name <table-name> --columns <columns> --data-format <data-format> --s3-location <s3-location>
For example, to create an external table named “my-table” in the schema “my-schema” with columns “col1, col2, col3” in CSV format and located in the S3 bucket “my-raw-data-bucket” at the path “data/my-table.csv”, you would use the following command:
aws redshift create-external-table --schema-name my-schema --table-name my-table --columns 'col1, col2, col3' --data-format CSV --s3-location 's3://my-raw-data-bucket/data/my-table.csv'
- To run SQL queries on the external table, you can use the
aws redshift execute-statementcommand. The basic syntax is as follows:
aws redshift execute-statement --cluster-identifier <cluster-identifier> --db <db-name> --query <query>
For example, to run the query “SELECT * FROM my-schema.my-table” on the database “my-db” in the cluster “my-cluster”, you would use the following command:
aws redshift execute-statement --cluster-identifier my-cluster --db my-db --query 'SELECT * FROM my-schema.my-table'
On the other hand, to use Amazon Athena to create a data catalog and query data stored in S3 using the AWS CLI, you can use the following commands:
- To create a table in Athena, you can use the
aws athena create-tablecommand. The basic syntax is as follows:
aws athena create-table --work
For example, to create a table named “my-table” in the workgroup “my-workgroup” with the input location in S3 bucket “my-raw-data-bucket” at the path “data/my-table.csv” and the input format as CSV, you would use the following command:
aws athena create-table --workgroup-name my-workgroup --table-name my-table --table-input '{"location":"s3://my-raw-data-bucket/data/my-table.csv","inputFormat":"CSV"}'
2.
Sure, here are the additional steps for creating a table in Athena and querying data using the AWS CLI:
- To create a table in Athena, you can use the
aws athena create-tablecommand. The basic syntax is as follows:
Copy codeaws athena create-table --workgroup-name <workgroup-name> --table-name <table-name> --table-input <table-input>
For example, to create a table named “my-table” in the workgroup “my-workgroup” with the input location in S3 bucket “my-raw-data-bucket” at the path “data/my-table.csv” and the input format as CSV, you would use the following command:
Copy codeaws athena create-table --workgroup-name my-workgroup --table-name my-table --table-input '{"location":"s3://my-raw-data-bucket/data/my-table.csv","inputFormat":"CSV"}'
- To run SQL queries on the table, you can use the
aws athena start-query-executioncommand. The basic syntax is as follows:
aws athena start-query-execution --query-string <query> --result-configuration <result-configuration>
For example, to run the query “SELECT * FROM my-table” and save the result in S3 bucket “my-result-bucket” at the path “query-results/my-table.csv”, you would use the following command:
aws athena start-query-execution --query-string 'SELECT * FROM my-table' --result-configuration '{"outputLocation":"s3://my-result-bucket/query-results/my-table.csv"}'
3. To check the status of a query execution, you can use the aws athena get-query-execution command. The basic syntax is as follows:
aws athena get-query-execution --query-execution-id <query-execution-id>
For example, to check the status of the query execution “qe_0123456789abcdef01”, you would use the following command:
aws athena get-query-execution --query-execution-id qe_0123456789abcdef01
Both Redshift Spectrum and Athena allow you to query data stored in S3 using standard SQL. With Redshift Spectrum, you can join the data in S3 with data stored in your Amazon Redshift cluster, while Athena is a standalone service that doesn’t require a cluster.
It’s worth noting that Redshift Spectrum and Athena both utilize the Glue Data Catalog to store the metadata about the external data, so you don’t need to create the table schema again.
Step 4 : Create interactive visualization
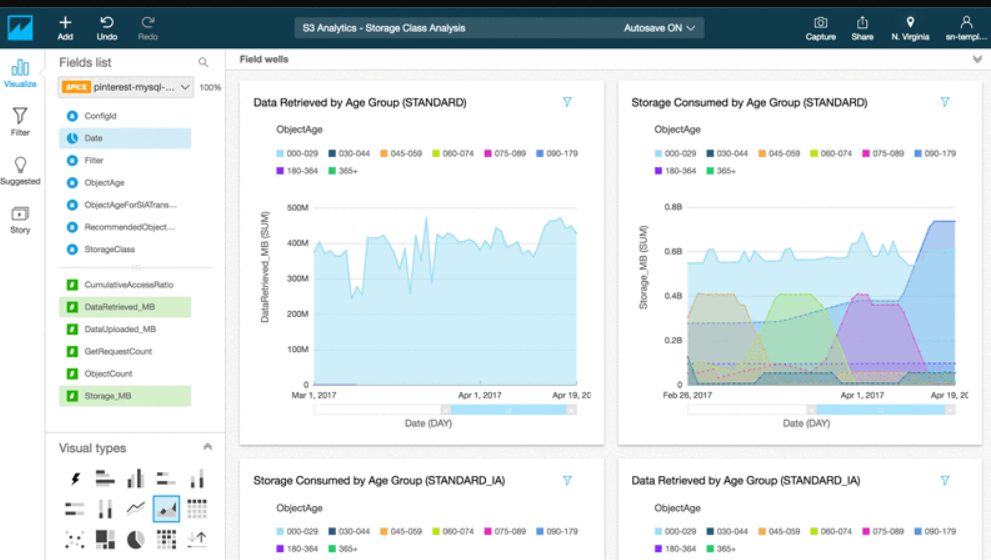
Utilize Amazon QuickSight to create interactive visualizations and reports from the data stored in the data warehouse.
Using Management Console
Once you have your data catalog set up and you can query the data using SQL, you can use Amazon QuickSight to create interactive visualizations and reports from the data stored in the data warehouse. Here are the general steps you can follow:
- In the AWS Management Console, navigate to the QuickSight service.
- Create a new data set by connecting to the data source you have set up (e.g. Amazon Redshift, Athena, or S3).
- In the “Edit/Preview data” section, you can define the schema of your data and perform any necessary data transformations.
- Create a new analysis by choosing the data set and selecting the visualizations you want to use.
- Use the QuickSight interface to create interactive visualizations and reports, such as charts, tables, and pivot tables.
- Share the analysis with others by creating a dashboard or publishing it to the web.
Using Command Line Interface
To use Amazon QuickSight to create interactive visualizations and reports from the data stored in the data warehouse using the AWS CLI, you can use the following commands:
- To create a new data set, you can use the
aws quicksight create-data-setcommand. The basic syntax is as follows:
aws quicksight create-data-set --name <data-set-name> --type <data-set-type> --data-source-arn <data-source-arn> --import-mode <import-mode> --column-group-schema <column-group-schema>
For example, to create a data set named “my-data-set” with type “S3” and data source ARN “arn:aws:quicksight:us-east-1:123456789:datasource/my-data-source” using import mode “SPICE” and providing the column group schema as json file column-group-schema.json, you would use the following command:
aws quicksight create-data-set --name my-data-set --type S3 --data-source-arn arn:aws:quicksight:us-east-1:123456789:datasource/my-data-source --import-mode SPICE --column-group-schema file://column-group-schema.json
2. To create an analysis, you can use the aws quicksight create-analysis command. The basic syntax is as follows:
aws quicksight create-analysis --name <analysis-name> --data-set-id <data-set-id> --aws-account-id <aws-account-id>
For example, to create an analysis named “my-analysis” with the data set “my-data-set” and in the AWS account “123456789”, you would use the following command:
aws quicksight create-analysis --name my-analysis --data-set-id my-data-set --aws-account-id 123456789
3. To share an analysis with others, you can use the aws quicksight share-analysis command. The basic syntax is as follows:
aws quicksight share-analysis --analysis-id <analysis-id> --aws-account-id <aws-account-id> --principal <principal>
For example, to share the analysis “my-analysis” with the principal “arn:aws:quicksight:us-east-1:123456789:user/user1” in the AWS account “123456789”, you would use the following command:
aws quicksight share-analysis --analysis-id my-analysis --aws-account-id 123456789 --principal arn:aws:quicksight:us-east-1:123456789:user/user1
It’s worth noting that you can also share an analysis with an organization or with a group of users by providing the appropriate principal ARN.
Additionally, you can use other QuickSight commands like describe-analysis to get information about the analysis, list-analyses to list all analyses, and update-analysis to update the analysis’s name or permissions.
It’s also important to note that to be able to access the data in QuickSight, you need to have the appropriate permissions on the IAM role that you’re using to run the CLI commands. Also, you’ll need to have a QuickSight account and a valid subscription to use the QuickSight service.
QuickSight also supports collaboration, you can share your analysis and reports with others, and you can also grant them different level of access, like view or edit. Additionally, QuickSight allows you to schedule data refreshes, so your visualizations and reports will always be up to date with the latest data.
Additionally, you can also use QuickSight to create Machine Learning Insights, to find patterns and insights from your data that you might have missed otherwise.
Conclusion
This approach allows for a fully serverless and scalable data warehouse, as the data storage and querying is handled by S3 and Redshift Spectrum/Athena, respectively, and the ETL process is managed by AWS Glue.
In conclusion, building a serverless data warehouse on AWS involves several steps, including setting up an Amazon S3 bucket to store the raw data, using AWS Glue to extract data from various sources, transform it, and load it into the S3 bucket, using Amazon Redshift Spectrum or Athena to create a data catalog of the data stored in S3 and allowing for easy querying of the data using SQL, and finally utilizing Amazon QuickSight to create interactive visualizations and reports from the data stored in the data warehouse. All these steps can be automated and orchestrated using the AWS CLI, allowing for a cost-effective and scalable solution for storing, processing, and visualizing large amounts of data. It’s also important to have the appropriate permissions on the IAM role and have a valid subscription to use the services. For real life case study you can read the article how woot made a serverless data warehouse on aws.
A Software Engineer by profession and a Writer by passion