
Amazon Keyspaces is a database service highly compatible with Apache Cassandra. It is a readily available service that can handle a high range of requests per second. Hence, Amazon Web Services (AWS) customers use Amazon Keyspaces (for Apache Cassandra) in order to modernize their Cassandra workloads.
What is Apache Cassandra?
Apache Cassandra is a non-relational database that offers fast read and write performance. It is similar to a traditional relational database but doesn’t rely on tables. Instead, the data is stored across multiple nodes and is accessed via a column-oriented structure called a ring.
It’s an open-source project, meaning anyone can freely modify and distribute it.You can read more on Apache Cassandra here.
Why use Amazon Keyspaces (for Apache Cassandra)?
Amazon Keyspaces is compatible with Apache Cassandra. It is very convenient for developers because it allows them to run Cassandra workloads on AWS without needing to master new application code and developer tools.
Amazon Keyspaces is serverless, so you do not need to provision, patch, or manage servers. You need only pay for the services you use, making Keyspaces a highly time and cost-efficient tool.
Connecting to amazon keyspaces from your IDE:
To better develop with Amazon Keyspaces, it’s beneficial to be able to connect to it directly from your development environment. This lets you write code and iterate on schemas within the same tool.
To connect to your Amazon Keyspaces from a local IDE, follow the instructions provided in this tutorial. In addition, I’ve written a guide to creating new Amazon Keyspaces tables and running CQL queries as well. The ultimate goal of the tutorial is to enable you to prepare a working development environment where you can start building modern applications with Amazon Keyspaces.
The funtionalities covered in this post are available in the Enterprise version of the various IDEs developed by JetBrains. Otherwise, you can also download the evaluation version of these softwares, which are free only for 30 days.
What you need for the Setup:
Service-specific credentials for an existing AWS IAM user are a prerequisite to follow the steps in this post. Service-specific credentials are similar to the password and username Cassandra uses for access management. AWS’s service-specific credentials are also associated with a specific IAM user. Read Using IAM with Amazon Keyspaces (for Apache Cassandra) for more details.
Remember that service-specific credentials aren’t the only way to authorize access to Amazon Keyspaces resources. Suppose you can modify the code or access its external configuration. In that case, using the AWS authentication plugin for Cassandra drivers is recommended, which is available for multiple programming languages.
Remember that service-specific credentials aren’t the only way to authorize access to Amazon Keyspaces resources. Suppose you can modify the code or access its external configuration. In that case, using the AWS authentication plugin for Cassandra drivers is recommended.
How to connect to amazon keyspaces:
Since Amazon Keyspaces is serverless and requires no infrastructure setup, you need only connect to one of the service endpoints. We will use a public service endpoint in this tutorial.
Follow the instructions below
- Go to your IDE and create a new project.
- Open the View menu and choose Tool Windows. Then click on Database.
- Choose the Data Source Properties.
- Click on the Add icon (+) on the Data Sources tab.
- Choose Apache Cassandra.
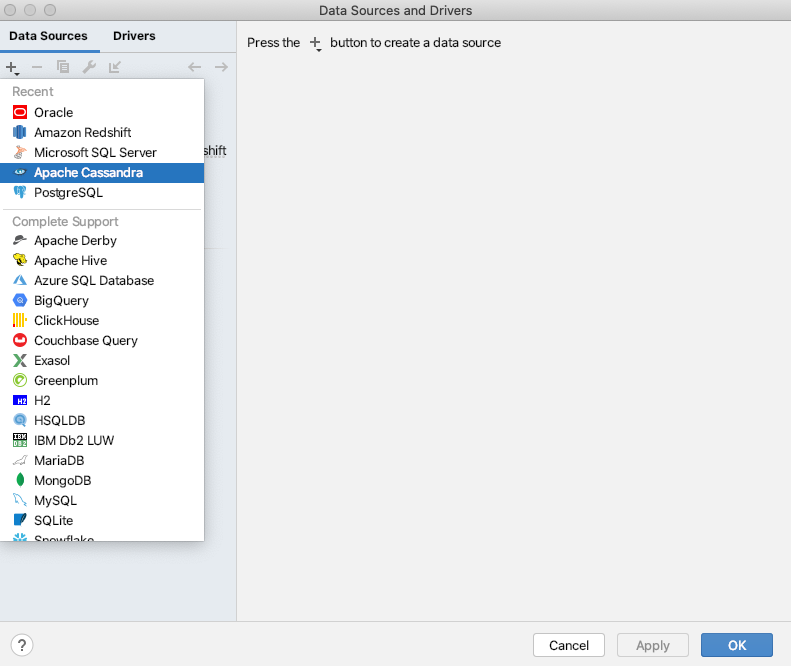
JetBrain IDEs do not list Amazon Keyspacesas one of the databases yet. But it is compatible with Apache Cassandra, so you can use your existing module to connect with Amazon Keyspaces.
- Now, choose Download missing driver files. The IDE will download the drivers required to connect with Amazon Keyspaces.
- The following screen will appear next.
- Enter an Amazon Keyspaces service endpoint for Host on the General tab.
When you use Apache Cassandra without connecting to Amazon Keyspaces, it will typically connect you to the IP address of a seed node. In contrast, Amazon Keyspaces requires you to enter one of the Amazon Keyspaces service endpoints for your AWS Region as the hostname.
- For Port, enter 9142.
Amazon Keyspaces employs Transport Layer Security (TLS) and only accepts connections secured using TLS.
- In the field labeled User, enter your username.
- Enter your password in the Password field.
The URL is generated, and the URL field will be populated automatically after you provide the host, user, and password information.
- Go to the SSH/SSL tab and choose Use SSL.
After this, the remaining fields will become visible.
- The next step is to download Amazon digital certificate. You can either download it directly :
- You must convert your Amazon digital certificate to a truststore file now. You can use the given code for this purpose:
openssl x509 -outform der -in sf-class2-root.crt -out temp_file.der

keytool -import -alias Cassandra -Keystore cassandra_truststore.jks -file temp_file.der
- Next you have to create a password for the Keystore and then trust this certificate. See the following article for details and an example:
Using a Cassandra Java Client Driver to Access Amazon Keyspaces Programmatically
- The cassandra_truststore.jks file is generated now. Type the file location in the CA file field and the password you chose in the last step.
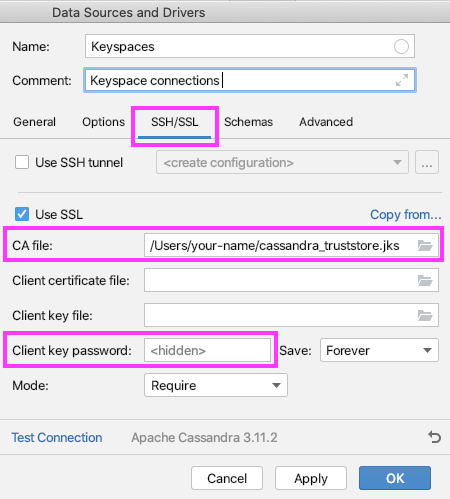
- Change sslenabled to true.
- Change consistencyLevel to LOCAL_QUORUM.

Amazon Keyspaces supports LOCAL_QUORUM only and for write operations.For more information about Amazon Keyspaces and their consistency levels you can visit here .
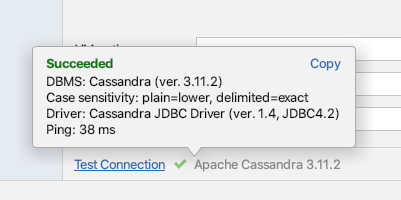
Validate the connection
In the next step, we must verify whether Amazon Keyspaces is properly connected to your IDE. for this purpose, click on Test Connection. If you specified everything correctly, a pop-up similar to the following screenshot would become visible on your computer screen:
Run queries
Your IDE is now connected to the Amazon Keyspaces service. Now, using CQL (Cassandra Query Language), we will run a few sample queries:
- Open the View menu and choose Tool Windows.
- Now click on Database.
- Choose a data source with right-click and choose New, then Query Console.
See Working with console files to get better acquainted with the console features.
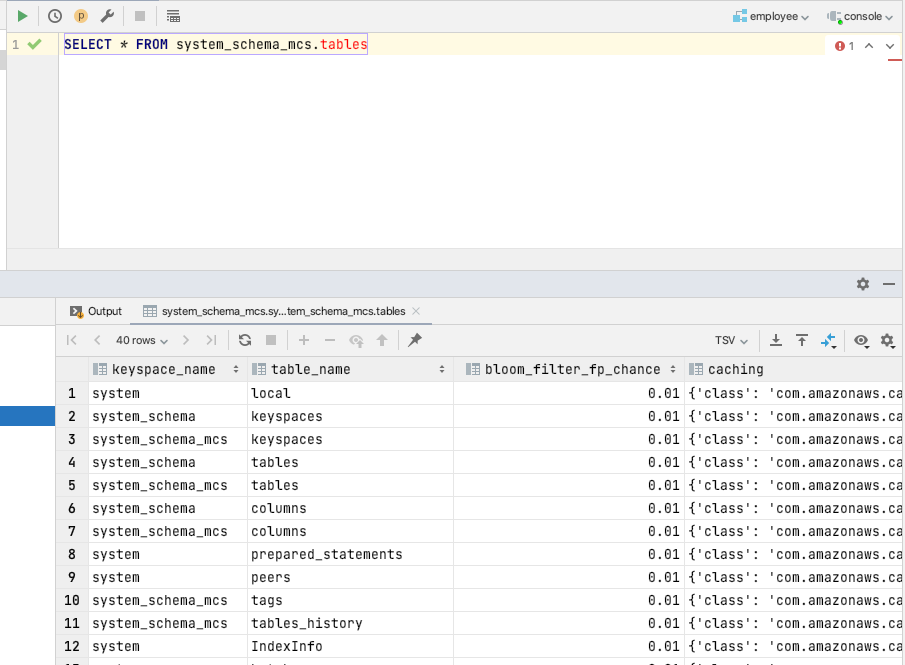
Creating a list of existing tables:
- Enter the following query:
SELECT * FROM system_schema_mcs.tables;
A list of all existing tables will be created with this CQL statement, including any internal system tables that Amazon Keyspaces may have created.
- Click the Run icon on the toolbar. A list of system tables should appear on your screen even if you have not created any tables yet.
Creating and populating a new keyspace:
Next, we will create and populate a new keyspace and a new table using the IDE.
- Choose your database connection with a right-click
- Now click on +New and then choose Keyspaces.
- Choose a name for your keyspace (for example, employee_ks) and type it in the Name field.
- Click OK.
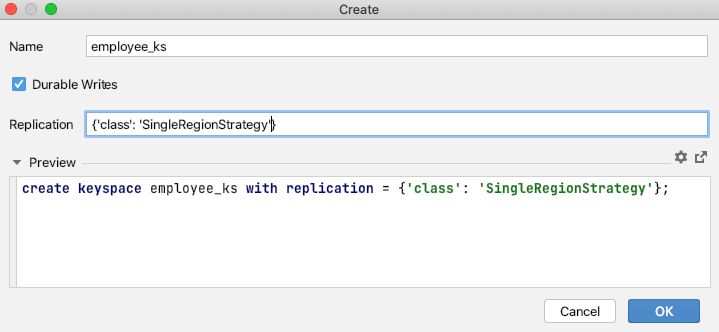
The IDE will choose the SimpleSrategy strategy by default. The value of the replication factor will be chosen as 1 by default too.
There is no need to manage replication factors since the per-GB price of Amazon Keyspaces storage already includes replication.
See the following resources for further information;
Amazon Keyspaces (for Apache Cassandra) Pricing
Creating and populating a table with data:
Now that you have created a new keyspace, you can create a new table and populate it with any desired data.
- For creating a table, employee_by_id_division in the employee_ks keyspace, enter the following CQL statements into the IDE.
CREATE TABLE IF NOT EXISTS "employee_ks"."employee_by_id_division"(

   id int,

   division text,

   name text,

   pay_scale int,

   role text,

   vacation_hrs float,

    PRIMARY KEY (id,division))

    WITH CLUSTERING ORDER BY("division" ASC) and custom_properties = {

   'capacity_mode':{'throughput_mode':'PROVISIONED', 'write_capacity_units':5, 'read_capacity_units':15},

   'point_in_time_recovery':{'status':'enabled'},

   'encryption_specification':{'encryption_type':'AWS_OWNED_KMS_KEY'}

} AND TAGS = {'project':'blog', 'costcenter' : '101', 'any_key':'any_val'} ;
Now we must populate the new table with data and insert any number of new records. CQL insert statements are used to insert new data:
INSERT INTO "employee_ks"."employee_by_id_division" (id, division, name, pay_scale, role, vacation_hrs)
VALUES (100, 'Engineering', 'Superman', 10, 'IC', 80) IF NOT EXISTS
INSERT INTO "employee_ks"."employee_by_id_division" (id, division, name, pay_scale, role, vacation_hrs)
VALUES (120, 'Management', 'Batman', 12, 'ZZ', 80) IF NOT EXISTS;
INSERT INTO "employee_ks"."employee_by_id_division" (id, division, name, pay_scale, role, vacation_hrs)
VALUES (130, 'Security', 'Joker', 12, 'XX', 80) IF NOT EXISTS;
//Duplicate key
INSERT INTO "employee_ks"."employee_by_id_division" (id, division, name, pay_scale, role, vacation_hrs)
VALUES (100, 'Engineering', 'New Superman', 12, 'IC', 40) IF NOT EXISTS;
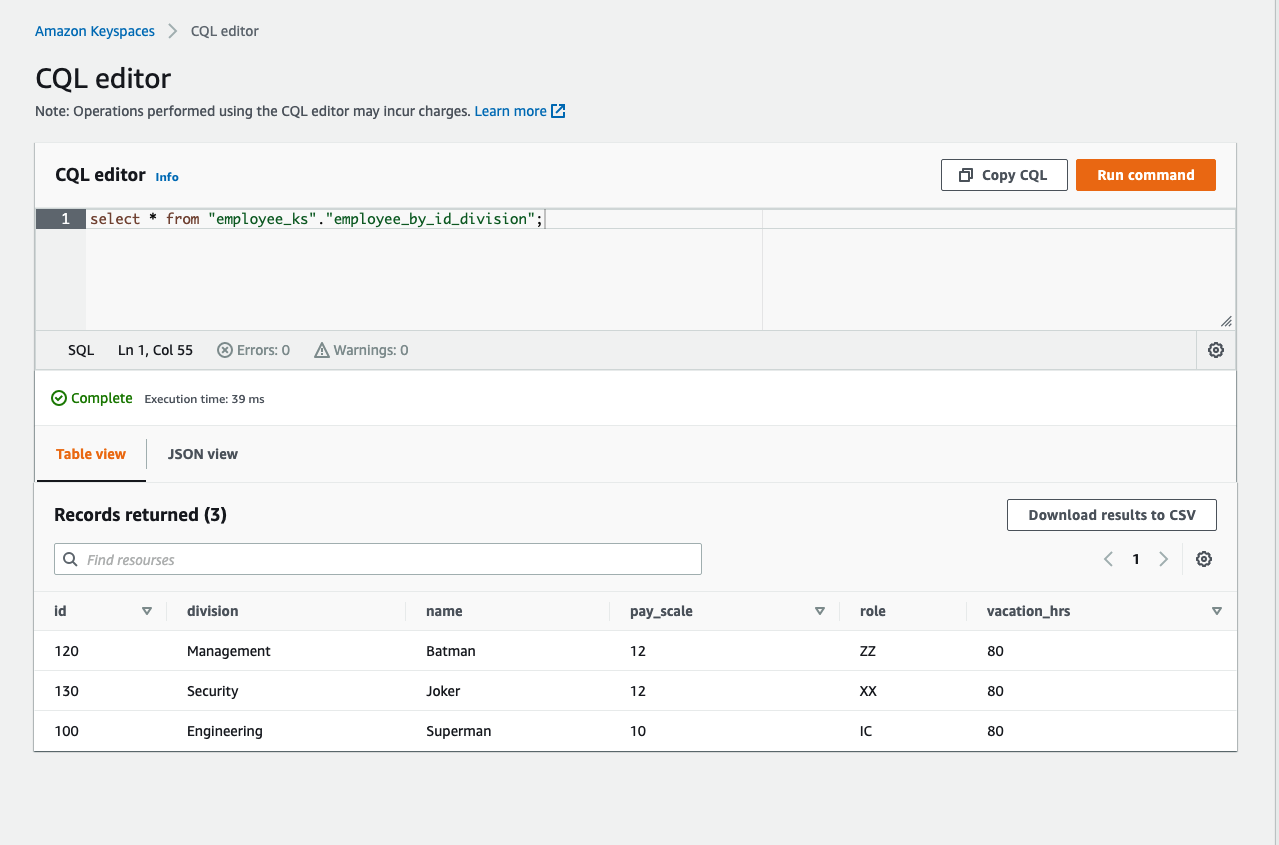
select * from "employee_ks"."employee_by_id_division
- The results of our INSERT statement are showcased in the screenshot below.
Clean up
The last and crucial step is to clean up the resources you used. Saving any resources that you do not need will incur extra charges. You can use the drop keyspace command to clean up the remaining resources created during this tutorial. This will delete the keyspace and all tables in that keyspace:
drop keyspace employee_ks;
Read Delete a Table and Keyspace in Amazon Keyspaces to learn more about deleting a keyspace.
Conclusion:
In this tutorial, I showed you how to connect to an Amazon Keyspace directly from your IDE. Now it’s time to explore the keyspaces features directly within the IDE instead of through the console. This tutorial shows how to run database queries directly within the IDE.
A Software Engineer by profession and a Writer by passion