Introduction
In this guide, we’ll explore how to connect Amazon Bedrock Models with LangChain Agents. I’ll walk you through a practical example where we create a basic weather-checking agent using Amazon Bedrock and LangChain. Together, we’ll build the agent step-by-step, with clear explanations of each component along the way.
Prerequisites
- An AWS account
- Python 3.7 or later
- Basic understanding of Python
Step 1: Enabling Amazon Bedrock
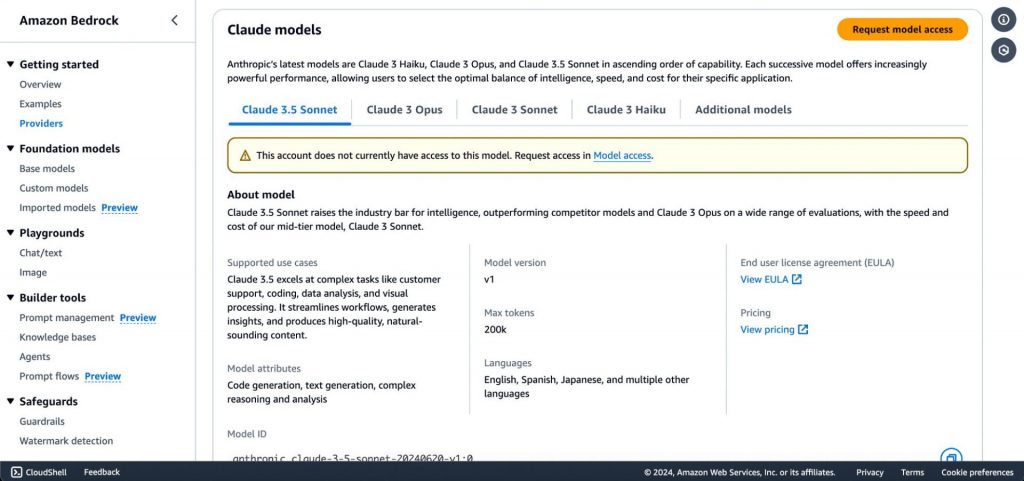
Before we start coding, we need to enable Amazon Bedrock in your AWS account
- Sign in to the AWS Management Console.
- Navigate to the Amazon Bedrock service.
- If you haven’t used Bedrock before, you’ll see a “Get started” button. Click it.
- In the “Model access” section, find “Anthropic – Claude 3 Sonnet” and request access by checking the box next to it.
- Click “Request model access” at the bottom of the page.
- Wait for the access to be granted. This usually happens quickly, but it may take up to 24 hours.

Step 2: Setting Up the Environment
- Create a new directory for your project.
- Set up a virtual environment:
python -m venv venv

source venv/bin/activate # On Windows, use venv\Scripts\activate- Install the required packages:
pip install langchain boto3 requests- Set up AWS credentials by running aws configure in your terminal and entering your AWS Access Key ID, Secret Access Key, and default region.
Step 3: Creating the Basic Structure
Create a new Python file named weather_agent.py and add the following imports:
import boto3
import requests
from langchain.llms import Bedrock
from langchain.prompts import PromptTemplate
from langchain.chains import LLMChain
Step 4: Setting Up Amazon Bedrock
Now, let’s set up the Bedrock client and initialize the Claude 3 Sonnet model:
# Set up Bedrock client
bedrock_client = boto3.client('bedrock-runtime')
llm = Bedrock(
    client=bedrock_client,
    model_id="anthropic.claude-3-sonnet-20240229-v1:0",
    model_kwargs={"max_tokens": 1000, "temperature": 0.7}
)
This code creates a Bedrock client using boto3 and initializes the Bedrock language model, specifying Claude 3 Sonnet as our model of choice. We’ve also set some parameters like max_tokens and temperature to control the output.
Step 5: Setting Up the Weather API
We’ll use OpenWeatherMap as our weather data source. Sign up for a free API key at openweathermap.org, then add the following code:
# Weather API setup (using OpenWeatherMap as an example)
WEATHER_API_KEY = "your_openweathermap_api_key"
WEATHER_API_URL = "http://api.openweathermap.org/data/2.5/weather"
def get_weather(city):
    params = {
        "q": city,
        "appid": WEATHER_API_KEY,
        "units": "metric"
    }
    response = requests.get(WEATHER_API_URL, params=params)
    return response.json()
Step 6: Creating the Language Model Chain
Set up the language model chain to process the weather data:
# Create a prompt template
prompt_template = PromptTemplate(
    input_variables=["weather_data"],
    template="Summarize the following weather data in a friendly, conversational tone: {weather_data}"
)
# Create an LLMChain
chain = LLMChain(llm=llm, prompt=prompt_template)
Step 7: Implementing the Weather-Checking Function
Now, let’s tie everything together with a function that checks the weather and generates a summary:
# Main function to check weather and generate summary
def check_weather(city):
    weather_data = get_weather(city)
    summary = chain.run(weather_data)
    return summary
Step 8: Testing the Agent
Finally, add some code to test our weather-checking agent:
# Example usage
if __name__ == "__main__":
    city = "New York"
    weather_summary = check_weather(city)
    print(f"Weather summary for {city}:")
    print(weather_summary)
Running the Agent
To run the agent, execute the following command in your terminal:
python weather_agent.pyConclusion
Congratulations! You’ve just built a simple weather-checking agent using Amazon Bedrock’s Claude 3 Sonnet model and LangChain. This agent demonstrates how to:
- Enable and use Amazon Bedrock
- Interact with external APIs to gather data
- Use Claude 3 Sonnet to process and summarize information
- Combine these components using LangChain for a smooth workflow
Feel free to expand on this example by adding more features, such as forecasting or handling multiple cities. Happy coding!


